

 Free US Calls: 1-888-433-4735
 International: 305-545-5588

Maintaining and repairing Cummins ISB and QSB engines requires a systematic approach to ensure optimal performance, longevity, and efficiency. This comprehensive guide covers critical repair areas, including cylinder head and valve adjustments, turbocharger inspection and repair, and electrical system diagnostics. Whether you’re a professional mechanic or an experienced DIY enthusiast, these detailed instructions will help you troubleshoot and address common engine issues effectively.
Parts Catalog Main Page for Cummins ISB Marine Engine
Cummins ISB 4.5 & Related Components
Cummins ISB 5.9 & Related components
Cummins ISB 6.7 & Related Components
Parts Catalog Main page for Cummins QSB Marine Engine
Cummins QSB 4.5 & Related Components
Cummins QSB 5.9 & Related Components
Cummins QSB 6.7 & Related Components
Cummins QSB 7.0 & Related Components
1. Cylinder Head and Valve Adjustments
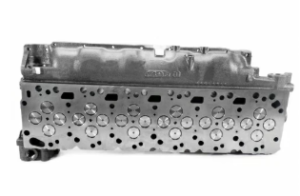
The cylinder head and valve train are crucial components in controlling the engine’s airflow, compression, and exhaust. Keeping them properly adjusted ensures efficient combustion, optimal power output, and prolonged engine life.
A. Signs That Your Cylinder Head Needs Attention

Recognizing early symptoms of cylinder head issues can prevent severe engine damage. Here are the common warning signs:
1. Loss of Engine Power
- Symptoms: Noticeable drop in performance, sluggish acceleration, or inability to maintain speed under load.
- Possible Cause: Warped or cracked cylinder head leading to poor compression.
2. Overheating
- Symptoms: Frequent temperature spikes even with a functioning cooling system.
- Possible Cause: Cracked cylinder head allowing coolant to leak into combustion chambers.
3. White Smoke from Exhaust
- Symptoms: Continuous white smoke, often with a sweet smell.
- Possible Cause: Coolant leaking into combustion chambers due to a damaged cylinder head or gasket.
4. Oil Contamination
- Symptoms: Milky substance on the oil dipstick or under the oil filler cap.
- Possible Cause: Coolant mixing with oil due to head gasket failure.
5. Misfiring or Rough Idling
- Symptoms: Uneven engine performance, shaking, or unusual noises during idle.
- Possible Cause: Poor valve seating or loss of compression in one or more cylinders.
B. Adjusting Valve Clearances Correctly
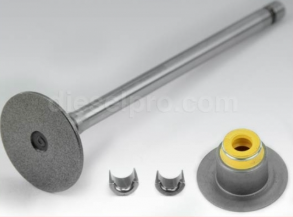
Proper valve clearance adjustment ensures that the intake and exhaust valves open and close at the right times, optimizing engine breathing and performance.
Tools Needed:
- Feeler gauge
- Torque wrench
- Screwdriver
- Wrenches (as per engine specifications)
Step-by-Step Valve Adjustment Process:
- Preparation:
- Ensure the engine is cool before starting.
- Disconnect the battery to prevent accidental starts.
- Remove the Valve Cover:
- Loosen the bolts and carefully remove the valve cover to expose the rocker arms and valve train.
- Loosen the bolts and carefully remove the valve cover to expose the rocker arms and valve train.
- Position the Engine at Top Dead Center (TDC):
- Rotate the crankshaft manually using a socket and breaker bar until cylinder 1 is at TDC on the compression stroke.
- Confirm by checking the alignment marks on the crankshaft pulley and timing cover.
- Check Valve Clearance:
- Insert the feeler gauge between the rocker arm and the valve stem.
- Compare the clearance with Cummins’ specifications.
- Adjust the Valves:
- If the clearance is out of spec:
- Loosen the lock nut on the adjustment screw.
- Turn the adjustment screw to achieve the correct clearance.
- Hold the screw in place and tighten the lock nut securely.
- If the clearance is out of spec:
- Repeat for All Cylinders:
- Rotate the crankshaft 360° to position the next cylinder at TDC.
- Repeat the process for each valve according to the firing order.
- Reassemble:
- Reinstall the valve cover with a new gasket if needed.
- Torque the bolts to the manufacturer’s specifications.
- Final Checks:
- Reconnect the battery.
- Start the engine and listen for unusual noises, ensuring smooth idling and performance.
Cylinder Head & Related Components such as Valves and Springs for Cummins ISB 4.5 Engine
Cylinder Head & Related Components such as Valves and Springs for Cummins ISB 5.9 Engine
Cylinder Head & Related Components such as Valves and Springs for Cummins ISB 6.7 Engine
Cylinder Head & Related Components such as Valves and Springs for Cummins QSB 4.5 Engine
Cylinder Head & Related Components such as Valves and Springs for Cummins QSB 5.9 Engine
Cylinder Head & Related Components such as Valves and Springs or Cummins QSB 6.7 Engine
Cylinder Head & Related Components such as Valves and Springs for Cummins QSB 7.0 Engine
2. Turbocharger Inspection and Repair
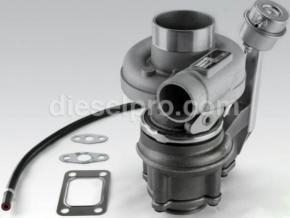
The turbocharger plays a vital role in boosting engine power and efficiency by forcing more air into the combustion chamber. Regular inspection and timely repairs are essential to prevent turbo-related engine failures.
A. Symptoms of Turbocharger Failure

Identifying early signs of turbocharger problems can save you from costly engine damage:
1. Loss of Power
- Symptoms: Reduced acceleration, sluggish performance, and difficulty maintaining speed under load.
- Cause: Faulty turbo failing to deliver adequate boost pressure.
2. Excessive Exhaust Smoke
- Symptoms: Blue or black smoke from the exhaust.
- Cause: Oil leaking into the combustion chamber (blue smoke) or improper air-fuel mixture (black smoke).
3. High Oil Consumption
- Symptoms: Frequent need to top up engine oil without external leaks.
- Cause: Turbo seals leaking oil into the intake or exhaust system.
4. Whining Noise
- Symptoms: High-pitched whining or siren-like noise that increases with engine speed.
- Cause: Damaged turbo bearings or compressor wheel contacting the housing.
5. Boost Pressure Loss
- Symptoms: Turbo boost gauge shows lower than normal readings.
- Cause: Boost leaks in intercooler pipes, wastegate issues, or turbocharger failure.
B. How to Remove and Inspect the Turbocharger
Tools Needed:
- Wrenches and sockets
- Torque wrench
- Screwdrivers
- Penetrating oil
- Inspection mirror
- Safety gear (gloves, eye protection)
Step-by-Step Turbocharger Removal Process:
- Preparation:
- Allow the engine to cool completely.
- Disconnect the battery.
- Remove Intake and Exhaust Connections:
- Loosen clamps and remove the intake hoses and exhaust pipes connected to the turbo.
- Loosen clamps and remove the intake hoses and exhaust pipes connected to the turbo.
- Disconnect Oil Lines:
- Carefully disconnect the oil supply and return lines.
- Cap the lines to prevent contamination.
- Remove the Turbo Mounting Bolts:
- Apply penetrating oil if bolts are corroded.
- Support the turbo’s weight to prevent damage during removal.
- Inspect the Turbocharger:
- Check for shaft play by moving the shaft side-to-side and in-and-out:
- Some axial play is normal, but excessive movement indicates worn bearings.
- Inspect the compressor and turbine wheels for damage, cracks, or oil residue.
- Look for signs of oil leaks around the seals.
- Check for shaft play by moving the shaft side-to-side and in-and-out:
- Clean and Reassemble:
- Clean all mating surfaces before reinstalling.
- Replace gaskets and seals as needed.
- Torque all bolts to Cummins specifications.
- Prime the Turbo:
- Before starting the engine, pour a small amount of clean oil into the turbo’s oil inlet to prevent dry startup.
- Before starting the engine, pour a small amount of clean oil into the turbo’s oil inlet to prevent dry startup.
- Final Checks:
- Reconnect the battery.
- Start the engine and allow it to idle for a few minutes.
- Check for leaks and verify proper turbo operation.
Turbocharger & Related Components for Cummins ISB 4.5 Engine
Turbocharger & Related Components for Cummins ISB 5.9 Engine
Turbocharger & Related Components for Cummins ISB 6.7 Engine
Turbocharger & Related Components for Cummins QSB 4.5 Engine
Turbocharger & Related Components for Cummins QSB 5.9 Engine
Turbocharger & Related Components for Cummins QSB 6.7 Engine
Turbocharger & Related Components for Cummins QSB 7.0 Engin
3. Electrical System Diagnostics
The electrical system in Cummins ISB and QSB engines is responsible for starting the engine, charging the battery, and powering essential components. Issues with the starter motor or alternator can lead to no-start conditions, battery drain, or erratic engine performance.
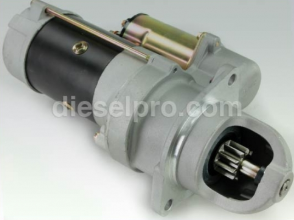
A. Troubleshooting Starter Motor Issues
The starter motor is responsible for cranking the engine to initiate the combustion process. When it fails, the engine won’t start.
Common Symptoms of Starter Motor Failure:
- No Crank, No Start:
- Turn the key, and nothing happens—no sound, no engine turnover.
- Turn the key, and nothing happens—no sound, no engine turnover.
- Clicking Noise:
- A single click or rapid clicking indicates a faulty solenoid or low battery voltage.
- A single click or rapid clicking indicates a faulty solenoid or low battery voltage.
- Slow Cranking:
- The engine turns over slowly, especially when hot, indicating starter motor wear.
- The engine turns over slowly, especially when hot, indicating starter motor wear.
- Intermittent Operation:
- Sometimes the engine starts; other times, nothing happens.
- Sometimes the engine starts; other times, nothing happens.
How to Diagnose Starter Motor Problems
- Check the Battery:
- Use a multimeter to measure voltage (12.6V or higher when fully charged).
- Load-test the battery to confirm its condition.
- Inspect Wiring and Connections:
- Ensure all starter cables are tight and free of corrosion.
- Ensure all starter cables are tight and free of corrosion.
- Test the Starter Relay:
- Swap the starter relay with a similar one to rule out relay failure.
- Swap the starter relay with a similar one to rule out relay failure.
- Perform a Voltage Drop Test:
- Measure voltage at the starter while cranking:
- If voltage is low, suspect wiring or connection issues.
- If voltage is normal but the starter doesn’t engage, the starter is faulty.
- Measure voltage at the starter while cranking:
- Bench Test the Starter:
- Remove the starter and apply 12V directly to the solenoid.
- If the starter doesn’t spin, it needs replacement.
B. Diagnosing Alternator Problems
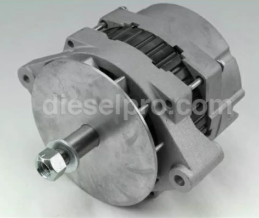
The alternator charges the battery and powers the electrical system when the engine is running. A failing alternator leads to battery drain, electrical malfunctions, and engine shutdowns.
Symptoms of Alternator Failure:
- Battery Warning Light:
- The dashboard light illuminates when the alternator isn’t charging correctly.
- The dashboard light illuminates when the alternator isn’t charging correctly.
- Dimming Lights:
- Headlights or dashboard lights dim when the engine idles.
- Headlights or dashboard lights dim when the engine idles.
- Dead Battery:
- The battery dies even after recent charging.
- The battery dies even after recent charging.
- Strange Noises:
- Grinding or whining noises from the alternator due to bearing failure.
- Grinding or whining noises from the alternator due to bearing failure.
How to Diagnose Alternator Issues
- Check Battery Voltage with Engine Off and On:
- Engine Off: 12.6V (fully charged battery).
- Engine Running: 13.8–14.5V (proper alternator output).
- Perform an Alternator Load Test:
- Use a load tester to verify if the alternator maintains voltage under electrical load.
- Use a load tester to verify if the alternator maintains voltage under electrical load.
- Inspect the Alternator Belt:
- Ensure the belt is tight and not slipping, as this can reduce charging efficiency.
- Ensure the belt is tight and not slipping, as this can reduce charging efficiency.
- Check for Voltage Drops:
- Measure voltage drop across the positive and negative battery cables.
- Measure voltage drop across the positive and negative battery cables.
- Test the Diodes:
- Faulty diodes can cause the battery to drain even when the engine is off.
- Use a multimeter set to diode mode to test for continuity in one direction only.
Repair and Replacement
- Starter Motor Replacement: Remove the old starter, clean the mounting surface, and install a new starter with proper torque.
- Alternator Replacement: Disconnect the battery, remove the belt, disconnect wiring, and replace the alternator with a new or rebuilt unit.
Starter and Alternator & Related Components for Cummins ISB 4.5 Engine
Starter and Alternator & Related Components for Cummins ISB 5.9 Engine
Starter and Alternator & Related Components for Cummins ISB 6.7 Engine
Starter and Alternator & Related Components for Cummins QSB 4.5 Engine
Starter and Alternator & Related Components for Cummins QSB 5.9 Engine
Starter and ALternator & Related Components for Cummins QSB 6.7 Engine
Starter and Alternator & Related Components for Cummins QSB 7.0 Engine
Conclusion
Performing effective repairs on Cummins ISB and QSB engines requires a clear understanding of mechanical, turbocharging, and electrical systems. By following these step-by-step repair instructions, you can diagnose and resolve issues related to the cylinder head, valves, turbocharger, starter motor, and alternator. Regular maintenance, early detection of symptoms, and adherence to Cummins’ service guidelines will ensure your engine remains reliable, efficient, and long-lasting.
Parts Catalog Main Page for Cummins ISB Marine Engine
Cummins ISB 4.5 & Related Components
Cummins ISB 5.9 & Related components
Cummins ISB 6.7 & Related Components
Parts Catalog Main page for Cummins QSB Marine Engine
Cummins QSB 4.5 & Related Components
Cummins QSB 5.9 & Related Components
Cummins QSB 6.7 & Related Components
Cummins QSB 7.0 & Related Components