

 Free US Calls: 1-888-433-4735
 International: 305-545-5588
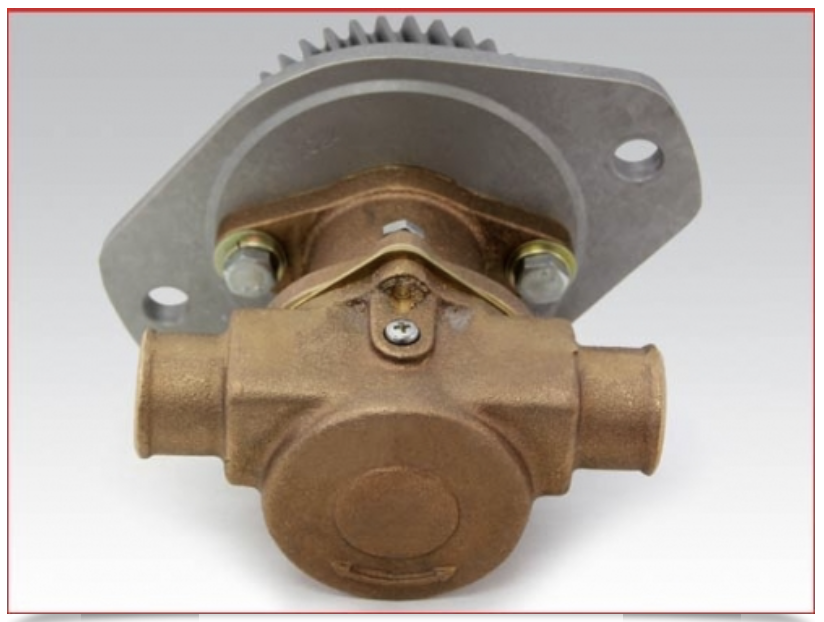
Introduction to Installing a Cummins 4BTA Sea Water Pump
When it comes to maintaining marine engines, few tasks are as critical as ensuring your cooling system functions flawlessly. For boat owners and operators running Cummins 4BTA engines, the sea water pump is a vital component. This pump draws seawater into the engine’s cooling circuit, helping regulate temperatures and prevent overheating.
Neglect or improper installation of this pump can lead to severe issues, including head gasket failures, warped cylinder heads, and even complete engine breakdowns. This comprehensive guide will walk you through every stage of installing a sea water pump on a Cummins 4BTA engine, from removing the old unit to running post-installation checks and offering maintenance advice to extend the life of your new pump.
Disclaimer: This guide provides general best practices. For precise torque specifications, tolerances, and procedures unique to your exact 4BTA model or vessel configuration, consult your Cummins engine manual or service documentation.
Understanding the Role of the Sea Water Pump
Before we get hands-on, it’s helpful to understand the fundamental job of the sea water pump (one of the most important cummins engine parts) and why proper installation matters so much.
-
Primary job: Draw raw water from the ocean, lake, or river where the vessel is operating.
-
Flow path: The water moves through the pump, into the heat exchanger where it absorbs heat from the engine coolant, then exits through the exhaust.
-
Purpose: Removes heat from the closed coolant system, preventing engine overheating.
-
Fail consequences: If this flow stops (due to pump failure or improper installation), engine temperatures can skyrocket, risking catastrophic engine damage.
A properly functioning sea water pump ensures that your Cummins 4BTA operates within its designed temperature range under all load conditions.
Preparing for Installation
1. Gather Tools and Parts
Starting with a well-prepared work area saves time and reduces frustration. Collect the following:
-
Replacement sea water pump (new or high-quality rebuilt, ideally from a trusted aftermarket supplier)
-
New gasket or O-ring set for the pump
-
Torque wrench (covering expected inch-pound and foot-pound ranges)
-
Full set of metric wrenches and sockets
-
Flathead and Phillips screwdrivers
-
Marine grease or light assembly lube
-
Marine-safe thread sealant
-
Shop towels or rags
-
Catch pan or bucket
-
Small wire brush or abrasive pad
-
Flashlight or engine bay light
2. Verify New Pump and Sealing Parts
-
Cross-check your new pump’s part number against your Cummins 4BTA build list or existing pump casting number. (Or call Diesel Pro To Help You Identify Which Pump You Need)
-
Rotate the impeller by hand. It should turn smoothly with some resistance.
-
Inspect the impeller vanes visually—ensure none are cracked or folded back.
-
Confirm the gasket or O-ring matches the mounting flange and is free of nicks.
3. Prepare Your Engine and Work Area
-
Shut off the engine completely and allow it to cool.
-
Disconnect battery master switches to prevent accidental starts.
-
Close the seawater intake seacock to stop raw water from entering.
-
Secure the engine hatch open. Use props or locks to keep it safely up.
-
Place absorbent pads or rags under the pump area to catch drips.
Removing the Old Sea Water Pump
1. Drain and Disconnect Hoses
-
Place your catch pan under the pump.
-
Loosen clamps on the inlet hose (coming from the seacock) and outlet hose (going to the heat exchanger or exhaust).
-
Gently twist and pull the hoses off. A flathead screwdriver can help break the hose seal, but avoid prying against fragile pump fittings.
2. Remove Mounting Bolts
-
Locate all mounting bolts holding the pump to the front gear housing.
-
Use your socket or wrench to loosen and remove them. Keep bolts organized—some engines use different lengths.
-
As the final bolts come out, support the pump with your hand to prevent it from dropping.
3. Remove the Pump and Inspect
-
Carefully pull the pump straight off the mounting surface.
-
Expect some residual water to drain.
-
Look at the drive gear (if external). Ensure no damage or abnormal wear is present on the drive teeth.
-
Check the old gasket surface. If it stuck, gently scrape it with a plastic scraper. Avoid gouging the metal flange.
Cleaning and Preparing the Mounting Surface
1. Clean the Flange
-
Use a small wire brush or abrasive pad to clean any leftover gasket material from the engine mounting surface.
-
Wipe with a clean rag and a bit of solvent to remove oil or corrosion.
-
Ensure the surface is completely flat and smooth.
2. Inspect Bolt Holes and Threads
-
Run a clean bolt through each hole by hand.
-
If you find resistance or debris, clean the threads with a chase tap or gently work them with an old bolt.
-
Clean out the holes with compressed air if available (wear eye protection).
Installing the New Sea Water Pump
1. Position the Gasket or O-Ring
-
Lightly coat the gasket with a thin smear of marine grease. This helps hold it in place and improves sealing.
-
If your pump uses an O-ring, ensure the groove is completely clean and seat the O-ring snugly with a light coat of grease.
2. Align and Mount the Pump
-
Carefully align the pump on the mounting studs or bolt holes.
-
Slide it straight onto the flange, avoiding twisting which could dislodge the gasket or O-ring.
-
Insert all bolts by hand to prevent cross-threading.
3. Torque the Mounting Bolts
-
Once hand-tight, torque the bolts in a crisscross pattern.
-
Typical specs range from 18-22 ft-lbs (24-30 Nm) for 8mm bolts on the 4BTA, but always verify for your exact engine.
-
Tighten gradually in stages—half torque first, then final spec.
Reconnecting Hoses and Priming the Pump
1. Reattach Raw Water Hoses
-
Slide the inlet and outlet hoses back onto the pump.
-
Secure with stainless hose clamps.
-
Double-check placement to avoid kinks.
2. Open the Seacock
-
Before starting the engine, open the seacock to allow water to reach the pump.
-
If you forget this, the pump will run dry and destroy the impeller almost immediately.
3. Prime If Needed
Most Cummins 4BTA pumps are self-priming, but if your raw water run is long or you had air trapped:
-
Pour a small amount of water into the discharge hose before reconnecting it.
-
Or briefly crack the outlet fitting on the pump until water flows.
First Startup and Leak Checks
1. Reconnect Batteries and Start Engine
-
Restore battery power.
-
Start the engine and immediately check your sea strainer and hoses for leaks.
2. Monitor Water Flow and Temperature
-
Check the exhaust outlet on your boat—ensure you see steady water flow after a few seconds.
-
Watch your engine temperature gauge. It should climb steadily to normal operating range (around 180°F or 82°C) and hold.
3. Look for Leaks
-
Inspect around the pump housing and mounting flange.
-
Check hose clamps again after the engine warms slightly. They may need a snug re-tighten.
Common Installation Mistakes to Avoid
-
Dry running: Forgetting to open the seacock. This rapidly destroys impellers.
-
Gasket shifts: Not holding the gasket properly during installation can cause misalignment and leaks.
-
Over-torquing: Excess torque warps housings and crushes gaskets.
-
Reusing old gaskets: Always install new gaskets or O-rings.
-
Ignoring hose condition: Cracked or spongy hoses should be replaced to prevent future leaks.
Additional Best Practices for Longevity
1. Periodic Impeller Inspection
Check the impeller every season or every 250 hours—whichever comes first. Look for:
-
Cracks or hardening in the rubber.
-
Broken or permanently bent vanes.
-
Shaft seals leaking water or showing salt crust.
2. Winterization and Storage
If you haul out or store in freezing climates:
-
Drain or flush the pump with antifreeze to protect the housing and impeller.
3. Keep a Spare Kit Onboard
Carry a spare impeller kit, gasket, and basic tools. A failed impeller underway can be quickly swapped if you’re prepared.
Troubleshooting Tips After Installation
If you notice problems after replacing the sea water pump:
| Symptom | Possible Causes |
|---|---|
| Overheating | Seacock closed, airlock, wrong rotation. |
| No water exiting exhaust | Impeller installed backwards (on keyed shaft models), air trapped. |
| Leaks around pump flange | Damaged gasket surface, incorrect torque. |
| Squealing noise | Dry running—impeller likely damaged. |
| Water leaks from weep hole | Shaft seal inside pump is worn. Replace pump. |
Frequently Asked Questions (FAQ)
1. How long does a typical Cummins 4BTA sea water pump last?
Generally 2-3 years depending on use hours and water quality. Regular inspection extends life.
2. Can I use silicone instead of a gasket?
Not recommended. Silicone can squeeze into coolant passages. Always use the proper gasket.
3. Should I replace the impeller only or the whole pump?
Impellers can be replaced on many models, but if your housing or seals show wear, replacing the full pump is smarter.
4. What raw water flow rate is expected?
Most Cummins 4BTA applications move around 30-40 gallons per minute. Low flow suggests restrictions.
5. Is there a rotation direction for the impeller?
Yes. It should match engine rotation and be installed with vanes pre-bent in the proper direction.