

 Free US Calls: 1-888-433-4735
 International: 305-545-5588

Introduction
The Cummins 6C, 6CT, and 6CTA engines are renowned for their durability, but even the most reliable engines require advanced repairs after extensive use. Whether you’re tackling valve and cylinder head maintenance or embarking on a comprehensive engine overhaul, having the right knowledge is essential to ensure long-term performance and reliability.
This guide consolidates critical information from both topics, providing a detailed roadmap for mechanics, technicians, and DIY enthusiasts handling advanced repairs on Cummins C Series engines.
Parts Catalog for Cummins 6C Marine Engine
Parts Catalog for Cummins 6CT Marine Engine
Parts Catalog for Cummins 6CTA Marine Engine
Valve and Cylinder Head Maintenance for Cummins 6C, 6CT, & 6CTA
1. Importance of Valve and Cylinder Head Maintenance

The valve and cylinder head assembly is critical for controlling airflow, fuel combustion, and exhaust expulsion. Proper maintenance ensures:
- Optimal engine performance
- Efficient fuel consumption
- Prevention of costly engine damage
- Extended engine lifespan
Neglecting valve and cylinder head issues can lead to poor compression, power loss, and catastrophic engine failure.
2. Key Components of the Valve and Cylinder Head System

- Cylinder Head: Houses the intake and exhaust valves, injectors, and cooling passages.
- Valves: Control the intake of air/fuel mixture and the expulsion of exhaust gases.
- Valve Springs: Maintain valve tension for proper opening and closing.
- Pushrods and Rocker Arms: Transfer motion from the camshaft to the valves.
- Head Gasket: Seals the cylinder head to the engine block, preventing coolant and oil leaks.
3. Valve Adjustment Procedure

Regular valve lash adjustments ensure proper engine timing and performance. Incorrect lash can cause poor fuel economy, power loss, and premature wear.
Tools Needed:
- Feeler gauge
- Torque wrench
- Screwdriver and wrench (for adjustment nuts)
Steps:
- Warm Up the Engine: Adjust valves when the engine is at operating temperature.
- Position at TDC: Rotate the crankshaft to Top Dead Center (TDC) on the compression stroke for cylinder #1.
- Measure Valve Lash: Use a feeler gauge to measure clearance between the rocker arm and valve stem.
- Adjust as Needed: Loosen the lock nut and turn the adjustment screw to achieve the correct clearance.
- Re-Torque Lock Nuts: After adjustment, tighten the lock nut to the specified torque.
Valve Lash Specifications:
- Intake Valves: 0.010 – 0.015 inches (check specific engine specs)
- Exhaust Valves: 0.020 – 0.025 inches (check specific engine specs)
4. Cylinder Head Removal and Installation
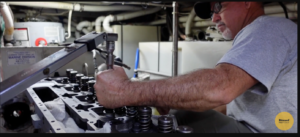
Removal Steps:
- Disconnect Battery: Prevent accidental starts.
- Drain Coolant and Oil: Remove fluids to avoid contamination.
- Remove Intake and Exhaust Manifolds: Disconnect all relevant hoses, lines, and wiring.
- Unbolt Cylinder Head: Follow the reverse order of the tightening sequence to prevent warping.
- Lift the Cylinder Head: Use lifting equipment for heavy-duty applications.
Installation Steps:
- Clean Mating Surfaces: Ensure no debris or gasket material remains.
- Inspect Cylinder Head: Check for cracks, warping, or damage.
- Install New Head Gasket: Always use a new gasket to ensure proper sealing.
- Torque Cylinder Head Bolts: Follow the manufacturer’s torque sequence and specifications in stages.
- Reconnect Components: Reinstall manifolds, hoses, wiring, and refill fluids.
Common Torque Specifications:
- Cylinder Head Bolts: Typically torqued in three stages, with final torque values ranging from 85 to 125 ft-lbs depending on the model.
5. Cylinder Head Inspection and Reconditioning
- Check for Cracks: Use a dye penetrant test to identify hairline fractures.
- Inspect Valve Seats: Ensure proper seating to maintain compression.
- Measure Warping: Use a straightedge and feeler gauge to check for flatness.
- Pressure Test: Test coolant passages for leaks under pressure.
If the cylinder head is damaged beyond repair, consider replacing it with a reconditioned or aftermarket cylinder head to restore engine performance.
6. Troubleshooting Valve and Cylinder Head Issues

Common Symptoms:
- Loss of power
- Misfiring or rough idling
- Excessive oil consumption
- Coolant in the oil (or vice versa)
- White or blue exhaust smoke
Potential Causes:
- Worn valve guides or seats
- Blown head gasket
- Warped cylinder head
- Cracked head casting
Engine Overhaul Basics for Cummins 6C, 6CT, & 6CTA
An engine overhaul restores the engine to like-new condition, addressing internal wear and damage. This is often required after high mileage, poor maintenance, or major component failure.
1. Signs Your Engine Needs an Overhaul
- Excessive oil consumption
- Low compression
- Knocking noises or internal mechanical failures
- Loss of power and efficiency
- High exhaust smoke (blue, white, or black)
2. Preparing for an Engine Overhaul

Tools and Equipment Needed:
- Engine hoist or crane
- Basic hand tools (wrenches, sockets, screwdrivers)
- Torque wrench
- Micrometers and dial bore gauges (for measuring clearances)
- Engine stand (for secure disassembly)
- Seal pullers, ring compressors, and specialty tools for Cummins engines
Preparation Steps:
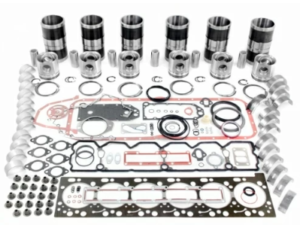
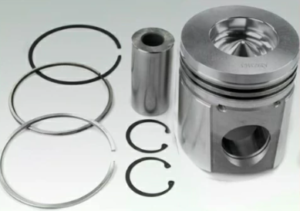
- Gather Parts and Tools: Ensure you have all necessary components, including a rebuild kit with pistons, rings, bearings, gaskets, and seals.
- Review the Service Manual: Familiarize yourself with specifications and procedures.
- Label Components: As you disassemble the engine, label parts for easier reassembly.
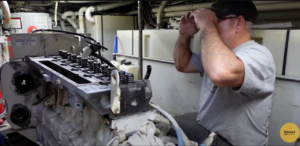
3. Engine Disassembly Process
- Remove External Components: Disconnect the intake, exhaust manifolds, turbocharger, and accessories.
- Drain Fluids: Remove coolant and oil to prevent spills.
- Separate the Engine from the Vehicle: Use an engine hoist if necessary.
- Disassemble Internal Components:
- Remove cylinder head
- Take out pistons, connecting rods, and crankshaft
- Remove camshaft, timing gears, and lifters
4. Inspection and Measurement
Critical Measurements:
- Cylinder Bore Diameter: Check for taper and out-of-round conditions.
- Piston Ring End Gap: Measure with feeler gauges.
- Crankshaft Journal Diameter: Use micrometers to check for wear.
- Bearing Clearances: Plastigage or micrometers can verify proper fit.
If components are out of specification, they may require machining or replacement.
5. Cleaning and Machining

- Clean All Parts Thoroughly: Remove carbon deposits, sludge, and old gasket material.
- Machine the Cylinder Head and Block (if needed): Decking the surfaces ensures proper sealing.
- Recondition Crankshaft: Polish journals or grind if necessary.
6. Reassembly Process

- Install Crankshaft: Use assembly lube on bearings and torque main caps to specification.
- Fit Pistons and Connecting Rods: Use a ring compressor to install pistons into the cylinders.
- Install Camshaft and Timing Components: Ensure proper alignment of timing marks.
- Attach Cylinder Head: Use a new gasket and follow the torque sequence.
- Reinstall External Components: Manifolds, turbocharger, and accessories go back on.
- Refill Fluids: Add fresh oil and coolant.
7. Engine Break-In Procedure

After an overhaul, proper break-in ensures that new components seat correctly.
Steps:
- Initial Start: Run the engine at idle for a few minutes, checking for leaks.
- Vary Engine RPM: Gradually increase RPM to load the engine lightly.
- Oil and Filter Change: After the first 20-50 hours of operation to remove contaminants.
- Monitor Performance: Check oil pressure, temperature, and listen for abnormal noises.
Common Overhaul Mistakes to Avoid
- Failing to clean components thoroughly
- Ignoring torque specifications
- Reusing old gaskets or seals
- Not checking clearances and tolerances
- Skipping the break-in procedure
Troubleshooting After an Overhaul
If issues arise after an overhaul:
- Low Compression: Recheck valve lash, piston ring installation, and head gasket seal.
- Oil Leaks: Verify seal installation and torque values.
- Unusual Noises: Check for loose bolts, incorrect timing, or internal clearance issues.
When to Seek Professional Help
While many advanced repairs can be done by experienced mechanics, consider professional assistance if:
- You lack specialized tools for precise measurements.
- Major machining is required.
- The engine fails to perform correctly after reassembly.
Conclusion
Advanced repairs for Cummins 6C, 6CT, and 6CTA engines, including valve and cylinder head maintenance and complete engine overhauls, are complex but manageable with the right knowledge and tools. Proper procedures, attention to detail, and thorough inspections are key to ensuring long-lasting performance.
Disclaimer: For detailed specifications, torque values, and procedures, refer to the official Cummins OEM service manual. This guide is intended as a general reference and should complement professional service resources.
Parts Catalog for Cummins 6C Marine Engine
Parts Catalog for Cummins 6CT Marine Engine
Parts Catalog for Cummins 6CTA Marine Engine