

 Free US Calls: 1-888-433-4735
 International: 305-545-5588

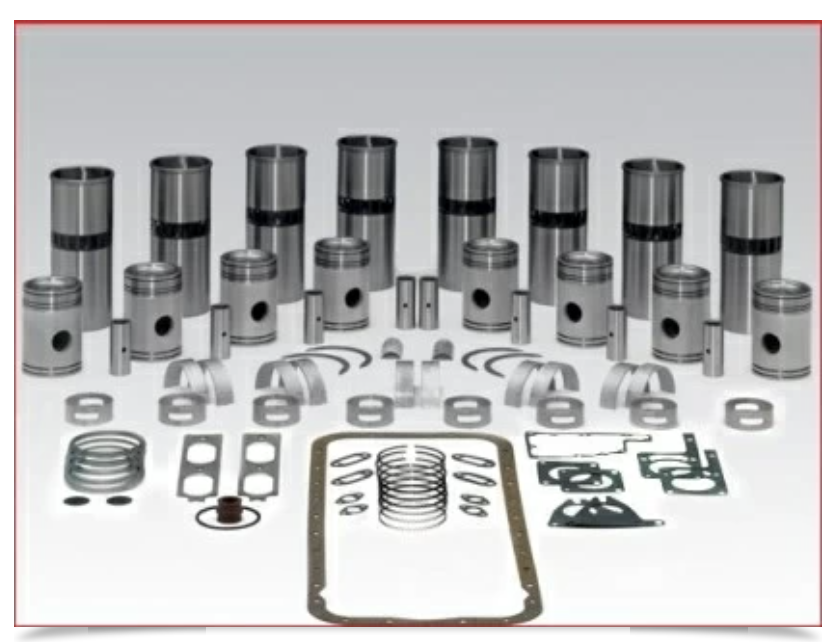
In this article we are going to talk about the assembly of a Detroit Diesel 671 long block model RC. Watch the included youtube videos to see the full process. By buying a long block you will save time on the engine assembly process since they already come timed, calibrated, and assembled by certified Diesel Pro Power technicians. A long block includes an engine block, crankshaft, connecting rods, cylinder kits, camshaft, balancer shaft, front counter weights, timing gears, front and rear end plates, complete cylinder head, mechanical injectors, injector fuel lines, and front top cover. In this article we cover an RC long block. This means that the engine is going to be a right hand rotation and the camshaft is going to be installed on the right hand side of the engine if you are looking from the back of the engine.

Part 1)
The technicians start by inspecting the Diesel Pro Power cylinder kits. These cylinder kits are part of the Detroit Diesel 671 Rebuild Kit.
While one technician opens and inspects the cylinder kits, another technician proceeds to do the liner fitting into the block. The technician marks each cylinder with the bore hole number as he fits them in the bore holes of the cylinder.
With a specific tool the technician will confirm that the piston crown has the correct compression ratio for the application. In the meantime the other technician will bore the cylinder holes for proper liner fitting.
Next the technician will install the piston pin retainers with the proper tool. Followed by a vacuum test to ensure that there is a proper seal and that there will not be any leaks.
The technician will now remove the main bearing caps to prepare the block for crankshaft installation. Then he proceeds to install the main bearings. Be aware that there is an upper bearing and a lower bearing, always look for the marks identifying them. After installing the main bearings he installs the thrust washers
The technicians adds international compound to the main bearing bolts to prepare them for installation.
Next the technician proceeds to install the end plates. Please note that he installs the camshaft end bearings to use as a guide for the installation of the end plate. With the gasket in place he proceeds to install the front end plate. He does the same thing with the rear end plate.
The technician prepares the connecting bolts and spacers to connect the connecting rods to the pistons. He proceeds to connect the connecting rods to the pistons. He uses a torque wrench to apply the correct torque to these bolts.
Now the technicians proceed to install the crankshaft. They check to see that each of the oil plugs are installed. If any of these plugs were not installed the engine would experience loss of oil pressure.
The mechanics proceed to install the upper thrust washers, please note that the lower thrust washers are already installed in the main bearing.
The technician proceeds to install the piston rings.
The technician then confirms the height of the block deck. Followed by installing the crankshaft timing gear. While one technician installs the timing gear the other technician installs the liner inserts. Next the technician proceeds to install the timing gear bolts.
With the piston assembled to the connecting rod and the piston rings in place, engine oil is applied to the piston rings to proceed to place them into the ring compressor and into the liner.
The technician proceeds to install the woodruff key into the camshaft.
The technicians then verify the connecting rod bearings. Then they proceed to install them, while verifying which one is the upper and which one is the lower bearing.
Once the cylinders are assembled they proceed to install them into the engine. Each rod that is installed must be torqued.
Part 2
We begin part 2 by preparing the components to assemble the cylinder head. The technician starts by installing the push rods and the push rod springs. Next he installs cam followers which have been lubricated with oil. The technician then applies lug tight to the bolts that will hold the cam follower brackets. Then he proceeds to install the cam follower brackets. With a silicon rubber hammer he proceeds to hit the cam followers to align them properly. Then he proceeds to torque the cam follower bracket bolts.
Now he installs the safety nuts into the push rods of the rocker arms. Next he installs the fuel line fittings also known as fuel towers. Next he torques the fuel line fittings. Followed by installing the cylinder head plugs.
Next the technician installs the rocker arms. Followed by the valve bridges. Once the valve bridges are installed he installs the bolts on the upper front cover.
After installing the balancer shaft end bearing the technicians install the timing gear. Once the balancer shaft is assembled, they proceed to install it into the block. Now the technician proceeds to tighten the balancer shaft end bearing bolts. Next he applies the specific torque to the bolts.
After installing the camshaft end bearings, the technicians proceed to install the timing gear.
The technician proceeds to install the front end bearing. Next he proceeds to torque the bolts. The technician now installs the middle camshaft bearings. The technician now installs the completed camshaft into the block. Now he tightens and torques the bolts for the camshaft end bearings. Next the screws are installed to hold the middle camshaft bearings in place.
Now they will install the balancer and camshaft counter weights. Next they will apply torque to the camshaft and balancer shaft nuts. Now they apply torque to the rear camshaft nuts. Now they will install the assembled idler gear. Now he will install the retainer washers into the timing gears.
Now they prepare the engine for the cylinder head installation. Preparing by installing the gasket or fire rings on top of the liners. Now the technician installs the perimeter oil seals. Once the perimeter oil seal is installed they proceed to install the ring seals.
After installing the guide studs, the technicians install the complete cylinder head, lowering it onto the block. The technicians proceed to install the cylinder head bolts, followed by applying the right torque to the cylinder head bolts.
Now the technicians prepare the injectors for installation. While one technician installs the injectors, the other technician calibrates the valve bridges. The technicians clamp the injectors to the head by applying torque to the injector bolt. Now they proceed to adjust the valve bridges. They then apply engine assembly grease to the valve bridges in case the unit is stored for long periods of time.
The technicians then proceed to install the rocker arm shaft. Now they proceed to install the rocker arm brackets. Now the technicians proceed to adjust the rocker arms. The technicians then set the correct injector timing height using the correct injector timing tool.
While one technician cranks the crankshaft the other technician is calibrating the injector height and valve bridges locking them in place by adjusting the push rod adjusting nut.
Next the technicians double check that the engine timing is correct.
Next the technicians install the injector fuel lines. Followed by torquing the injector fuel lines.
This completes the assembly of the Detroit Diesel 671 Longblock!
Parts Catalog for Detroit Diesel 671 Marine Engine