

 Free US Calls: 1-888-433-4735
 International: 305-545-5588
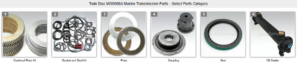
Parts catalog for Twin Disc MG50590A Marine Transmissions
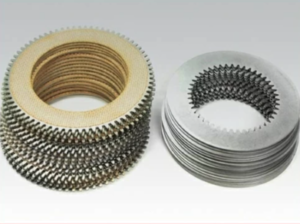
Overhaul Plate Kit For Twin Disc MG5090A Marine Transmission
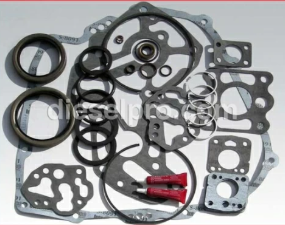
Gasket Kits For Twin Disc MG5090A Marine Transmission
Introduction: Why Bearing and Gear Inspection Matters in the MG-5090A Marine Gear
The Twin Disc MG-5090A is a hydraulic reverse and reduction marine gear engineered for durability under heavy loads and continuous operation. However, even the best components wear over time—particularly bearings and gears, which operate under constant torque, pressure, and oil immersion. At the 3,000-hour service interval, or if you’re experiencing unusual noise, vibration, overheating, or loss of performance, a complete internal inspection of bearings and gears is not just recommended—it’s essential.
This guide outlines the full procedure for inspecting the internal rotating components of the MG-5090A, including tools required, step-by-step teardown, warning signs of wear, reassembly tips, and when to consider a rebuild kit or a remanufactured unit from Diesel Pro Power.
When and Why to Perform a Bearing and Gear Inspection
Recommended Service Interval
- Every 3,000 hours of operation
- Sooner if the transmission shows signs of distress
Common Indicators That an Internal Inspection Is Needed
- Whining or grinding noises during gear engagement or operation
- Excessive vibration from the transmission or output shaft
- Oil contamination (metal particles, milky oil, burnt smell)
- Overheating beyond 190°F under normal operating loads
- Abnormal gear backlash or shaft endplay
- Loss of propulsion under load
Early detection of gear tooth wear, bearing degradation, or shaft misalignment can prevent catastrophic failure.
Overview of Gears and Bearings Inside the MG-5090A
The MG-5090A includes the following key internal rotating components:
Gear Types:
- Input Gear (driven by the engine via the input shaft)
- Reduction Sun Gear
- Planetary Gears and Carrier
- Ring Gear
- Output Shaft Gear
Bearings:
- Tapered roller bearings (on input and output shafts)
- Ball bearings (supporting planetary carriers)
- Needle bearings (in planetary assemblies)
- Thrust washers or needle-thrust bearings (absorbing axial loads)
All these components operate in a bath of transmission oil and must maintain strict tolerances to function efficiently.
Tools and Supplies Required for Inspection
Basic Tools:
- Socket set (metric and SAE)
- Torque wrench
- Snap ring pliers
- Rubber mallet
- Feeler gauges
- Dial indicator with magnetic base
- Puller set (bearing and gear types)
- Marking pen or punch tool
- Clean workbench or parts layout tray
Inspection Supplies:
- Clean transmission oil
- Parts cleaner or solvent
- Lint-free rags
- Borescope or inspection mirror (optional)
- Diesel Pro Power rebuild kit (if replacing components)
- Anti-seize compound and Loctite
- New gaskets and seals
- Shop manual or exploded view diagram for reference
Step-by-Step Internal Access and Disassembly for MG-5090A
Step 1: Drain the Transmission Oil
- Run the engine briefly to warm the oil
- Shut down, set gear in neutral
- Place a clean oil drain pan under the drain plug
- Remove plug and allow all oil to drain completely
- Clean and inspect the drain plug for metal particles
Note: Use this time to check the condition of the oil for signs of gear or bearing wear (e.g., metal shavings, discoloration).
Step 2: Remove External Covers
- Unbolt and remove the inspection cover on the top or side of the transmission
- Remove any access panels or side covers that provide visibility to gears
- Use care not to damage gaskets—replace with new ones upon reassembly
Step 3: Remove Input Shaft Housing
- Detach the input shaft housing and carefully slide out the shaft
- Support the shaft during removal to prevent damage to bearings or gear teeth
- Mark any shims or spacers for correct reassembly
Step 4: Mark All Components Before Removal
- Use a paint pen, scribe, or metal punch to mark:
- Gear orientation
- Carrier positions
- Shim and washer locations
This ensures accurate reassembly of all rotating assemblies.
Step 5: Remove Gears and Shafts
- Begin with input gear, followed by the reduction gear set
- Extract the planetary gear carrier
- Carefully remove output shaft and ring gear as a unit or separately depending on access
- Collect and organize shims, spacers, thrust washers, and snap rings
Use bearing pullers to remove tight-fit components.
Gear Inspection Guidelines for MG-5090A
Visual Gear Tooth Inspection
Carefully examine all gear teeth under strong light. Look for:
- Pitting – small, crater-like holes on tooth surface (metal fatigue)
- Scoring or galling – scratches or welded metal streaks from oil breakdown
- Spalling – flaking or delamination of gear tooth surface
- Tooth wear or rounding – indicates long-term use and misalignment
- Cracked teeth – caused by shock load or foreign object entry
- Uneven wear pattern – suggests misalignment or bent shaft
Use a borescope to examine gear root and flanks in hard-to-see areas.
Backlash and Alignment
Use feeler gauges and a dial indicator to measure:
- Backlash between gear pairs (clearance when changing rotation direction)
- Runout of gear hubs or flanges (eccentric rotation)
- Axial endplay of shafts
Compare values against OEM specifications (typically ±0.003–0.010 inches for backlash depending on gear type).
Bearing Inspection Guidelines for MG-5090A
Visual and Tactile Inspection
Inspect each bearing for:
- Discoloration or blueing – indicates overheating
- Pitted or spalled races – failure of bearing surface
- Scoring or cage deformation – from lack of lubrication
- Dry feel – indicates lubricant loss
- Flat-spotted rollers – from shaft shock or vibration
Rotate each bearing by hand. It should be:
- Smooth and quiet
- Free from grinding, clicking, or roughness
Axial and Radial Play
Use a dial indicator to test:
- Radial play – side-to-side movement
- Axial play – end-to-end shaft float
Excess play typically means:
- Worn inner or outer races
- Shaft wear at bearing journal
- Collapsed or cracked bearing cage
Replacing Bearings and Gears with a Rebuild Kit
If any components are worn, Diesel Pro Power provides premium aftermarket rebuild kits for the MG-5090A, which typically include:
- Input, output, and planetary bearings
- Clutch bearing sets
- Reduction gear thrust washers
- Input and output gears (if required)
- Snap rings, seals, and alignment shims
- Gaskets and fasteners
All parts are OEM-equivalent or better, designed specifically for MG-5090A compatibility.
Installation Best Practices:
- Use heated bearing installation tools—do not force bearings cold
- Align shims and washers exactly as marked during disassembly
- Check gear mesh and backlash after installation
- Torque all fasteners to spec using a calibrated wrench
- Use Loctite or anti-seize on specific threads per manufacturer recommendation
Reassembly Procedure
Step 1: Clean and Prep Components
- Use parts cleaner to remove debris and oil from all components
- Clean gasket surfaces with a plastic scraper
- Blow dry with compressed air if available
Step 2: Install Bearings and Gears
- Reinstall bearings using press tools or heat/shrink methods
- Install gears in correct orientation as marked
- Replace all snap rings, pins, and spacers as required
Step 3: Reinstall Shafts and Housings
- Insert shafts carefully to avoid scoring new bearings
- Confirm proper gear mesh and alignment
- Reinstall the input shaft housing
- Torque bolts and retest shaft rotation by hand
Step 4: Replace Gaskets and Covers
- Install new gaskets on inspection and side covers
- Tighten bolts in a crisscross pattern
- Torque to OEM spec
Step 5: Fill with New Oil and Test
- Fill with approved transmission oil to correct level
- Run engine and shift through gears
- Monitor for noise, leaks, or pressure loss
- Conduct a sea trial under load if possible
When to Choose Remanufactured MG-5090A vs. Rebuilding
Rebuilding is ideal for experienced technicians with full tooling, but in many cases, a remanufactured unit is the best choice.
Consider Ordering a Remanufactured MG-5090A If:
- Housing is cracked or worn
- Gear wear is severe or multiple parts are damaged
- Shop lacks tooling or skilled labor
- Time constraints require fast turnaround
- Service record shows multiple failures
Diesel Pro Power offers fully rebuilt MG-5090A transmissions, dyno-tested and ready to install, with fast shipping worldwide.
Summary: Bearing and Gear Inspection Is Critical at the 3,000-Hour Interval
The MG-5090A is a proven marine transmission, but like all gear-driven systems, it depends on healthy bearings and precision gears. A failure to inspect and replace worn components at the 3,000-hour mark risks expensive damage, clutch problems, and catastrophic failure.
By following a proper teardown, inspection, and rebuild procedure—or by using a certified remanufactured unit from Diesel Pro Power—you ensure long service life and reliable operation under all marine conditions.
Quick Inspection Checklist
Component |
What to Check |
Warning Signs |
| Gear Teeth | Pitting, scoring, cracking | Noise, vibration, gear slippage |
| Input Gear | Tooth profile and alignment | Delayed engagement, shuddering |
| Output Gear | Wear on splines and contact faces | Prop shaft vibration, slippage |
| Planetary Gears | Spalling, needle bearing integrity | Rough shifting, whining |
| Bearings | Discoloration, noise, looseness | Overheating, clicking, shaft play |
| Shaft Play | Radial and axial movement | Excessive endplay, noise under load |
| Oil Condition | Metallic particles, discoloration | Internal wear indicator |
Overhaul Plate Kit For Twin Disc MG5090A Marine Transmission
Gasket Kits For Twin Disc MG5090A Marine Transmission
Videos About Twin Disc Transmissions
6 Reasons Your Twin Disc Transmission Has Low Oil Pressure
7 Reasons Your Twin Disc Transmission Is Overheating
3 Reasons Your Clutch Plates in Your Twin Disc Transmission Are Making Excessive Noise
Bull Gear On A Twin Disc Transmission
Rebuilt Twin Disc Transmissions