

 Free US Calls: 1-888-433-4735
 International: 305-545-5588

Key Points in This Article
- Component Overview and Replacement Procedures for Twin Disc MG514C Marine Gear
- Detailed Description of Major Components for Twin Disc MG514C Marine Gear
- Guidelines for Disassembly and Assembly for Twin Disc MG514C Marine Gear
- Replacement Procedures for Critical Parts in Twin Disc MG514C Marine Gear
- Recommended Torque Specifications for Twin Disc MG514C Marine Gear
- Final Recommendations for Maintenance and Replacement
Introduction
The Twin Disc MG514C Marine Gear is a robust and efficient marine transmission system designed for smooth operation and long-term reliability. However, to maintain peak performance, understanding the key components and their replacement procedures is essential. This comprehensive guide provides an in-depth overview of major components, step-by-step disassembly and assembly procedures, replacement guidelines for critical parts, and recommended torque specifications.
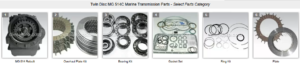
Parts Catalog for Twin Disc MG514C Marine Transmissions
Rebuilt Twin Disc MG514C Marine Transmissions
Bearings For Twin Disc MG514C Marine Transmissions
Plate Kit For Twin Disc MG514C Marine Transmission
Gasket Kits For Twin Disc MG514C Marine Transmission
Detailed Description of Major Components for Twin Disc MG514C Marine Gear
Understanding the core components of the Twin Disc MG514C Marine Gear is essential for effective troubleshooting, maintenance, and repair. Below is an overview of the critical parts and their roles within the system.
-
Input Shaft
- Function: Transfers power from the engine to the gear assembly.
- Material: Typically made from hardened steel for durability.
- Common Issues: Wear due to friction, misalignment, or inadequate lubrication.
-
Output Shaft
- Function: Delivers rotational power to the propeller or final drive system.
- Material: Precision-machined steel for maximum strength.
- Common Issues: Misalignment, excessive wear, or damage from improper loading.
-
Clutch Assembly
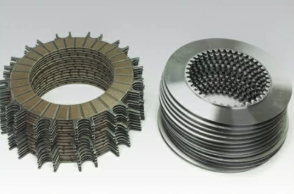
Complete Overhaul Plate Kit for MG514B & C
- Function: Engages and disengages the power from the engine to the gear assembly.
- Components: Includes clutch plates, friction discs, and pressure plates.
- Common Issues: Wear due to overheating, slipping, or inadequate lubrication.
-
Gear Set
- Function: Provides torque conversion and speed adjustment.
- Components: Consists of planetary gears and ring gears.
- Common Issues: Worn or broken teeth, improper meshing, and lubrication failures.
-
Oil Pump
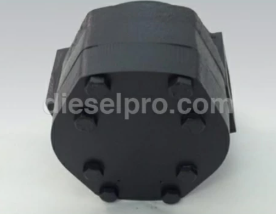
Hydraulic pump for Twin Disc MG514C marine transmission
- Function: Ensures proper circulation of lubrication oil within the system.
- Components: Includes gears, shafts, and seals.
- Common Issues: Leakage, low pressure, or contamination.
-
Hydraulic System
- Function: Provides hydraulic power for gear shifting and clutch engagement.
- Components: Hydraulic lines, actuators, and control valves.
- Common Issues: Leakage, air contamination, or faulty pressure regulators.
-
Cooling System
- Function: Maintains optimal operating temperatures by dissipating heat.
- Components: Heat exchangers, coolant lines, and thermostatic valves.
- Common Issues: Blockages, corrosion, or inadequate coolant levels.
-
Housing and Seals
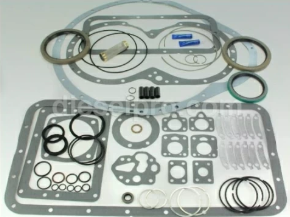
Gasket and seal kit for Twin Disc marine gear MG514C.
- Function: Encases the components and maintains alignment while protecting against external elements.
- Components: Outer casing, seals, and gaskets.
- Common Issues: Cracks, wear, or leaking seals.
Guidelines for Disassembly and Assembly for Twin Disc MG514C Marine Gear

Proper disassembly and assembly procedures are crucial to ensure the safe and effective servicing of the Twin Disc MG514C Marine Gear.
Tools and Safety Precautions
- Personal Protective Equipment (PPE): Wear safety goggles, gloves, and protective footwear.
- Tools Required:
- Torque wrench
- Socket and spanner sets
- Seal pullers
- Hydraulic press
- Bearing puller
- Cleaning solvents
- Safety Tips:
- Ensure the engine is shut down and isolated.
- Depressurize hydraulic systems.
- Support heavy components with appropriate lifting devices.
Step-by-Step Disassembly Procedure
-
Preparation:
- Disconnect power and secure the vessel.
- Drain all lubricants and hydraulic fluids.
-
Remove External Components:
- Detach any external piping, hoses, and wiring.
- Label components for accurate reassembly.
-
Disassemble Housing:
- Remove bolts from the outer casing using a torque wrench.
- Carefully lift off the housing cover.
-
Extract Internal Components:
- Use a bearing puller to remove the input and output shafts.
- Disassemble the clutch assembly by removing the pressure plates and friction discs.
- Extract the gear set using lifting equipment.
-
Inspect and Clean Components:
- Clean each component using appropriate solvents.
- Inspect for signs of wear, corrosion, or damage.
Step-by-Step Assembly Procedure

-
Prepare Work Area:
- Ensure all components are clean and free from debris.
- Apply a light coating of oil to moving parts.
-
Reassemble Internal Components:
- Install the gear set first, ensuring proper alignment.
- Insert the input and output shafts using a hydraulic press if necessary.
- Assemble the clutch components, ensuring friction discs and plates are correctly seated.
-
Secure Housing:
- Replace gaskets and seals.
- Position the housing cover and torque bolts to specification.
-
Reconnect External Components:
- Reattach all hoses, wiring, and piping, ensuring secure connections.
- Refill with lubricants and hydraulic fluids.
-
Testing and Verification:
- Conduct a dry test to ensure components move freely.
- Perform a wet test under load conditions to confirm operational integrity.
Replacement Procedures for Critical Parts in Twin Disc MG514C Marine Gear
Certain components require regular inspection and, if necessary, replacement. Here’s how to handle the replacement of critical parts.
-
Replacing Clutch Plates
Complete Overhaul Plate Kit for MG514B & C
- Step 1: Disassemble Clutch Housing
- Remove the clutch cover and extract the old clutch plates.
- Remove the clutch cover and extract the old clutch plates.
- Step 2: Inspect and Clean
- Check for wear or damage. Clean the housing to remove debris.
- Check for wear or damage. Clean the housing to remove debris.
- Step 3: Install New Plates
- Position new plates, ensuring correct alignment.
- Position new plates, ensuring correct alignment.
- Step 4: Reassemble Housing
- Replace the clutch cover and torque bolts to the recommended specifications.
- Replace the clutch cover and torque bolts to the recommended specifications.
- Step 1: Disassemble Clutch Housing
-
Replacing Bearings

Complete bearing kit for Twin Disc MG514 B and MG514 C marine transmission
- Step 1: Remove the Old Bearings
- Use a bearing puller to extract worn bearings.
- Use a bearing puller to extract worn bearings.
- Step 2: Inspect Bearing Housing
- Clean and inspect for any damage.
- Clean and inspect for any damage.
- Step 3: Install New Bearings
- Press-fit new bearings using a hydraulic press.
- Press-fit new bearings using a hydraulic press.
- Step 4: Lubricate
- Apply appropriate grease to extend lifespan.
- Apply appropriate grease to extend lifespan.
- Step 1: Remove the Old Bearings
-
Replacing Seals and Gaskets
Gasket and seal kit for Twin Disc marine gear MG514C.
- Step 1: Extract Old Seals
- Use a seal puller for safe removal.
- Use a seal puller for safe removal.
- Step 2: Prepare the Surface
- Clean and smooth the area to ensure proper seating.
- Clean and smooth the area to ensure proper seating.
- Step 3: Install New Seals
- Press new seals into place, ensuring they are flush and secure.
- Press new seals into place, ensuring they are flush and secure.
- Step 1: Extract Old Seals
-
Replacing Hydraulic Lines
- Step 1: Disconnect Old Lines
- Safely release hydraulic pressure and remove faulty lines.
- Step 2: Clean Fittings
- Remove debris from connection points.
- Step 3: Install New Lines
- Secure new lines using appropriate fittings.
- Secure new lines using appropriate fittings.
- Step 1: Disconnect Old Lines
-
Replacing Oil Pump
Hydraulic pump for Twin Disc MG514C marine transmission
- Step 1: Remove Old Pump
- Detach the pump by removing securing bolts.
- Step 2: Inspect Mounting Surface
- Clean and check for any damage.
- Step 3: Install New Pump
- Mount the new pump, ensuring it is securely fastened.
- Step 4: Test Operation
- Run the system and verify proper oil circulation.
- Step 1: Remove Old Pump
Recommended Torque Specifications for Twin Disc MG514C Marine Gear
Proper torque application is essential for the safety and longevity of the marine gear system. Below are the recommended torque values:
Component |
Torque Specification (Nm) |
|---|---|
| Housing Bolts | 75 Nm |
| Clutch Plate Retaining Bolts | 85 Nm |
| Input Shaft Nuts | 120 Nm |
| Output Shaft Nuts | 130 Nm |
| Oil Pump Bolts | 50 Nm |
| Hydraulic Line Fittings | 40 Nm |
Note: Always cross-check torque specifications with the OEM manual before final assembly.
Final Recommendations for Maintenance and Replacement
- Regular Inspections: Conduct routine checks to identify potential wear or damage early.
- Use Premium Aftermarket Parts: Ensure you use high-quality components from trusted suppliers like Diesel Pro Power.
- Follow Torque Guidelines: Always adhere to the specified torque values for critical components.
- Monitor Fluid Levels: Regularly check hydraulic and lubrication fluids.
- Schedule Periodic Professional Servicing: Engage professionals for comprehensive assessments every operating season.
Disclaimer: This guide is intended for informational purposes. For more complex procedures, always refer to the OEM service manual or consult with a qualified marine technician.
Rebuilt Twin Disc MG514C Marine Transmissions
Bearings For Twin Disc MG514C Marine Transmissions
Plate Kit For Twin Disc MG514C Marine Transmission
Gasket Kits For Twin Disc MG514C Marine Transmission
Videos About Twin Disc Transmissions
6 Reasons Your Twin Disc Transmission Has Low Oil Pressure
7 Reasons Your Twin Disc Transmission Is Overheating
3 Reasons Your Clutch Plates in Your Twin Disc Transmission Are Making Excessive Noise
Bull Gear On A Twin Disc Transmission
Rebuilt Twin Disc Transmissions