

 Free US Calls: 1-888-433-4735
 International: 305-545-5588

Introduction
Proper disassembly and reassembly of the Twin Disc MG518 Marine Gear is crucial for maintenance, repair, and rebuilding. A well-structured approach ensures that the marine gear is taken apart safely, inspected for wear and damage, and reassembled to manufacturer specifications for optimal performance.
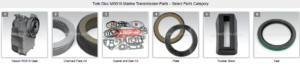
Parts Catalog for Twin Disc MG518 Marine Transmissions
Rebuilt Twin Disc MG518 Marine Transmissions
Plate Kit For Twin Disc MG518 Marine Transmission
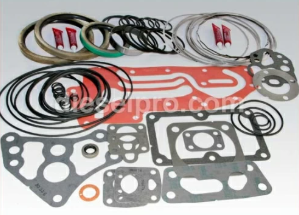
Gasket Kits For Twin Disc MG518 Marine Transmission
This guide provides detailed step-by-step instructions, covering:
- Tools required for disassembly
- Safe disassembly techniques
- Identification and handling of critical components
- Cleaning and inspection during reassembly
- Torque specifications for reassembly
Following these procedures ensures accurate maintenance, minimizes the risk of component damage, and extends the lifespan of the Twin Disc MG518 Marine Gear.
Tools Required for Disassembly
Before beginning the disassembly process, ensure you have the necessary tools and equipment. Having the right tools will help prevent component damage and make the process efficient and safe.
1. Essential Hand Tools
- Socket set (metric and SAE) – For removing various fasteners.
- Torque wrench – To accurately tighten bolts during reassembly.
- Box-end wrenches – For loosening hard-to-reach fasteners.
- Hex key set – For removing small internal bolts.
2. Specialty Tools
- Bearing puller – For safely removing pressed-in bearings.
- Snap ring pliers – To remove and install snap rings without damage.
- Seal puller – To remove oil seals without damaging surrounding surfaces.
- Dial indicator with magnetic base – To check shaft and bearing runout.
3. Safety Equipment

- Heavy-duty gloves – For handling metal components.
- Safety goggles – To protect against debris during disassembly.
- Work apron – To keep hands and clothing free from oil and grime.
4. Support Equipment
- Hoist or transmission jack – To lift and support the marine gear.
- Parts trays and labeled containers – To organize bolts, seals, and small parts.
- Shop rags and degreaser – For cleaning components during inspection.
Safe Disassembly Techniques
Proper disassembly techniques are essential for avoiding damage to critical components and ensuring a smooth reassembly process.
1. Preparation Before Disassembly
- Ensure the engine is off and the transmission is cool.
- Drain transmission fluid completely before removing components.
- Label all hoses, wires, and components for easier reassembly.
2. Step-by-Step Disassembly Process
Step 1: Remove the Marine Gear from the Engine
- Support the transmission with a hoist or transmission jack.
- Disconnect control linkages and electrical connections.
- Remove the output shaft coupling bolts.
- Unbolt the marine gear from the engine bellhousing.
Step 2: Remove the Input Shaft Assembly
- Use a puller tool to remove the input shaft bearing.
- Slide out the input shaft carefully to prevent damage to the splines.
- Inspect the clutch engagement teeth for wear or chipping.
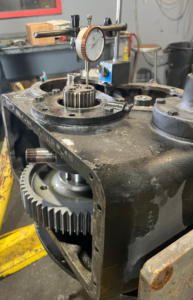
Step 3: Disassemble the Gear Set
- Remove the gear housing cover and set it aside.
- Use snap ring pliers to extract retaining clips from gear shafts.
- Pull out individual gears using a bearing puller if necessary.
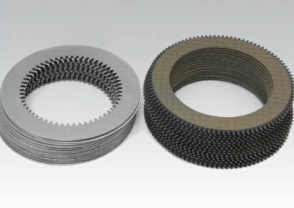
Step 4: Extract the Hydraulic Clutch Assembly
- Remove bolts securing the clutch pack.
- Carefully slide out friction discs and steel plates.
- Inspect the actuator piston for wear or scoring.
Step 5: Remove Bearings and Seals
- Use a bearing puller to remove all ball bearings.
- Use a seal puller to extract oil seals without damaging the housing.
- Clean all bearing surfaces and prepare for reinstallation.
3. Handling Precautions
- Keep small parts in labeled trays to avoid misplacement.
- Never force parts apart—use the correct tools to prevent damage.
- Avoid using excessive heat—doing so can warp metal components.
Identification and Handling of Critical Components
During disassembly, proper identification and careful handling of key components is essential to ensure they can be reused or replaced properly.
1. Input Shaft and Output Shaft
- Ensure shafts are free of scoring, rust, or excessive wear.
- Inspect keyways and splines for signs of rounding or damage.
2. Clutch Pack (Friction and Steel Plates)
- Check for burn marks or glazing on friction plates.
- Steel plates should be flat and free from warping.
3. Bearings and Races
- Look for pitting, discoloration, or excessive play.
- Ensure bearing surfaces are free of cracks or spalling.
4. Hydraulic Pump and Actuators
- Inspect the pump for fluid leaks and pressure loss.
- Check seals and O-rings for signs of deterioration.
Pro Tip: If a component shows excessive wear or damage, replace it during reassembly.
Cleaning and Inspection During Reassembly
Before reassembling the Twin Disc MG518 Marine Gear, all components must be thoroughly cleaned and inspected to ensure proper fitment and functionality.
1. Cleaning Procedures
- Degrease all metal components using an oil-safe cleaning solution.
- Blow out all oil passages with compressed air to remove debris.
- Use a brass wire brush to clean rust or deposits from gear teeth.
2. Inspection Checklist
| Component | Inspection Criteria |
| Bearings | Check for smooth rotation and replace if rough or noisy. |
| Gears | Look for chipped teeth, cracks, or excessive wear. |
| Oil Seals | Replace all seals to prevent future leaks. |
| Hydraulic Lines | Ensure no cracks or blockages exist. |
Torque Specifications for Reassembly
Proper torque settings are essential to ensure secure fastening and prevent failure.
| Component | Torque Specification (lb-ft/Nm) |
| Input Shaft Retaining Nut | 140-180 lb-ft (190-244 Nm) |
| Bellhousing Bolts | 75-90 lb-ft (102-122 Nm) |
| Clutch Pack Assembly Bolts | 50-70 lb-ft (68-95 Nm) |
| Mounting Bracket Bolts | 50-70 lb-ft (68-95 Nm) |
| Output Flange Bolts | 60-80 lb-ft (81-108 Nm) |
Note: Always use a calibrated torque wrench for accuracy.
Step-by-Step Reassembly Process
Step 1: Install Bearings and Seals
- Press-fit new bearings into place using a bearing installer.
- Apply a light coat of transmission oil on oil seals before installing.
Step 2: Reassemble the Gear Set
- Insert gears in the correct orientation according to the assembly diagram.
- Install snap rings and retainers to hold gears in place.
Step 3: Install the Clutch Pack
- Stack friction and steel plates in alternating order.
- Secure the clutch pack with new fasteners torqued to spec.
Step 4: Reinstall the Input and Output Shafts
- Align splines correctly and slide the shafts into place.
- Use a dial indicator to ensure minimal shaft runout.
Step 5: Final Assembly and Testing
- Secure the gear housing cover and torque all bolts.
- Fill with manufacturer-approved transmission fluid.
- Perform a manual rotation test before reinstalling onto the engine.
Conclusion
The disassembly and reassembly of the Twin Disc MG518 Marine Gear requires precision, patience, and proper technique. By following this guide, marine technicians can:
- Safely disassemble the marine gear without damage.
- Inspect, clean, and replace worn components.
- Reassemble the transmission to factory specifications.
- Apply correct torque values for a secure and durable fit.
By adhering to these best practices, you can ensure optimal performance and longevity of the Twin Disc MG518 Marine Gear.
Rebuilt Twin Disc MG518 Marine Transmissions
Plate Kit For Twin Disc MG518 Marine Transmission
Gasket Kits For Twin Disc MG518 Marine Transmission
-
Videos About Twin Disc Transmissions
6 Reasons Your Twin Disc Transmission Has Low Oil Pressure
7 Reasons Your Twin Disc Transmission Is Overheating
3 Reasons Your Clutch Plates in Your Twin Disc Transmission Are Making Excessive Noise
Bull Gear On A Twin Disc Transmission
Rebuilt Twin Disc Transmissions