

 Free US Calls: 1-888-433-4735
 International: 305-545-5588
Introduction
The Twin Disc MG5050 Marine Gear is a highly reliable and durable transmission designed for marine applications. However, even the most robust marine transmissions require occasional repair and part replacements due to wear and tear. Proper disassembly, repair, and reassembly procedures are critical to ensuring that the transmission continues to operate smoothly and efficiently.
This guide covers the tools and workspace preparation, step-by-step disassembly procedures, replacing key components such as seals, bearings, and clutches, and the reassembly process with proper torque specifications.
Parts Catalog for Twin Disc MG5050 Marine Transmissions
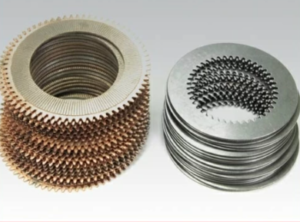
Plate Kit For Twin Disc MG5050 Marine Transmission
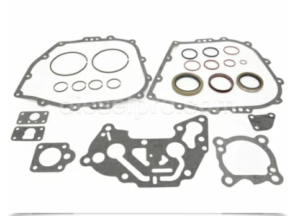
Gasket Kits For Twin Disc MG5050 Marine Transmission
By following these procedures, vessel operators and marine technicians can effectively service and repair the Twin Disc MG5050, ensuring its longevity and performance.
Tools and Workspace Preparation

Before disassembling the Twin Disc MG5050, it is crucial to set up a well-organized workspace and have the proper tools on hand. This preparation helps ensure safety, efficiency, and accuracy during the repair process.
1. Setting Up the Work Area
- Choose a clean and well-lit workspace with adequate ventilation.
- Ensure you have a sturdy workbench or table to place transmission components.
- Have oil-absorbing mats or drip trays ready to catch any residual transmission fluid.
- Keep shop rags and cleaning solvents nearby for cleaning parts.
- Ensure you have an organized storage system for bolts, washers, and small parts.
2. Essential Tools for Disassembly and Repair
A well-equipped toolkit is necessary for disassembling and repairing the Twin Disc MG5050.
| Tool | Purpose |
| Socket Set (Metric & SAE) | Removing bolts and fasteners |
| Torque Wrench | Ensuring proper torque specifications |
| Pry Bars | Assisting with separating components |
| Bearing Puller | Removing worn-out bearings |
| Seal Removal Tool | Extracting old oil seals |
| Snap Ring Pliers | Removing snap rings from shaft assemblies |
| Dial Indicator | Checking gear and shaft alignment |
| Feeler Gauge | Measuring clearance between components |
| Soft Mallet | Tapping components gently into place |
| Hydraulic Press | Installing bearings and pressing components |
3. Safety Equipment
- Safety gloves to protect against sharp edges and hot surfaces.
- Safety glasses to prevent debris from entering the eyes.
- Steel-toe boots for foot protection when handling heavy parts.
- Hearing protection if working in a noisy environment.
- Fire extinguisher on hand in case of oil spills and ignition hazards.
Proper preparation minimizes the risk of accidents and ensures a smooth disassembly process.
Step-by-Step Disassembly Guide
1. Draining Transmission Fluid
Before beginning disassembly, the transmission fluid must be drained.
Steps to Drain the Oil:
- Place a drain pan under the transmission.
- Remove the oil drain plug and allow the transmission fluid to drain completely.
- Inspect the drained oil for metal shavings or debris, which could indicate internal damage.
- Replace the drain plug once the oil has been fully drained.
2. Removing External Components
Before accessing internal parts, external components such as the mounting brackets, control linkages, and cooler lines must be removed.
- Disconnect the Control Linkages
- Carefully remove shift and throttle linkages to prevent damage.
- Label and document connections for easy reassembly.
- Detach the Transmission from the Engine
- Use a hoist or crane to support the weight of the transmission.
- Remove mounting bolts and carefully separate the transmission from the engine.
- Lower the transmission onto a workbench or sturdy surface.
- Remove the Oil Cooler and Hoses
- Disconnect the oil cooling lines and drain any residual fluid.
- Cap off the hoses to prevent contamination.
3. Disassembling the Twin Disc MG5050 Internal Components
Once external components are removed, begin taking apart the internal components in a systematic manner.
Disassembling the Input and Output Shafts
- Remove the Output Shaft Coupling
- Use a socket wrench to unbolt the coupling.
- Slide the output shaft assembly out carefully.
- Extract the Clutch Pack
- Remove snap rings securing the clutch assembly.
- Use a seal removal tool to extract old clutch discs and plates.
- Inspect each clutch component for signs of wear or scoring.
- Remove Bearings and Seals
- Use a bearing puller to remove worn bearings.
- Remove old shaft seals and inspect for leak points.
- Check Gear Train and Housing for Wear
- Inspect gear teeth for pitting or fractures.
- Check the transmission housing for cracks or damage.
Replacing Seals, Bearings, and Clutches
1. Replacing Oil Seals
Oil seals prevent fluid leaks and must be replaced if damaged.
Steps to Replace Oil Seals:
- Clean the seal seating area with a solvent.
- Apply a thin layer of transmission oil to the new seal.
- Use a seal driver tool to press the new seal into place evenly.
- Verify that the seal is flush and properly seated.
2. Installing New Bearings
Worn bearings can lead to excessive noise and misalignment.
Steps to Replace Bearings:
- Use a bearing puller to remove the old bearing.
- Apply lubrication to the new bearing.
- Use a hydraulic press to install the new bearing.
- Rotate the bearing manually to check for smooth movement.
3. Replacing the Clutch Pack
The clutch pack engages and disengages the Twin Disc MG5050, and worn clutch plates can cause slippage.
Steps to Replace the Clutch Pack:
- Remove old clutch plates and pressure plates.
- Inspect for warped or burned clutch plates.
- Install new clutch plates, ensuring proper sequence.
- Reassemble the clutch housing and secure snap rings.
Reassembly and Proper Torque Specifications
1. Step-by-Step Reassembly Guide
Reassembly must be done carefully and systematically to avoid misalignment and future failures.
- Reinstall the Gear Train and Bearings
- Insert the gear assemblies and check for proper meshing.
- Ensure bearings are correctly seated.
- Reassemble the Clutch Pack and Shafts
- Reinstall the clutch pack, aligning plates properly.
- Insert the input and output shafts and check for smooth rotation.
- Install New Seals and Gaskets
- Use new gaskets to prevent leaks.
- Apply Loctite or thread sealant where necessary.
- Reconnect Oil Cooler Lines and Mounting Hardware
- Reattach cooling lines securely.
- Install mounting brackets and fasteners.
- Fill Transmission with Fresh Fluid
- Use the recommended transmission fluid.
- Check for proper fluid level before operation.
2. Proper Torque Specifications for Fasteners
Using the correct torque values prevents over-tightening or under-tightening, which can cause misalignment or part failure.
| Component | Torque Specification (ft-lbs) |
| Input Shaft Bolts | 80-100 |
| Output Shaft Coupling | 90-120 |
| Transmission Mount Bolts | 55-75 |
| Clutch Pack Retaining Bolts | 50-65 |
| Oil Pan Drain Plug | 30-40 |
Always refer to manufacturer specifications to ensure proper torque values.
Final Thoughts on Disassembling and Repairing the Twin Disc MG5050 Marine Gear
Following proper disassembly, repair, and reassembly procedures ensures that the Twin Disc MG5050 Marine Gear continues to function smoothly and reliably.
By systematically replacing worn bearings, seals, and clutch components, and using correct torque values, operators can extend the lifespan of their marine transmission.
For OEM-quality replacement parts, clutch kits, and expert guidance, visit Diesel Pro Power for high-quality Twin Disc MG5050 components.
By following this detailed repair guide, marine professionals can maintain their Twin Disc MG5050 Marine Gear in peak condition, ensuring years of trouble-free service.
Parts Catalog for Twin Disc MG5050 Marine Transmissions
Plate Kit For Twin Disc MG5050 Marine Transmission
Gasket Kits For Twin Disc MG5050 Marine Transmission
Videos About Twin Disc Transmissions
6 Reasons Your Twin Disc Transmission Has Low Oil Pressure
7 Reasons Your Twin Disc Transmission Is Overheating
3 Reasons Your Clutch Plates in Your Twin Disc Transmission Are Making Excessive Noise
Bull Gear On A Twin Disc Transmission
Rebuilt Twin Disc Transmissions