

 Free US Calls: 1-888-433-4735
 International: 305-545-5588

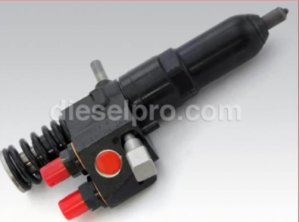
Injectors are the backbone of the fuel delivery system in Detroit Diesel 53 Series engines, responsible for atomizing fuel into the combustion chamber for efficient ignition and power generation. Proper maintenance, timely replacement, and precision adjustments of injectors are critical to ensuring the optimal performance, fuel efficiency, and longevity of your engine.
This guide provides an in-depth look at the replacement procedures and adjustment techniques for injectors in Detroit Diesel 53 Series engines (3-53, 4-53, 6V53, and 8V53), equipping you with the knowledge to keep your engine running at peak efficiency.
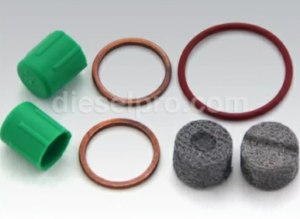
Injectors & Related Components for Detroit Diesel 353 Non – Turbo Marine & industrial Engines
Injectors & Related Components for Detroit Diesel 353 Turbo Marine & industrial Engine
Injectors & Related Components for Detroit Diesel 453 Non – Turbo Marine & industrial Engines
Injectors & Related Components for Detroit Diesel 453 Turbo Marine & industrial Engine
Injectors & Related Components for Detroit Diesel 6V53 Non – Turbo Marine & industrial Engines
Injectors & Related Components for Detroit Diesel 6V53 Turbo Marine & industrial Engine
Injectors & Related Components for Detroit Diesel 8V53 Non – Turbo Marine & industrial Engines
Injectors & Related Components for Detroit Diesel 8V53 Turbo Marine & industrial Engine
Importance of Injector Maintenance
Injectors are exposed to extreme operating conditions, including high pressure, temperature, and exposure to fuel contaminants. Over time, this can result in:
- Reduced Efficiency: Poor atomization leads to incomplete combustion, resulting in decreased power and fuel economy.
- Increased Emissions: Faulty injectors can produce unburned hydrocarbons and excessive smoke.
- Engine Damage: Fuel leaks or spray irregularities can cause cylinder scoring or piston damage.
Regular injector maintenance ensures:
- Consistent Fuel Delivery: Proper spray patterns and atomization improve combustion.
- Improved Fuel Efficiency: Accurate fuel injection minimizes waste.
- Prolonged Engine Life: Prevents secondary damage caused by injector malfunctions.
Tools and Materials Required
Before starting any injector maintenance, gather the necessary tools and materials to ensure efficiency and safety:
- Torque wrench
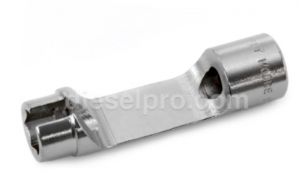
- Injector removal tool (e.g., J 22062-01)
- Injector height gauge (e.g., J 22882)
- Clean rags and a small brush
- Dial indicator (for timing adjustments)
- Replacement injectors (if necessary)
- Anti-seize compound or assembly lubricant
- Protective gloves and safety glasses
Step-by-Step Injector Replacement Procedures
1. Preparation
- Ensure Safety:
- Disconnect the battery to prevent accidental engine starts.
- Allow the engine to cool completely to avoid burns from hot components.
- Clean the Work Area:
- Use compressed air to remove debris around the injectors and fuel lines. Cleanliness prevents contaminants from entering the fuel system.
- Use compressed air to remove debris around the injectors and fuel lines. Cleanliness prevents contaminants from entering the fuel system.
2. Injector Removal
- Disconnect the Fuel Supply:
- Loosen the high-pressure fuel lines connecting the injectors to the fuel manifold. Use a flare nut wrench to avoid rounding the nuts.
- Cap the fuel line openings to prevent dirt ingress.
- Remove Retaining Hardware:
- Unscrew and remove the injector hold-down clamps or bolts using the appropriate socket or wrench.
- Keep the hardware organized for reuse.
- Extract the Injector:
- Attach the injector removal tool and carefully lift the injector straight out of its bore. Avoid prying or twisting, which can damage the injector or cylinder head.
- Inspect the injector bore for signs of wear, corrosion, or deposits.
3. Cleaning and Inspecting the Injector Bore
- Clean the Bore:
- Use a soft brush and a small amount of fuel oil to scrub the bore, ensuring all carbon deposits and debris are removed.
- Wipe the bore dry with a clean, lint-free cloth.
- Inspect for Damage:
- Check for pitting, cracks, or other imperfections that could compromise the injector seal or affect combustion efficiency.
- Check for pitting, cracks, or other imperfections that could compromise the injector seal or affect combustion efficiency.
4. Installing the New Injector
- Prepare the Injector:
- Lubricate the injector O-rings or sealing surfaces with a thin layer of clean engine oil.
- Verify the injector model matches the engine specifications.
- Position the Injector:
- Insert the injector carefully into the bore, aligning it with the fuel inlet and outlet ports. Ensure the injector is seated fully and evenly.
- Insert the injector carefully into the bore, aligning it with the fuel inlet and outlet ports. Ensure the injector is seated fully and evenly.
- Secure the Injector:
- Reinstall the hold-down clamps or bolts, tightening them to the manufacturer’s specified torque value using a torque wrench. Over-tightening can deform the injector body, while under-tightening may cause fuel leaks.
- Reinstall the hold-down clamps or bolts, tightening them to the manufacturer’s specified torque value using a torque wrench. Over-tightening can deform the injector body, while under-tightening may cause fuel leaks.
Injector Adjustment: Ensuring Peak Efficiency

Injector adjustment, often referred to as injector timing, is critical for ensuring that fuel is delivered at the precise moment for optimal combustion. Incorrect timing can result in hard starts, rough idling, and reduced engine performance.
1. Understanding Injector Timing
Injector timing refers to the synchronization of fuel injection with the engine’s piston position. Proper timing ensures that fuel enters the combustion chamber when conditions are ideal for ignition.
- Early Injection:
- Can cause knocking and increased NOx emissions.
- Late Injection:
- Results in incomplete combustion, poor fuel economy, and excessive smoke.
- Results in incomplete combustion, poor fuel economy, and excessive smoke.
2. Tools for Injector Adjustment
- Injector height gauge
- Feeler gauge (for specific engines)
- Dial indicator
- Timing chart or specifications from the manufacturer
3. Adjustment Procedure
- Set Engine to Top Dead Center (TDC):
- Rotate the crankshaft to position the cylinder being adjusted at TDC on the compression stroke.
- Use timing marks on the crankshaft pulley or flywheel for alignment.
- Adjust Injector Height:
- Place the injector height gauge on the injector body.
- Adjust the injector rocker arm until the height matches the specified value. Lock the adjustment screw to maintain the setting.
- Verify Timing:
- Ensure the injector control rack is fully engaged with the injector lever.
- Double-check the timing marks and alignment after each adjustment.
- Repeat for All Cylinders:
- Rotate the crankshaft to bring each cylinder to TDC and repeat the adjustment procedure for all injectors.
- Rotate the crankshaft to bring each cylinder to TDC and repeat the adjustment procedure for all injectors.
Common Issues and Troubleshooting
1. Hard Starting or No Start
- Cause: Incorrect injector timing or clogged injector nozzles.
- Solution: Recheck timing settings and clean or replace injectors as needed.
2. Excessive Smoke
- Cause: Worn or damaged injectors causing improper fuel atomization.
- Solution: Replace faulty injectors and ensure proper adjustments.
3. Fuel Leaks
- Cause: Loose connections or damaged O-rings.
- Solution: Tighten connections to the specified torque and replace seals.
Maintaining Injector Efficiency
Regular maintenance and proactive measures can extend the life of injectors and maintain engine performance:
- Use Clean Fuel:
- Always use high-quality fuel and replace fuel filters as recommended.
- Always use high-quality fuel and replace fuel filters as recommended.
- Inspect Frequently:
- Conduct routine inspections for leaks, wear, or injector spray pattern irregularities.
- Conduct routine inspections for leaks, wear, or injector spray pattern irregularities.
- Monitor Engine Performance:
- Watch for changes in fuel consumption, power output, or emissions as early indicators of injector issues.
- Watch for changes in fuel consumption, power output, or emissions as early indicators of injector issues.
Benefits of Proper Injector Maintenance
- Improved Fuel Efficiency:
- Accurate fuel delivery reduces waste and maximizes combustion efficiency.
- Accurate fuel delivery reduces waste and maximizes combustion efficiency.
- Reduced Emissions:
- Proper injector function minimizes smoke and harmful exhaust emissions.
- Proper injector function minimizes smoke and harmful exhaust emissions.
- Enhanced Engine Longevity:
- Prevents damage to pistons, cylinders, and valves caused by improper fuel delivery.
- Prevents damage to pistons, cylinders, and valves caused by improper fuel delivery.
- Lower Operating Costs:
- Well-maintained injectors reduce the need for costly repairs and downtime.
- Well-maintained injectors reduce the need for costly repairs and downtime.
Final Thoughts
Injector maintenance is a vital aspect of maintaining Detroit Diesel 53 Series engines. By following these detailed replacement procedures and adjustment techniques, you can ensure your engine operates efficiently, with consistent performance and minimal downtime. Proper care of injectors not only enhances fuel efficiency but also reduces emissions and prolongs the overall life of your engine. Whether you’re a professional mechanic or an engine enthusiast, regular attention to injector maintenance is a key step in achieving peak engine performance.
Injectors & Related Components for Detroit Diesel 353 Non – Turbo Marine & industrial Engines
Injectors & Related Components for Detroit Diesel 353 Turbo Marine & industrial Engine
Injectors & Related Components for Detroit Diesel 453 Non – Turbo Marine & industrial Engines
Injectors & Related Components for Detroit Diesel 453 Turbo Marine & industrial Engine
Injectors & Related Components for Detroit Diesel 6V53 Non – Turbo Marine & industrial Engines
Injectors & Related Components for Detroit Diesel 6V53 Turbo Marine & industrial Engine
Injectors & Related Components for Detroit Diesel 8V53 Non – Turbo Marine & industrial Engines
Injectors & Related Components for Detroit Diesel 8V53 Turbo Marine & industrial Engine