

 Free US Calls: 1-888-433-4735
 International: 305-545-5588
Introduction

Piston rings play a crucial role in the performance, efficiency, and longevity of Detroit Diesel 53 Series engines. These small but vital components maintain compression, control oil consumption, and help dissipate heat from the piston to the cylinder wall. Proper installation is critical to ensuring optimal engine performance, preventing premature wear, and avoiding costly repairs. This guide provides an in-depth look at the correct installation procedures for piston rings in Detroit Diesel 53 Series engines, covering preparation, installation, and post-installation checks to ensure a precise and trouble-free assembly.
Parts Catalog for Detroit Diesel 3-53 Engine
Parts Catalog for Detroit Diesel 4-53 Engine
Parts Catalog for Detroit Diesel 6v53 Engine
Parts Catalog for Detroit Diesel 8v53 Engine
Understanding Piston Rings and Their Functions
Before installing piston rings, it is important to understand their function in an engine. The piston rings form a seal between the piston and the cylinder wall, preventing combustion gases from escaping into the crankcase while ensuring that lubricating oil does not enter the combustion chamber.
Detroit Diesel 53 Series engines use a set of three rings per piston:
- Compression Rings (Top and Second Rings):

Compression Rings For Detroit Diesel 53 Series Engines
These rings create a tight seal that prevents the combustion gases from leaking past the piston. They also help transfer heat from the piston to the cylinder wall.
- Oil Control Ring (Lower Ring):
Oil Control Ring For Detroit Diesel 53 Series
This ring is responsible for scraping excess oil from the cylinder walls and returning it to the oil pan, preventing oil from burning in the combustion chamber.
Each ring must be installed correctly, with the right orientation and ring gap positioning, to ensure efficient engine operation.
Preparation for Piston Ring Installation
Proper preparation is key to a successful installation. Before installing the piston rings, follow these steps:

1. Gather Necessary Tools and Materials
- Piston Ring Expander Tool – This tool is used to safely expand the rings without causing damage.
- Ring Compressor Tool – Helps in compressing the rings during piston installation.
- Feeler Gauge – Ensures proper ring gap clearance.
- Clean Engine Oil – Used for lubricating the rings before installation.
- Soft Cloths and Clean Work Surface – Prevents contamination.
- Micrometer or Vernier Caliper – To measure ring dimensions accurately.
2. Inspect the Piston and Rings
- Ensure the piston is clean and free from carbon buildup, scratches, or scoring.
- Check the piston ring grooves for any dirt, carbon deposits, or burrs that might prevent proper seating.
- Inspect the piston rings for cracks, warping, or improper manufacturing defects.
3. Verify Ring Gap Clearance
Before installing the rings onto the piston, check the ring end gaps:
- Insert the ring into the cylinder bore, square it using a piston, and measure the gap using a feeler gauge.
- The gap must meet Detroit Diesel’s specifications (typically 0.010″ – 0.020″ for compression rings and 0.015″ – 0.025″ for oil rings).
- If the gap is too small, lightly file the ends to increase clearance. If it is too large, new rings may be needed.
Lubrication Before Installing
Before installing the piston rings, lubricate both the piston rings and the piston with a mixture of clean engine oil and STP (or equivalent) in an 8:1 ratio. This combination ensures optimal adhesion and prevents scuffing during engine startup.
Proper lubrication is critical to prevent scuffing and ensure the longevity of the piston rings and cylinder walls. The specified mixture provides the necessary film strength during initial engine operation.
Installing the Compression Rings
Compression rings must be installed carefully to ensure proper sealing and prevent ring breakage. Follow these steps:
1. Identify the Rings
- The top compression ring typically has a slightly chamfered or beveled edge and should be installed with the marking “TOP” facing upwards toward the cylinder head.
- The second compression ring may have a scraper edge or a tapered face, which should also face upwards to help control oil and prevent carbon buildup.
2. Installation Sequence
Starting with the bottom compression ring and working upwards, install the compression rings using tool J 8128 to avoid breaking or overstressing them.
Installing the rings from the bottom groove upwards prevents overstressing the rings and ensures proper seating.
2. Expand the Rings for Installation
- Using the piston ring expander tool , gently spread the ring just enough to slip over the piston.
- Avoid overexpanding the ring, as excessive stretching can weaken it and cause premature failure.
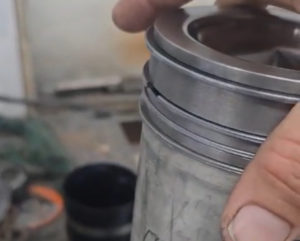
3. Position the Rings in the Correct Grooves
- The top compression ring goes in the topmost groove closest to the piston crown.
- The second compression ring is placed in the middle groove.
- Ensure the rings fit snugly and are not twisted or unevenly seated in the grooves.
4. Stagger the Ring Gaps
- The ring end gaps should be positioned 120 degrees apart around the piston to prevent gas leakage and maintain compression.
- Avoid aligning the gaps with the piston pin or wrist pin bosses, as this can lead to oil loss and blow-by.
Installing the Oil Control Ring
The oil control ring plays a crucial role in regulating oil distribution on the cylinder wall. Proper installation ensures optimal oil consumption and prevents excessive smoke or oil burning.
1. Install the Oil Control Expander
- Place the expander ring (or oil control ring spacer) into the lowest piston groove.
- Ensure that the expander does not overlap at the ends, as an overlapped expander will push the oil ring out too far and cause damage during piston installation.
2. Install the Oil Control Rings
- The upper and lower oil control rings should be installed by hand, slipping them over the piston and into the groove.
- Like the compression rings, use the ring expander tool to prevent excessive force.
3. Verify the Positioning of the Oil Rings
- The scraper edges of the oil rings must face downward, ensuring proper oil removal from the cylinder walls.
- On high-output marine and military engines, the top oil control ring is installed in an inverted position to improve lubrication.
4. Stagger the Ring Gaps
- Oil ring gaps should be positioned 90 degrees apart from the compression rings for even oil control and sealing.
Final Checks Before Piston Installation
After installing all the rings onto the piston, perform the following checks:
1. Ensure Proper Movement
- Manually rotate the rings in their grooves to verify smooth movement without excessive binding.
2. Check the Gaps Again
- Confirm that ring gaps remain staggered and have not moved out of alignment.
3. Lubricate the Rings
- Before inserting the piston into the cylinder bore, generously coat the rings with clean engine oil to reduce friction during startup.
Note: For high-output marine and military engines, the top oil control ring must be installed in an inverted position, with the scraper edge facing up. This ensures proper oil control under high-performance conditions.
Installing the Piston into the Cylinder

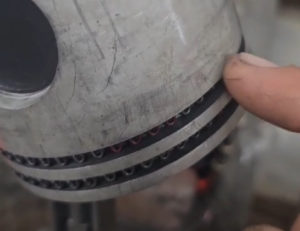
1. Use a Ring Compressor
- Place the ring compressor tool around the piston and tighten it evenly to compress all the rings within their grooves.
- Ensure that no ring is protruding from the tool before inserting the piston.
2. Insert the Piston Carefully
- Align the piston correctly with the cylinder bore and connecting rod journal.
- Gently tap the piston into the bore using a wooden hammer handle or rubber mallet, ensuring smooth entry without forcing it.
3. Verify Piston Movement
- Once installed, the piston should move freely within the bore without excessive resistance.
- If resistance is encountered, remove and inspect the rings for incorrect positioning or damage.
Post-Installation Checks
1. Rotate the Crankshaft
- Rotate the crankshaft manually at least two full revolutions to ensure smooth piston movement and confirm that no rings have become misaligned.
2. Check for Proper Oil Distribution
- Prime the oiling system to ensure oil reaches the rings and cylinder walls before starting the engine.
3. Perform a Leak-Down Test
- A leak-down test can help verify compression and check for any signs of air escaping past the rings.
Parts Catalog for Detroit Diesel 3-53 Engine
Parts Catalog for Detroit Diesel 4-53 Engine
Parts Catalog for Detroit Diesel 6v53 Engine
Parts Catalog for Detroit Diesel 8v53 Engine
Conclusion
Proper installation of piston rings in Detroit Diesel 53 Series engines is essential for optimal engine performance and longevity. Following these detailed steps ensures that the rings are installed correctly, preventing issues such as blow-by, excessive oil consumption, and premature wear. Careful preparation, proper ring positioning, and thorough post-installation checks will contribute to a well-sealed and efficiently running engine.
The ring compressor can be a pain for the 53 series as it needs to be adjusted to be exact.