

 Free US Calls: 1-888-433-4735
 International: 305-545-5588
The Cummins KTA19 is a powerhouse of an engine designed for industrial, marine, and heavy-duty applications. A key component of its reliable performance is the drive units and gear train system, responsible for ensuring that all the moving parts of the engine work together seamlessly. Maintaining this system is critical for optimizing performance, preventing mechanical failures, and extending the engine’s lifespan.
In this comprehensive guide, we’ll cover the gear train layout, drive unit functions, gear alignment importance, troubleshooting methods, timing adjustments, and common maintenance practices for the Cummins KTA19.
Parts Catalog for Cummins KTA19 Marine Engine
Oil Pump & Related Components for Cummins KTA19
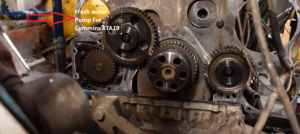
Fresh Water Pump & Related Components for Cummins KTA19
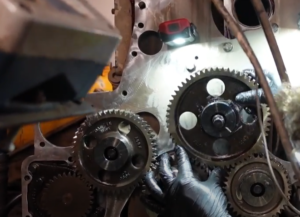
Understanding the Gear Train Layout

The gear train in the Cummins KTA19 engine is a complex assembly of interlocking gears that transmit rotational power from the crankshaft to various engine components. These components include the camshaft, fuel pump, water pump, oil pump, and accessory drives.
Key Components of the Gear Train:
- Crankshaft Gear:
The primary driver, connected directly to the crankshaft. It supplies rotational force to the rest of the gear train.
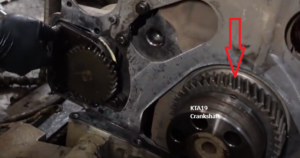
Cummins KTA19 Crankshaft Gear
- Camshaft Gear:
Controls valve timing by operating the camshaft in synchronization with the crankshaft.
Cummins KTA19 Camshaft Gear
- Idler Gears:
Intermediate gears that help transfer motion between the crankshaft gear and other driven components, maintaining proper gear alignment.
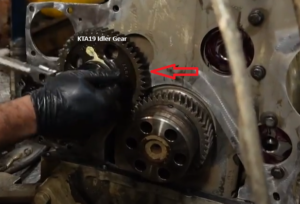
Cummins KTA19 Idler gear
- Accessory Drive Gears:
Power auxiliary components such as the alternator, air compressor, and hydraulic pumps.
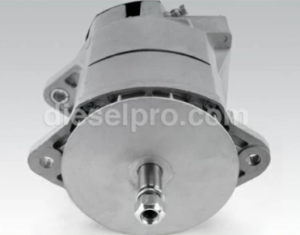
Alternator for Cummins KTA19
- Fuel Pump Drive Gear:
Ensures precise fuel injection timing.
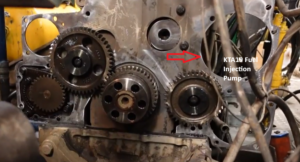
This is where the Fuel injection goes in the KTA19
Fuel Injection Pump for Cummins KTA19
- Oil Pump Drive Gear:
Provides lubrication throughout the engine.
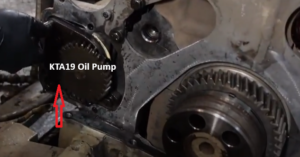
Cummins KTA19 Oil Pump Gear
Types of Gear Arrangements in the KTA19:
- Direct Drive: The gear is directly connected to the driven component, like the crankshaft-to-camshaft connection.
- Compound Gear Train: Uses idler gears to transmit motion over longer distances or change rotation directions.
- Planetary Gear System (in some configurations): Provides compact, high-torque transmission.
The gear train is located at the front or rear of the engine (depending on the application), enclosed within a gear housing that protects it from contaminants and helps retain lubrication.
The Function of Idler Gears and Drive Units
Idler Gears:
Idler gears are intermediary gears placed between two other gears to transfer motion efficiently. They don’t change the gear ratio but serve several important functions:
- Change Direction: In engines like the KTA19, idler gears can reverse the direction of rotation to ensure components like the camshaft rotate correctly.
- Maintain Alignment: They allow flexibility in gear placement, helping maintain proper gear mesh and alignment.
- Reduce Load: By distributing loads across multiple gears, they minimize stress on any single gear, enhancing durability.
Drive Units:
Drive units in the KTA19 engine transmit power to auxiliary components, including:
- Accessory Drive Unit:
Powers the alternator, air compressor, and hydraulic pumps.
Alternator for Cummins KTA19
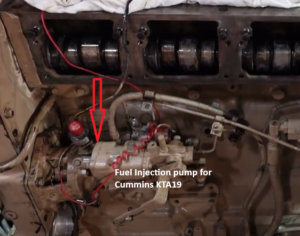
- Fuel Pump Drive Unit:
Ensures accurate timing for fuel injection.
This is where the Fuel injection goes in the KTA19
Fuel Injection Pump for Cummins KTA19
- Water Pump Drive Unit:
Circulates coolant through the engine for optimal temperature control.
Freshwater Pump for Cummins KTA19
Proper functioning of these drive units is essential for engine efficiency, cooling, and lubrication.
Importance of Proper Gear Alignment
Correct gear alignment is critical in the KTA19’s gear train to prevent premature wear, mechanical failures, and performance issues.
Why Gear Alignment Matters:
- Prevents Gear Wear: Misaligned gears can cause uneven contact, leading to rapid wear, pitting, and gear tooth damage.
- Ensures Efficient Power Transmission: Proper alignment reduces friction and energy loss, maximizing engine efficiency.
- Reduces Noise and Vibration: Misalignment can cause excessive noise, vibrations, and even damage to surrounding components.
- Maintains Timing Accuracy: Especially critical for camshaft and fuel pump gears where precise timing is essential for combustion efficiency.
Signs of Gear Misalignment:
- Excessive Gear Noise: Whining, grinding, or knocking sounds from the gear housing.
- Vibrations: Noticeable vibrations at certain RPMs.
- Uneven Gear Wear: Pitted or chipped gear teeth.
- Overheating: Due to increased friction between misaligned gears.
Accessory Drive Troubleshooting
The accessory drive system powers components like the alternator, air compressor, and hydraulic pumps. Issues with these components can lead to engine inefficiencies or failures.
Common Accessory Drive Problems:
- Worn or Slipping Belts: Leads to reduced performance of driven accessories.
- Misaligned Pulleys: Causes uneven belt wear and excessive noise.
- Bearing Failure: Creates grinding noises and may cause the accessory to seize.
- Loose or Damaged Tensioners: Results in improper belt tension.
Identifying Worn Drive Belts and Pulleys
Symptoms of Worn Belts:
- Cracking or Fraying: Indicates the belt material is deteriorating.
- Glazing: A shiny appearance on the belt surface suggests slipping due to overheating.
- Squealing Noise: Often due to loose or worn belts.
- Loss of Power to Accessories: Such as undercharging from the alternator or poor air compressor performance.
Inspecting Pulleys:
- Visual Inspection: Look for cracks, chips, or deformation.
- Check for Wobble: A pulley that doesn’t spin true can indicate bearing issues.
- Misalignment Check: Ensure pulleys are in line with the belt path.
Replacing and Aligning Accessory Components
Steps to Replace Drive Belts:
- Turn Off the Engine: Ensure the engine is cool before starting.
- Release Belt Tension: Loosen the tensioner to relieve pressure.
- Remove the Old Belt: Inspect it for uneven wear or damage.
- Install the New Belt: Ensure it’s routed correctly around all pulleys.
- Adjust Tension: Use a tension gauge to achieve proper belt tension.
Aligning Accessory Components:
- Use a Straight Edge: To ensure pulleys are perfectly aligned.
- Adjust Brackets: If pulleys are out of alignment, adjust the mounting brackets as needed.
- Check Belt Tension: Improper tension can cause misalignment over time.
Gear Train Timing Adjustments
Proper timing adjustments ensure the camshaft, crankshaft, and fuel pump are synchronized for optimal engine performance.
When Timing Adjustments Are Needed:
- After gear replacement or engine rebuild.
- Following major repairs involving the camshaft or crankshaft.
- To correct timing-related performance issues like poor combustion or hard starting.
Tools Required:
- Timing marks reference (from the service manual).
- Feeler gauges for checking clearances.
- Dial indicators for precise adjustments.
Adjusting Timing for Optimal Performance
Steps for Timing Adjustment:
- Access the Gear Train:
- Remove the gear housing cover to expose the timing gears.
- Remove the gear housing cover to expose the timing gears.
- Align Timing Marks:
- Rotate the crankshaft until the timing marks on the crankshaft and camshaft gears align.
- Use the service manual to identify the correct alignment marks.
- Adjust the Fuel Pump Timing:
- Loosen the fuel pump mounting bolts.
- Rotate the pump slightly to advance or retard the timing as needed.
- Verify Valve Timing:
- Check that the camshaft is correctly timed with the crankshaft.
- Adjust if necessary to achieve the correct valve timing.
- Reassemble and Test:
- Reinstall the gear housing cover.
- Start the engine and verify performance.
Troubleshooting Gear Alignment Issues
Common Gear Alignment Issues:
- Backlash Problems:
- Excessive Backlash: Causes noisy operation and gear wear.
- Insufficient Backlash: Leads to binding and overheating.
- Gear Tooth Wear:
- Pitting or Chipping: Often due to misalignment or insufficient lubrication.
- Pitting or Chipping: Often due to misalignment or insufficient lubrication.
- Gear Slippage:
- Caused by loose fasteners or worn gear keyways.
- Caused by loose fasteners or worn gear keyways.
Troubleshooting Steps:
- Visual Inspection:
- Check for wear patterns, cracks, and proper alignment.
- Check for wear patterns, cracks, and proper alignment.
- Measure Backlash:
- Use a dial indicator to measure the gear backlash.
- Compare readings with the manufacturer’s specifications.
- Check Timing Marks:
- Ensure timing marks are correctly aligned.
- Ensure timing marks are correctly aligned.
- Inspect Bearings and Shafts:
- Worn bearings can cause gear misalignment.
- Worn bearings can cause gear misalignment.
Preventive Maintenance Tips for Gear Train and Drive Units
- Regular Inspections: Check gears, belts, and pulleys for wear and alignment issues.
- Proper Lubrication: Ensure the gear housing has clean, adequate oil to reduce friction.
- Torque Fasteners Correctly: Prevent gear slippage by securing bolts to the correct torque specifications.
- Monitor for Unusual Noises: Early detection of abnormal sounds can prevent major failures.
Conclusion
Maintaining the drive units and gear train of the Cummins KTA19 is essential for optimal engine performance and longevity. Regular inspections, timely replacements, proper alignment, and accurate timing adjustments can prevent costly repairs and ensure smooth operation.
Key Takeaways:
- Understand the gear train layout and functions of drive units.
- Identify signs of gear misalignment and worn accessory components.
- Perform timing adjustments with precision for optimal engine performance.
- Follow a preventive maintenance schedule to catch issues early.
Disclaimer:
Gear train timing adjustments require precise alignment. Refer to the Cummins KTA19 service manual for correct timing mark configurations and torque specifications. Improper adjustments can cause severe engine damage.
Parts Catalog for Cummins KTA19 Marine Engine
Oil Pump & Related Components for Cummins KTA19
Fresh Water Pump & Related Components for Cummins KTA19