

 Free US Calls: 1-888-433-4735
 International: 305-545-5588

The electrical system is a critical component of Cummins ISB and QSB engines, responsible for powering essential systems, starting the engine, and ensuring smooth operation of sensors and control modules. One of the most vital parts of this system is the starter motor, which initiates the engine’s combustion process by cranking the engine until it starts running on its own. When the starter motor fails or shows signs of trouble, diagnosing and resolving the issue promptly is essential to prevent downtime and costly repairs. This comprehensive guide covers the troubleshooting of starter motor issues, including symptoms, diagnostic procedures, and repair solutions.
Parts Catalog Main Page for Cummins ISB Marine Engine
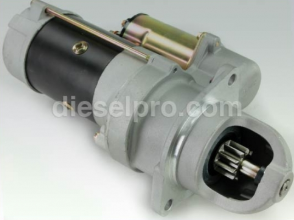
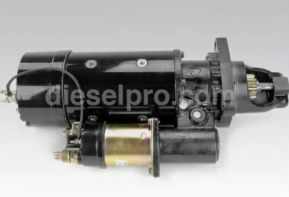
Starter & Related Components for Cummins ISB 4.5 Engine
Starter & Related Components for Cummins ISB 5.9 Engine
Starter & Related Components for Cummins ISB 6.7 Engine
Parts Catalog Main page for Cummins QSB Marine Engine
Starter & Related Components for Cummins QSB 4.5 Engine
Starter & Related Components for Cummins QSB 5.9 Engine
Starter & Related Components for Cummins QSB 6.7 Engine
Starter & Related Components for Cummins QSB 7.0 Engine
1. Understanding the Role of the Starter Motor
The starter motor is an electric motor that engages the engine’s flywheel to crank the engine during the starting process. It relies on power from the battery and is controlled through the ignition switch and starter solenoid. When the starter system works correctly, the engine starts quickly and efficiently. However, when any part of this system fails, the engine may not start, leaving the vehicle or equipment inoperable.
Key Components of the Starter System:
- Starter Motor: The main component that turns the engine over.
- Starter Solenoid: Acts as a relay, connecting the starter motor to the battery when the ignition key is turned.
- Ignition Switch: Sends the electrical signal to the starter solenoid to engage the starter motor.
- Battery: Provides the electrical power needed to operate the starter motor.
- Wiring and Connectors: Transfers power from the battery to the starter motor and solenoid.
2. Common Symptoms of Starter Motor Issues

Recognizing the symptoms of starter motor problems is the first step in effective diagnostics. These symptoms often indicate whether the issue lies with the starter motor itself or another component of the starting system.
A. No Crank, No Start Condition
- Symptoms: When turning the ignition key, there’s no sound, no engine movement, and the dashboard lights may dim slightly.
- Possible Causes: Dead battery, faulty starter motor, defective solenoid, or poor electrical connections.
B. Clicking Noise When Turning the Key
- Symptoms: A rapid clicking sound or a single loud click when trying to start the engine.
- Possible Causes: Weak battery, corroded battery terminals, faulty starter solenoid, or insufficient power reaching the starter motor.
C. Engine Cranks Slowly
- Symptoms: The engine turns over very slowly, struggling to start, especially in cold conditions.
- Possible Causes: Weak battery, poor ground connection, worn-out starter motor, or internal mechanical resistance.
D. Intermittent Starting Issues
- Symptoms: The engine starts fine sometimes but fails to crank at other times without any clear pattern.
- Possible Causes: Failing ignition switch, loose electrical connections, or a starter motor with worn internal components.
E. Grinding Noise
- Symptoms: A loud grinding noise when attempting to start the engine, often accompanied by difficulty cranking.
- Possible Causes: Worn or damaged starter gear, misalignment with the flywheel, or a damaged flywheel ring gear.
F. Starter Motor Runs Without Engaging the Engine
- Symptoms: A whining sound when the key is turned, but the engine doesn’t crank.
- Possible Causes: Faulty starter solenoid, broken starter drive (Bendix), or damaged flywheel teeth.
3. Causes of Starter Motor Failure
Understanding what causes starter motor issues can help with both diagnostics and preventive maintenance.
A. Electrical Issues
- Weak or Dead Battery: The most common cause of starting problems.
- Corroded or Loose Connections: Poor electrical contact reduces current flow to the starter motor.
- Faulty Solenoid: The solenoid may fail to engage or provide sufficient power to the starter motor.
B. Mechanical Failures
- Worn Brushes or Commutator: Reduces electrical conductivity within the starter motor.
- Damaged Armature or Windings: Internal short circuits or open circuits can prevent the motor from functioning.
- Faulty Starter Drive (Bendix): Prevents the starter from engaging with the flywheel properly.
C. External Factors
- Extreme Temperatures: Can affect battery performance and increase resistance in the electrical system.
- Oil or Coolant Leaks: Fluids leaking onto the starter motor can cause corrosion or short circuits.
4. Step-by-Step Starter Motor Diagnostic Process
Diagnosing starter motor issues involves a systematic approach to identify whether the problem lies with the starter itself, the battery, wiring, or related components.
A. Safety Precautions
- Ensure the Vehicle is in Park or Neutral
Prevents accidental movement during diagnostics.
- Disconnect the Battery
When handling electrical components, disconnect the negative battery terminal to prevent shorts or accidental starts.
- Wear Safety Gear
Use insulated tools and wear gloves to avoid electric shock.
B. Check the Battery
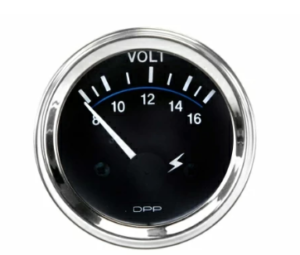
- Measure Battery Voltage:
- Use a multimeter to measure the battery’s resting voltage.
- A fully charged battery should read around 12.6 volts.
- If the voltage is below 12.4 volts, charge the battery before proceeding.
- Perform a Load Test:
- Apply a load to the battery using a load tester to check its ability to maintain voltage under stress.
- Voltage should not drop below 9.6 volts during cranking.
- Inspect Battery Terminals:
- Check for corrosion, loose connections, or damaged cables.
- Clean terminals and tighten connections as needed.
C. Check the Starter Relay and Fuses
- Locate the Starter Relay:
- Refer to the fuse box diagram to find the starter relay.
- Refer to the fuse box diagram to find the starter relay.
- Test the Relay:
- Swap the starter relay with a similar known-good relay from the fuse box to rule out relay failure.
- Swap the starter relay with a similar known-good relay from the fuse box to rule out relay failure.
- Inspect Fuses:
- Check for blown fuses related to the starter circuit.
- Check for blown fuses related to the starter circuit.
D. Test for Voltage at the Starter Motor
- Locate the Starter Motor
- Identify the starter motor under the engine, usually near the transmission bell housing.
- Identify the starter motor under the engine, usually near the transmission bell housing.
- Check for Power at the Starter
- With the ignition key in the “START” position, use a multimeter or test light to check for voltage at the starter’s main terminal.
- If there’s no voltage, the issue may lie with the ignition switch, starter relay, or wiring.
- Check the Solenoid Signal Wire
- Test the small wire connected to the solenoid.
- It should receive 12 volts when the key is turned to “START.”
E. Perform a Voltage Drop Test
- Test Positive Side:
- Place the multimeter’s positive lead on the battery’s positive terminal and the negative lead on the starter’s main terminal.
- Crank the engine and observe the voltage drop; it should be less than 0.5 volts.
- Test Ground Side:
- Place the positive lead on the starter housing and the negative lead on the battery’s negative terminal.
- The voltage drop should also be less than 0.5 volts.
High voltage drop indicates resistance in the cables, connectors, or grounds, which should be cleaned or replaced.
F. Bench Test the Starter Motor
If the starter motor still doesn’t work after confirming the battery and wiring are good, it’s time to remove and test it directly.
Starter Motor Removal:
- Disconnect the Battery
- Always disconnect the negative battery cable first.
- Always disconnect the negative battery cable first.
- Remove Wiring
- Label and disconnect the wires attached to the starter.
- Label and disconnect the wires attached to the starter.
- Unbolt the Starter
- Remove the mounting bolts and carefully extract the starter motor.
- Remove the mounting bolts and carefully extract the starter motor.
Bench Testing Procedure:
- Secure the Starter
- Place the starter on a stable surface.
- Place the starter on a stable surface.
- Connect Test Leads
- Attach jumper cables from a battery: positive to the starter’s large terminal and negative to the starter’s housing (ground).
- Attach jumper cables from a battery: positive to the starter’s large terminal and negative to the starter’s housing (ground).
- Apply Power
- Briefly touch the positive jumper cable to the small terminal (solenoid trigger).
- The starter should spin rapidly and the drive gear should extend.
- If the starter fails to spin: It’s faulty and needs repair or replacement.
- If the starter spins slowly: This indicates internal wear or electrical issues.
5. Starter Motor Repair and Replacement
Depending on the diagnosis, the starter motor may require simple repairs or a complete replacement.
A. When to Repair:
- Replace Brushes: Worn brushes reduce electrical contact inside the motor.
- Clean the Commutator: Remove carbon buildup to restore conductivity.
- Lubricate Bearings: Ensure smooth rotation of the armature.
B. When to Replace:
- Severe Wear: If the armature, windings, or solenoid are damaged.
- Cracked Housing: Structural damage compromises the motor’s integrity.
- Burnt Smell: Indicates overheating, often beyond repair.
C. Starter Motor Reinstallation
- Align the Starter: Position the starter correctly against the engine block.
- Insert Mounting Bolts: Tighten to the manufacturer’s torque specifications.
- Reconnect Wiring: Ensure all connections are clean and secure.
- Reconnect the Battery: Attach the negative terminal last.
- Test the Starter: Start the engine to confirm proper operation.
6. Preventive Maintenance for the Starter System
Regular maintenance can extend the life of the starter motor and prevent unexpected failures.
- Check Battery Health Regularly:
- A weak battery puts extra strain on the starter.
- A weak battery puts extra strain on the starter.
- Inspect Wiring and Connections:
- Clean terminals and check for loose or corroded connections.
- Clean terminals and check for loose or corroded connections.
- Listen for Warning Signs:
- Address unusual noises or slow cranking promptly.
- Address unusual noises or slow cranking promptly.
- Keep the Engine Compartment Clean:
- Prevent oil leaks and debris from contaminating the starter motor.
- Prevent oil leaks and debris from contaminating the starter motor.
- Avoid Prolonged Cranking:
- Limit cranking time to prevent overheating the starter.
- Limit cranking time to prevent overheating the starter.
7. Troubleshooting Common Starter System Issues
| Symptom | Possible Cause | Solution |
| No Crank, No Sound | Dead battery, faulty solenoid | Charge battery, replace solenoid |
| Clicking Noise | Weak battery, corroded terminals | Clean terminals, charge battery |
| Slow Cranking | Weak battery, worn starter motor | Replace battery or starter motor |
| Grinding Noise | Worn starter gear, damaged flywheel | Replace starter or flywheel |
| Intermittent Starting | Loose wiring, failing ignition switch | Tighten connections, replace switch |
| Starter Spins, No Engagement | Faulty Bendix drive | Replace starter motor |
8. Conclusion
Diagnosing and repairing starter motor issues in Cummins ISB and QSB engines requires a systematic approach, from checking the battery and electrical connections to performing bench tests on the starter motor itself. Understanding the symptoms of starter motor failure, following step-by-step diagnostic procedures, and knowing when to repair or replace components can prevent costly downtime and ensure reliable engine performance. Regular maintenance and prompt attention to early warning signs are key to keeping your starter system in top condition. Always refer to the Cummins service manual for specific torque settings, wiring diagrams, and troubleshooting guidelines tailored to your engine model.
Parts Catalog Main Page for Cummins ISB Marine Engine
Starter & Related Components for Cummins ISB 4.5 Engine
Starter & Related Components for Cummins ISB 5.9 Engine
Starter & Related Components for Cummins ISB 6.7 Engine
Parts Catalog Main page for Cummins QSB Marine Engine
Starter & Related Components for Cummins QSB 4.5 Engine
Starter & Related Components for Cummins QSB 5.9 Engine
Starter & Related Components for Cummins QSB 6.7 Engine
Starter & Related Components for Cummins QSB 7.0 Engine