

 Free US Calls: 1-888-433-4735
 International: 305-545-5588

Exhaust Manifold and Gasket Inspection | Turbocharger Troubleshooting
The exhaust system in Cummins ISM, ISMe, and QSM11 engines is a crucial component in managing engine performance, emissions control, and turbocharging efficiency. A well-maintained exhaust system ensures proper airflow, prevents back pressure issues, and optimizes fuel combustion.
Key elements of the exhaust system include:
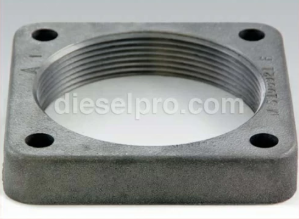
✔ Exhaust Manifold – Channels exhaust gases from the cylinders to the turbocharger.
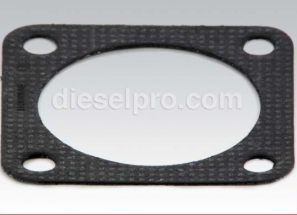
✔ Exhaust Gaskets – Create airtight seals between the manifold and cylinder head.
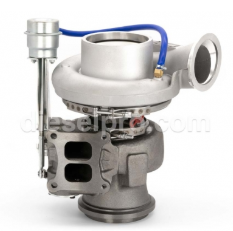
✔ Turbocharger – Uses exhaust gases to compress intake air, improving efficiency.
✔ Exhaust Aftertreatment System – Includes Diesel Particulate Filters (DPF) and Selective Catalytic Reduction (SCR) for emissions control.
A damaged or leaking exhaust system can lead to poor engine performance, excessive emissions, turbocharger inefficiency, and fuel economy losses. This guide provides detailed step-by-step procedures for exhaust manifold inspection, gasket replacement, and turbocharger troubleshooting.
For specific torque values, boost pressure settings, and repair intervals, consult an OEM service manual or contact Diesel Pro Power for expert assistance.
Parts Catalog for ISM Cummins Marine and Industrial Engines
Exhaust Manifold & Related Components for Cummins ISM engine
Parts Catalog for QSM11 Cummins Marine and Industrial Engines
Exhaust Manifold & Related Components for Cummins QSM11 engine
Exhaust Manifold and Gasket Inspection for Cummins ISM, ISMe, and QSM11

The exhaust manifold collects exhaust gases from the cylinder head ports and directs them to the turbocharger. Over time, heat cycles, vibration, and carbon buildup can cause manifold warping, cracking, and gasket leaks.
Common Exhaust Manifold Issues and Symptoms
Symptom |
Possible Cause |
Recommended Action |
| Loud Ticking Noise | Exhaust leak from cracked manifold or gasket | Inspect for soot marks, replace gaskets |
| Loss of Turbo Boost | Exhaust gas escaping before turbocharger | Check manifold for cracks or leaks |
| Black Soot Around Manifold | Gasket failure or warped manifold | Resurface manifold, replace gasket |
| Excessive Exhaust Smoke | Air/fuel imbalance due to exhaust leak | Inspect sensors, repair leaks |
Step 1: Inspecting the Exhaust Manifold and Gaskets
- Perform a Visual Inspection of the Manifold
- Look for cracks, warping, or missing bolts.
- Inspect the manifold surface for carbon buildup or heat stress.
- Check for Exhaust Leaks with Soapy Water
- Spray soapy water around the manifold while the engine is running.
- If bubbles appear, there is an active leak that must be repaired.
- Inspect the Gasket Sealing Surfaces
- Check for soot marks or carbon streaks around the gasket edges.
- If the gasket is damaged, replace it immediately.
- Use a Straightedge to Check for Warping
- Lay a precision straightedge across the manifold mounting surface.
- If gaps exceed 0.003 inches, the manifold needs to be resurfaced or replaced.
Step 2: Removing and Replacing the Exhaust Manifold
If the manifold is cracked, warped, or leaking, it must be replaced.
1. Preparing for Manifold Removal
- Let the engine cool completely to avoid burns.
- Disconnect the battery to prevent electrical shorts.
- Spray penetrating oil on manifold bolts to loosen rust.
2. Unbolt and Remove the Exhaust Manifold
- Remove heat shields and turbo mounting brackets.
- Unbolt the manifold in a crisscross pattern to prevent stress.
- Carefully lift the manifold away from the cylinder head.
3. Inspect and Clean the Mounting Surface
- Remove old gasket material using a plastic scraper.
- Ensure bolt holes are free of debris and corrosion.
4. Install the New Exhaust Manifold and Gaskets
- Use OEM-approved gaskets for a proper seal.
- Torque manifold bolts to manufacturer specifications in sequence.
5. Check for Leaks After Reinstallation
- Start the engine and listen for exhaust leaks.
- Perform a smoke test or soap bubble test to confirm a proper seal.
Turbocharger Troubleshooting for Cummins ISM, ISMe, and QSM11
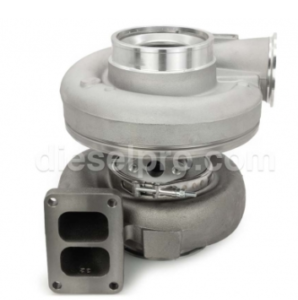
The turbocharger uses exhaust gases to compress intake air, increasing engine efficiency and power output. A malfunctioning turbocharger can cause poor acceleration, excessive smoke, or engine overheating.
Common Turbocharger Issues and Symptoms
| Symptom | Possible Cause | Recommended Action |
| Loss of Power | Turbocharger not spinning properly | Inspect bearings, compressor wheel |
| Whining or Grinding Noise | Worn turbo bearings, damaged turbine blades | Inspect shaft play, check for oil leaks |
| Black Smoke from Exhaust | Air restriction, boost leak, or fuel issue | Check intake piping, inspect boost control |
| Excessive Oil Consumption | Oil leaking past turbo seals | Check oil supply and drain lines |
| Overheating Turbocharger | Lack of lubrication, excessive exhaust heat | Verify oil supply, inspect exhaust temperature |
Step 1: Inspecting the Turbocharger for Wear and Damage
- Check for Boost Pressure Leaks
- Use a boost pressure gauge to compare readings with OEM specifications.
- If boost pressure is low, inspect for air leaks or intake restrictions.
- Inspect the Compressor and Turbine Wheels
- Remove the intake piping and visually inspect the compressor wheel for blade damage.
- Examine the turbine wheel for cracks, erosion, or foreign object damage.
- Check for Excessive Shaft Play
- Spin the turbo shaft by hand; it should rotate freely without excessive movement.
- If shaft wobble is present, the bearings may be worn.
- Inspect the Turbocharger Oil Supply and Drain Lines
- Look for oil leaks around the turbo housing.
- Ensure the oil return line is free of clogs.
Step 2: Replacing a Failing Turbocharger
If the turbocharger shows significant wear or damage, it must be replaced.
1. Remove the Intake and Exhaust Piping
- Unbolt and disconnect the intake and intercooler pipes.
- Loosen the exhaust manifold connection.
2. Disconnect the Oil Supply and Drain Lines
- Use a catch pan to prevent oil spills.
- Inspect lines for blockages or leaks.
3. Unbolt and Remove the Turbocharger
- Support the turbo while removing mounting bolts.
4. Install the New Turbocharger
- Apply assembly oil to the turbo bearing housing before installation.
- Use new gaskets and O-rings for a proper seal.
- Torque mounting bolts to manufacturer specifications.
5. Reconnect All Hoses and Check for Leaks
- Cycle the ignition before starting the engine to prime the oil system.
- Start the engine and monitor boost pressure and turbo noise.
Final Notes on Exhaust System Maintenance for Cummins ISM, ISMe, and QSM11
✔ Inspect the exhaust manifold regularly for leaks and cracks.
✔ Replace damaged gaskets to maintain proper exhaust sealing.
✔ Check turbochargers for wear and replace if there is excessive shaft play.
✔ Ensure the oil supply and return lines to the turbocharger are free of blockages.
✔ Monitor boost pressure to detect early signs of turbo failure.
✔ Consult an OEM manual or Diesel Pro Power for precise servicing guidelines.
By following these detailed procedures, you ensure optimal exhaust flow, improved engine efficiency, and extended turbocharger life for Cummins ISM, ISMe, and QSM11 engines.
Parts Catalog for ISM Cummins Marine and Industrial Engines
Exhaust Manifold & Related Components for Cummins ISM engine
Turbocharger & Related Components for Cummins ISM engine
Parts Catalog for QSM Cummins Marine and Industrial Engines
Exhaust Manifold & Related Components for Cummins QSM11 engine
Turbocharger & Related Components for Cummins QSM11 engine