

 Free US Calls: 1-888-433-4735
 International: 305-545-5588

Fuel Pump and Injector System Overview
The fuel system in Cummins ISM, ISMe, and QSM11 engines plays a critical role in delivering precise amounts of fuel for combustion while maintaining fuel efficiency and reducing emissions. Proper maintenance of the fuel pump, injectors, and fuel lines is essential for ensuring optimal engine performance, longevity, and compliance with emissions standards.
A faulty fuel system can lead to power loss, increased fuel consumption, misfires, excessive smoke, and hard starting. This guide provides a detailed overview of the fuel pump, injectors, fuel line inspection, and replacement procedures, helping to troubleshoot issues and perform preventive maintenance.
For specific torque values, fuel pressure settings, and service intervals, consult an OEM service manual or contact Diesel Pro Power for expert guidance.
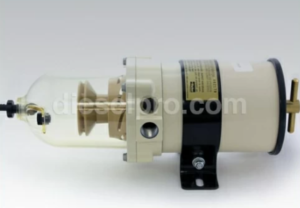
Parts Catalog for ISM Cummins Marine and Industrial Engines
Fuel Pump & Related Components for Cummins ISM engine
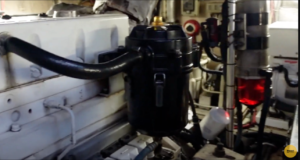
Parts Catalog for QSM Cummins Marine and Industrial Engines
Fuel Pump & Related Components for Cummins QSM11 engine
Fuel System Components in Cummins ISM, ISMe, and QSM11
The fuel system comprises multiple key components that work together to ensure proper fuel delivery and atomization.
Key Fuel System Components and Their Functions
✔ Fuel Pump – Pressurizes and delivers fuel from the tank to the injectors.
✔ Electronic Fuel Injectors – Precisely inject fuel into the combustion chamber.
✔ Fuel Rail and High-Pressure Lines – Distribute fuel under high pressure.
✔ Fuel Filter and Water Separator – Remove contaminants and prevent fuel system damage.
✔ ECM (Electronic Control Module) – Controls injection timing and fuel delivery rates.
✔ Fuel Pressure Regulator – Maintains proper system pressure.
Common Symptoms of Fuel System Issues
A faulty fuel system can lead to engine inefficiency, starting issues, and performance loss.
| Symptom | Possible Causes | Recommended Actions |
| Hard Starting or No Start | Air in fuel system, fuel pump failure, clogged fuel filter | Check fuel pump, replace filters |
| Rough Idle or Misfire | Injector failure, fuel rail pressure issues | Scan ECM, test injectors |
| Excessive Smoke (Black or White) | Incorrect fuel-air mixture, leaking injectors | Inspect fuel injectors and sensors |
| Loss of Power | Weak fuel pump, restricted fuel lines | Test fuel pressure, check for leaks |
| High Fuel Consumption | Faulty fuel pressure sensor, injector over-fueling | Inspect injectors, scan ECM |
Step-by-Step Fuel Pump Inspection and Maintenance
The fuel pump delivers fuel under pressure from the tank to the injectors. Over time, fuel pumps can wear out due to contaminated fuel, excessive heat, or mechanical wear.
Step 1: Diagnosing Fuel Pump Issues
- Check for Fuel Delivery Issues
- Turn the ignition ON and listen for the fuel pump priming sound.
- If no sound is heard, test the fuel pump relay and fuse.
- Test Fuel Pressure at the Rail
- Connect a fuel pressure gauge to the fuel rail test port.
- Compare readings with OEM specifications:
- Normal fuel pressure: ~25-35 psi at idle
- Cranking fuel pressure: ~40-50 psi
- Scan for ECM Fault Codes
- Use Cummins INSITE™ or a diagnostic scanner to check for fuel-related DTCs.
- Use Cummins INSITE™ or a diagnostic scanner to check for fuel-related DTCs.
Step 2: Fuel Pump Removal and Replacement
If the fuel pump is faulty, follow these steps to replace it safely.
- Depressurize the Fuel System
- Disconnect the negative (-) battery terminal.
- Remove the fuel pump fuse and crank the engine for 5-10 seconds.
- Disconnect Fuel Lines from the Pump
- Label the fuel inlet and outlet lines for proper reinstallation.
- Label the fuel inlet and outlet lines for proper reinstallation.
- Unbolt and Remove the Fuel Pump
- Secure the pump with an oil catch pan below to prevent spills.
- Carefully lift the pump out of its mounting location.
- Install the New Fuel Pump
- Lubricate O-rings and gaskets with clean engine oil before installing.
- Torque mounting bolts to manufacturer specifications.
- Reconnect the Fuel Lines and Prime the System
- Reinstall fuel lines and secure clamps properly.
- Cycle the ignition ON and OFF several times to prime the system before starting.
Step-by-Step Fuel Injector Inspection and Service
The fuel injectors precisely control fuel atomization, delivery timing, and combustion efficiency. A faulty injectorcan cause misfires, poor fuel economy, and excessive smoke.
Step 1: Diagnosing Fuel Injector Issues
- Listen for Injector Operation
- Use a mechanic’s stethoscope to check for injector clicking sounds.
- A silent injector may indicate electrical failure or clogged nozzles.
- Perform a Cylinder Balance Test
- Use a diagnostic scanner to disable one injector at a time.
- If the engine performance does not change, the injector is likely faulty.
- Inspect the Injector Spray Pattern
- Remove the injectors and use a fuel injector tester.
- Look for uneven spray or fuel dribbling.
Step 2: Fuel Injector Removal and Replacement
- Remove the Valve Cover
- Loosen all valve cover bolts and set the cover aside.
- Loosen all valve cover bolts and set the cover aside.
- Disconnect the Injector Harness
- Unplug the electrical connectors from each injector.
- Unplug the electrical connectors from each injector.
- Unbolt and Remove the Injectors
- Loosen the injector hold-down bolts evenly to prevent warping.
- Carefully lift the injectors out of their bores.
- Install New Injectors
- Apply a thin coat of clean engine oil to O-rings and sealing surfaces.
- Secure injectors with new hold-down bolts, torqued to specification.
- Reconnect the Injector Harness and Reinstall Valve Cover
- Tighten the valve cover bolts evenly to prevent oil leaks.
- Tighten the valve cover bolts evenly to prevent oil leaks.
Fuel Line Inspection and Replacement
Fuel lines transport fuel under high pressure from the fuel pump to the injectors. Any leaks, restrictions, or clogs can cause fuel starvation and power loss.
Step 1: Inspecting Fuel Lines for Wear and Leaks
- Perform a Visual Inspection
- Look for cracks, leaks, or fuel stains along the lines.
- Look for cracks, leaks, or fuel stains along the lines.
- Check for Air Leaks in the Fuel System
- Use a clear section of fuel hose to check for air bubbles.
- If air is present, replace any leaking seals or fittings.
Step 2: Replacing Fuel Lines
- Depressurize the Fuel System
- Remove the fuel pump fuse and crank the engine for 5-10 seconds.
- Remove the fuel pump fuse and crank the engine for 5-10 seconds.
- Disconnect the Fuel Lines
- Use fuel line quick-disconnect tools if required.
- Label the lines to ensure proper reinstallation.
- Install the New Fuel Lines
- Ensure proper routing and secure clamps tightly.
- Avoid sharp bends or tight angles that could restrict flow.
- Prime the Fuel System and Check for Leaks
- Cycle the ignition ON and OFF multiple times.
- Start the engine and inspect for leaks or air in the lines.
Final Notes on Fuel System Maintenance for Cummins ISM, ISMe, and QSM11
✔ Perform routine fuel filter changes to prevent injector damage.
✔ Use high-quality diesel fuel to avoid contamination and sludge buildup.
✔ Check fuel pressure regularly to identify early pump or injector failure.
✔ Prime the fuel system properly after replacing components to prevent airlocks.
✔ Consult an OEM manual or Diesel Pro Power for precise service specifications.
By following these detailed procedures, you can ensure optimal fuel delivery, improved engine efficiency, and extended service life for Cummins ISM, ISMe, and QSM11 engines.
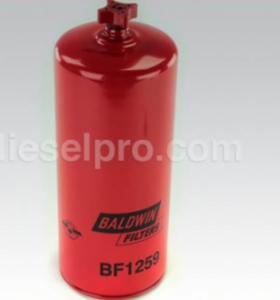
Parts Catalog for ISM Cummins Marine and Industrial Engines
Fuel Pump & Related Components for Cummins ISM engine
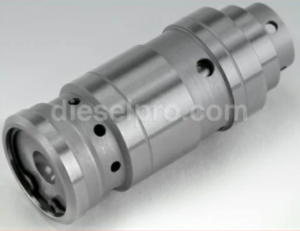
Parts Catalog for QSM Cummins Marine and Industrial Engines
Fuel Pump & Related Components for Cummins QSM11 engine