

 Free US Calls: 1-888-433-4735
 International: 305-545-5588
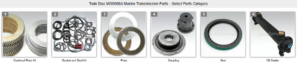
Parts Catalog for Twin Disc MG5090A Marine Transmissions
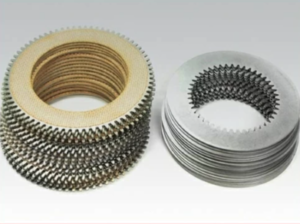
Overhaul Plate Kit For Twin Disc MG5090A Marine Transmission
Gasket Kits For Twin Disc MG5090A Marine Transmission
Introduction: The Importance of Oil Changes for Twin Disc MG-5090A Marine Gear
An oil change is one of the most important and cost-effective maintenance tasks you can perform on the Twin Disc MG-5090A marine transmission. This unit relies on clean, high-quality hydraulic oil to lubricate gears and bearings, engage clutch packs, and regulate internal temperatures. Contaminated or degraded oil leads directly to increased wear, shifting problems, overheating, and ultimately, early failure of critical components.
This comprehensive guide outlines the complete oil change process for the MG-5090A, including best practices, troubleshooting tips, required tools, and safety considerations. Whether you’re a vessel owner performing routine dockside maintenance or a technician working in a commercial marine yard, this guide ensures your oil change is done correctly and efficiently.
Why Regular Oil Changes Are Critical for the MG-5090A Transmission
The MG-5090A uses transmission oil as both a lubricant and a hydraulic fluid. Its performance depends heavily on maintaining the oil’s proper viscosity, cleanliness, and thermal stability.
Functions of Oil in the MG-5090A:
- Hydraulic Actuation: Engages clutch packs using hydraulic pressure.
- Lubrication: Reduces friction on gear teeth, bearings, and shafts.
- Cooling: Transfers heat away from internal components and through the oil cooler.
- Contaminant Suspension: Keeps particles in suspension until they’re filtered.
When the oil becomes oxidized, contaminated, or thermally broken down, it no longer provides these benefits—putting the entire transmission at risk.
Risks of Delayed Oil Changes:
- Clutch slippage or harsh shifting
- Gear wear and galling
- Premature bearing failure
- Oil foaming and aeration
- Internal corrosion
For most applications, change the oil every 1,000 hours or once a year, whichever comes first. If your vessel operates in high-load or high-temperature conditions, consider reducing that interval to every 750 hours.
Required Tools and Supplies for an MG-5090A Oil Change
Before starting the procedure, gather all tools and consumables needed to avoid mid-process delays.
Tools:
- Torque wrench (inch-lbs and ft-lbs)
- Oil filter wrench (strap, claw, or cap type)
- Socket set and ratchet
- Drain pan or container (minimum 5-gallon capacity)
- Funnel with screen
- Inspection mirror and flashlight
- Clean rags or shop towels
Supplies:
- Approved transmission oil (SAE 30 or OEM-specified)
- New oil filter (OEM or Diesel Pro Power aftermarket equivalent)
- Replacement drain plug washer (if applicable)
- Thread sealant or Loctite (optional, depending on plug type)
- Parts cleaner or brake cleaner (for cleaning drain plug and mating surfaces)
Step-by-Step Oil Change Procedure for Twin Disc MG-5090A Marine Gear

Step 1: Warm the Transmission Oil to Operating Temperature
Start the engine and run it for 5–10 minutes in neutral to bring the oil up to operating temperature (typically around 160°F to 180°F).
Why this matters:
- Warm oil flows more freely, ensuring a more complete drain.
- Heated oil helps suspend debris and wear particles, so they exit with the fluid.
Caution: Do not run the engine in gear or under load while docked or tied up unless specifically instructed by the manufacturer.
Step 2: Shut Down and Secure the Vessel
- Stop the engine completely.
- Set the engine control to neutral.
- Lock out ignition systems if applicable (to prevent accidental restart).
- Ensure vessel stability and ventilation in the engine compartment.
Safety Tip: Allow 5–10 minutes for hot oil to settle before opening the drain plug.
Step 3: Locate and Remove the Drain Plug
- Find the drain plug at the bottom of the MG-5090A casing.
- Place the drain pan directly beneath the plug.
- Use the appropriate socket or wrench to loosen the plug.
- Carefully remove the plug, allowing oil to drain fully.
Inspection Tip:
- Clean the plug and inspect it—many plugs are magnetic and will collect metal particles.
- Moderate buildup of metallic sludge is normal.
- Large flakes or shiny chips indicate gear or bearing wear and require further investigation.
Step 4: Remove the Inspection Cover (Optional but Recommended)
- The MG-5090A typically includes an inspection cover that allows access to the clutch and gear cavity.
- Use an appropriate hex key or socket to remove the cover bolts.
- Gently remove the cover and set aside the gasket (replace if worn or damaged).
Why this is helpful:
- Verifies full oil drainage (some oil may remain trapped in internal cavities).
- Provides an opportunity to inspect internal cleanliness.
- Allows borescope access to clutch plates, gears, and bearings.
Cleaning Tip: Use lint-free rags and parts cleaner to wipe away debris or sludge visible through the opening.
Step 5: Replace the Drain Plug and Washer
- Inspect the drain plug threads and clean them thoroughly.
- Replace the sealing washer or gasket with a new one if it shows signs of wear, compression, or corrosion.
- Reinstall the plug and torque it to the manufacturer’s recommended specification.
Torque Guidance:
- Most drain plugs require 20–30 ft-lbs.
- Over-tightening can strip threads or crack the case.
- Under-tightening can lead to leaks.
Optional: Apply thread sealant if specified by the Twin Disc service manual.
Step 6: Remove the Old Oil Filter
- Use the appropriate oil filter wrench to loosen the spin-on filter.
- Turn it counterclockwise until it comes off completely.
- Be prepared for some residual oil to spill out—position a rag or tray below.
Inspection Tip:
- Check the old filter for metal shavings or clutch material.
- Retain it if you plan to cut it open for a more detailed inspection.
Caution: Ensure the rubber gasket from the old filter is not stuck to the housing—double-gasketing can cause major leaks.
Step 7: Prepare and Install the New Oil Filter
- Unbox the new filter and inspect it for shipping damage.
- Apply a thin layer of clean transmission oil to the rubber gasket on the filter’s base.
- Screw the new filter on by hand until it seats.
- Tighten an additional ¾ turn using your hand—do not use a wrench to over-tighten.
Tip: Mark the filter body with a paint pen to record the installation date and engine hours.
Step 8: Add New Transmission Oil
- Locate the oil fill port—usually found on the top of the transmission case.
- Remove the cap and insert a funnel with a mesh screen to prevent debris from entering.
- Slowly pour in approved SAE 30 transmission oil or the manufacturer-recommended equivalent.
Capacity Guidelines:
| MG-5090A Configuration | Approximate Oil Capacity |
| Standard | 2.5 – 3.0 gallons |
| With cooler & long lines | Up to 4.0 gallons |
Tips:
- Fill in stages and allow the oil to settle into passages.
- Do not overfill—the oil expands during operation.
- Use a clean, dry dipstick or sight glass to monitor progress.
Step 9: Start Engine and Check Oil Level in Neutral
- Start the engine and let it idle in neutral for several minutes.
- Shift briefly into forward and reverse (1–2 seconds) to circulate oil into clutch pistons.
- Return to neutral and recheck oil level with the dipstick.
Note: The oil should be checked while engine is idling in neutral and transmission at operating temperature.
Oil Level Zones:
- Below MIN: Add oil immediately
- Between MIN and MAX: Optimal range
- Above MAX: Drain some oil—overfilling causes foaming, aeration, and heat retention
Step 10: Inspect for Leaks and Test Function
- With the engine still running, inspect around the:
- Drain plug
- Oil filter
- Fill cap
- Sight glass
- Cooler lines
- Look for signs of seepage, active drips, or air bubbles in the oil
Noise Check:
- Listen for whining, cavitation, or harsh engagement sounds—may indicate air pockets or insufficient oil.
Test Run:
- Perform a short sea trial (or engine load test) and check for:
- Smooth gear shifts
- No slippage or delayed engagement
- Proper temperature (no overheating)
Post-Service Checklist and Documentation
Once the oil change is complete, log the service to help track intervals and verify maintenance history.
Suggested Log Entry Format:
Date |
Engine Hours |
Service Performed |
Oil Type Used |
Filter Part # |
Notes |
| 04/30/2025 | 2,248 | Oil and filter change | SAE 30 Diesel Pro Synthetic | 107623DP | No metal debris, pressure normal |
Digital Fleet Tip: Use QR codes on filters or decals to log entries via mobile devices.
Troubleshooting Common Oil Change Issues
1. Oil Foaming or Aeration
- Cause: Overfilled oil, internal leaks, or cooler return issues
- Fix: Drain to correct level; inspect return lines and filter bypass
2. Oil Leak After Filter Change
- Cause: Double gasket, misaligned filter, or housing crack
- Fix: Remove filter, clean surfaces, reinstall with new gasket
3. Pressure Drop After Oil Change
- Cause: Air pocket in system or faulty filter
- Fix: Bleed system by shifting between gears; replace filter if needed
Summary: Proper Oil Change = Peak Performance for MG-5090A
Performing regular and thorough oil changes is not just routine maintenance—it’s your best defense against premature wear, unexpected breakdowns, and loss of transmission performance. For the Twin Disc MG-5090A, oil is the lifeblood of the system. Treating it that way ensures you’ll get thousands of hours of reliable service.
Key Takeaways:
- Always warm the transmission before draining
- Inspect and replace filter and gaskets
- Use only approved marine transmission oils
- Check oil level with engine idling in neutral
- Log all maintenance for service tracking
Parts catalog for Twin Disc MG50590A Marine Transmissions
Overhaul Plate Kit For Twin Disc MG5090A Marine Transmission
Gasket Kits For Twin Disc MG5090A Marine Transmission
Videos About Twin Disc Transmissions
6 Reasons Your Twin Disc Transmission Has Low Oil Pressure
7 Reasons Your Twin Disc Transmission Is Overheating
3 Reasons Your Clutch Plates in Your Twin Disc Transmission Are Making Excessive Noise
Bull Gear On A Twin Disc Transmission
Rebuilt Twin Disc Transmissions