

 Free US Calls: 1-888-433-4735
 International: 305-545-5588
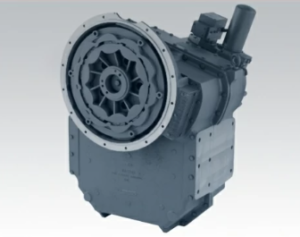
Reassembling the Twin Disc MG520 Marine Gear is a precision process. After hours of teardown, cleaning, and inspection, every component must now be reinstalled with accuracy, discipline, and attention to detail. This section provides a comprehensive reassembly guide, including best practices, general torque procedures, and step-by-step guidance for installing seals and gaskets without warping or leakage.
 Note: Always refer to the official Twin Disc MG520 OEM Service Manual for exact torque values, component clearances, and specific installation diagrams. This guide is a general framework optimized for real-world servicing while staying within the limits of legal usage and copyright compliance.
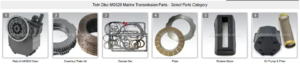
Parts Catalog for Twin Disc MG520 Marine Transmissions
Rebuilt Twin Disc MG520 Marine Transmissions
Plate Kit For Twin Disc MG520 Marine Transmission
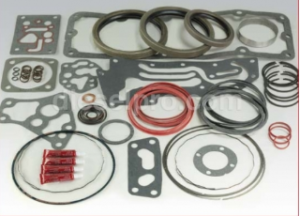
Gasket Kits For Twin Disc MG520 Marine Transmission
Best Practices for Reassembly For Twin Disc MG520 Marine Gear

1. Cleanliness Is Mandatory
Contamination is the number one cause of premature failure in reassembled marine transmissions. A speck of grit in a bearing seat or a stray metal shaving in the oil gallery can ruin an otherwise perfect overhaul.
Before You Begin:
- Wipe down all components with lint-free cloths soaked in solvent.
- Blow out oil passages, cooler lines, and galleries with compressed air.
- Keep parts organized by subassembly: input, clutch pack, output, etc.
- Store clean components on rubber mats, foam trays, or wrapped in plastic until ready for use.
- Use clean nitrile gloves to avoid oil contamination or fingerprint residue.
2. Dry Fit Critical Assemblies
Before applying sealants or torquing bolts:
- Dry-fit components to confirm:
- Correct part orientation
- Free movement of rotating shafts
- Proper alignment of bolt holes and mating surfaces
- This is especially important for:
- Clutch packs
- Pressure plates
- Shaft couplings
- Output flanges
- Valve bodies
3. Apply Assembly Lubricant Appropriately
- Use marine-grade assembly lube or transmission oil to lubricate:
- Bearings
- Shaft journals
- Gear teeth
- Clutch pistons
- Seal lips
- Avoid over-lubricating friction materials. Never get oil on friction plates or steel clutch plates.
4. Alignment Checks
Misalignment can cause:
- Shaft runout
- Clutch dragging
- Oil pump cavitation
- Premature bearing wear
How to Avoid It:
- Use a dial indicator to confirm shaft runout is within spec before final bearing preload is applied.
- Align:
- Input shaft to engine flywheel
- Output shaft to propeller shaft or shaft brake
- Control valves and actuator levers
- If shaft-to-shaft alignment cannot be confirmed visually, use laser alignment tools or feeler gauges at coupling faces.
5. Replace All Wear Items
Any of the following should never be reused during reassembly:
- Shaft seals
- O-rings
- Gaskets
- Snap rings (if distorted)
- Lock washers
- Friction plates (if thickness is below spec)
- Any bolt or plug showing thread deformation or corrosion
Always install a full overhaul kit, preferably from a trusted aftermarket provider like Diesel Pro Power.
Torque Sequences and Values (General Reference) For Twin Disc MG520 Marine Gear
Proper torque application is more than just tightening bolts—it’s about even clamping, gasket sealing, and component centering.
1. General Torque Guidelines (Non-Specific)
| Bolt Diameter | Grade 8 Bolt (ft-lbs) | Grade 5 Bolt (ft-lbs) |
| 1/4″-20 | 12 | 9 |
| 5/16″-18 | 25 | 17 |
| 3/8″-16 | 45 | 33 |
| 7/16″-14 | 70 | 55 |
| 1/2″-13 | 105 | 80 |
| 9/16″-12 | 150 | 115 |
| 5/8″-11 | 210 | 165 |
| 3/4″-10 | 375 | 300 |
ALWAYS check OEM manual for exact torque specs. Use these as general references only.
2. Recommended Torque Wrench Procedures
- Use a calibrated torque wrench capable of the correct torque range.
- Apply torque in three stages:
- Snug (hand-tight)
- Mid-range (~50% of final torque)
- Final torque
- Use crisscross or star patterns when torquing covers, housings, flanges, and valve bodies.
- After torquing, mark bolt heads with paint to verify which bolts have been completed.
3. Torque Application Tips
- Never torque dry bolts into aluminum or cast iron—use anti-seize or thread lubricant where appropriate.
- Be cautious with low-torque gaskets—over-torquing can crush or warp mating surfaces.
- Torque bolts only when both surfaces are fully flush—do not use torque to “pull in” misaligned parts.
Seal and Gasket Installation For Twin Disc MG520 Marine Gear
Proper seal and gasket installation is vital to ensure fluid containment, pressure integrity, and internal cleanliness. This is especially critical in the MG520’s high-pressure clutch circuits and rotating shaft assemblies.
1. Gasket Preparation and Installation
Gasket Types Found in MG520:
- Paper or Fiber Gaskets: Used between valve body covers, housing flanges, inspection ports.
- Cork-Rubber Composite: Rare; typically used on access panels.
- Metallic or Graphite Gaskets: Found in high-temperature zones or flange seals.
- O-Ring Gaskets: Installed in cooler ports, shaft bores, and control valve ports.
Installation Steps:
- Clean the Surface Thoroughly
- Use a plastic scraper to remove old material
- Finish with solvent-wipe (acetone or brake cleaner)
- Check for Flatness
- Use a straightedge across the gasket face
- If warped, machine or replace the mating surface
- Apply Sealant (Only If Recommended)
- Only apply RTV or anaerobic sealants if OEM instructions specify
- Avoid excessive application—squeeze-out can block oil passages
- Position Gasket Carefully
- Use alignment dowels or gasket adhesive to hold position
- Don’t overtighten bolts during initial seating
- Torque in Sequence
- Tighten evenly to ensure uniform gasket compression
- Tighten evenly to ensure uniform gasket compression
Common Mistakes to Avoid:
- Over-compressing paper gaskets—this causes early failure and weeping
- Applying sealant on gaskets not rated for it
- Allowing foreign material between gasket and metal
- Failing to re-torque after heat cycle (if specified)
2. Shaft Seal Installation
Seals are critical in the MG520 because they keep transmission oil inside and water/dirt out, especially around rotating input/output shafts.
Types of Shaft Seals:
- Lip Seals (Radial Shaft Seals): Used for both input and output shafts
- Face Seals (Rare in MG520): Found in some PTO variants
Installation Procedure:
- Clean and Deburr Shaft and Bore
- Use fine emery cloth to remove any sharp edges
- Polish seal bore with solvent and soft cloth
- Apply Light Oil
- Coat the shaft and seal inner lip with marine gear oil
- Coat the shaft and seal inner lip with marine gear oil
- Use a Seal Driver
- Tap the seal evenly into place using a tool that contacts only the outer casing
- Do not use a socket or hammer directly—it risks deformation
- Check for Flush Fit
- Seal should be flush or slightly recessed—never proud of the housing face
- Seal should be flush or slightly recessed—never proud of the housing face
- Verify Lip Contact
- Rotate shaft to ensure smooth movement
- Lip should maintain gentle contact without binding
Post-Installation Tip:
Allow seals to rest for 30 minutes before running the unit. This allows the rubber to settle and prevents lip roll-over during initial shaft spin-up.
3. O-Ring and Valve Body Seals
O-rings are used in cooler ports, control valves, and hydraulic pistons. Even minor nicks or swelling will cause internal pressure loss or leakage.
O-Ring Installation Tips:
- Use only O-rings rated for petroleum-based oils (NBR or Viton).
- Lightly coat O-rings with assembly lube or oil before seating.
- Install by rolling into place—not stretching.
- Avoid sharp tools or picks that can nick the rubber.
- Seat O-rings evenly and confirm they do not twist or bulge.
Sealant Application Dos and Don’ts
 Use Sealant When:
- Installing inspection plugs, pipe threads, or cooler fittings
- OEM specifies RTV or anaerobic sealants in gear joint interfaces
- Shaft spline protection is needed (anti-seize with sealing properties)
 Don’t Use Sealant:
- On paper gaskets unless OEM says so
- On bearing seats or bushing bores
- As a substitute for proper gaskets
- Around shaft seals (seal installs dry—sealant can damage the lip)
Final Checks Before Startup For Twin Disc MG520 Marine Gear
Before powering up the transmission, perform these essential checks:
- Confirm Torque Application
- Check every major bolt, especially:
- Housing flanges
- Gear covers
- Valve body bolts
- Shaft nuts
- Check every major bolt, especially:
- Verify Seal and Gasket Fit
- Look for visible gaps, pinched edges, or misaligned bolt patterns
- Look for visible gaps, pinched edges, or misaligned bolt patterns
- Rotate Input/Output Shafts
- Ensure free movement with no binding or abnormal resistance
- Ensure free movement with no binding or abnormal resistance
- Fill with Recommended Oil
- Use SAE 30W or 40W non-detergent transmission oil (per MG520 spec)
- Verify oil level on dipstick or sight glass
- Prime the Oil Pump (if necessary)
- Some gear designs require pre-lubing of internal passages
- Some gear designs require pre-lubing of internal passages
- Reconnect and Secure All Lines
- Hydraulic controls, cooling lines, and electrical connections
- Hydraulic controls, cooling lines, and electrical connections
- Bleed Air from System
- Run the gear at idle and shift through forward/reverse to remove air pockets
- Recheck oil level after running
Conclusion: Reassembly Is a Test of Precision and Patience For Twin Disc MG520 Marine Gear
Reassembling the Twin Disc MG520 isn’t just about putting parts back together—it’s about restoring factory-level integrity with every turn of the wrench. The attention you give to cleanliness, alignment, torque, and sealing directly determines the success of your service.
By following the best practices in this guide—alongside torque procedures and smart seal/gasket strategies—you’ll ensure your MG520 delivers trouble-free operation, smooth shifting, and years of reliable marine propulsion.
Need a full rebuild kit, torque specs guide, or premium seals for your Twin Disc MG520? Visit Diesel Pro Power for trusted aftermarket parts and support.
Rebuilt Twin Disc MG520 Marine Transmissions
Plate Kit For Twin Disc MG520 Marine Transmission
Gasket Kits For Twin Disc MG520 Marine Transmission
Videos About Twin Disc Transmissions
6 Reasons Your Twin Disc Transmission Has Low Oil Pressure
7 Reasons Your Twin Disc Transmission Is Overheating
3 Reasons Your Clutch Plates in Your Twin Disc Transmission Are Making Excessive Noise
Bull Gear On A Twin Disc Transmission
Rebuilt Twin Disc Transmissions