

 Free US Calls: 1-888-433-4735
 International: 305-545-5588
Parts Catalog for Twin Disc MG5091 Marine Transmissions
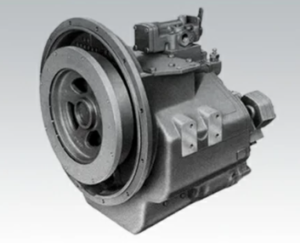
Rebuilt Twin Disc MG5091 Marine Transmissions
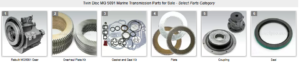
Plate Kit For Twin Disc MG5091 Marine Transmission
Gasket Kits For Twin Disc MG5091 Marine Transmission
The Twin Disc MG-5091 Marine Gear is a robust, heavy-duty marine transmission designed for continuous use in commercial, industrial, and offshore marine applications. Once disassembled and inspected, proper reassembly is essential to ensure the gearbox returns to full operational performance and service longevity.
Reassembly is not just the reverse of disassembly — it’s a precision procedure involving component inspection, measured tolerances, correct torque sequences, and cleanliness standards. A small oversight during reassembly can cause oil leaks, clutch failures, premature wear, or total transmission loss within hours of operation.
This comprehensive 5,000-word guide walks through the full reassembly process: from parts washing and surface prep, to seal and gasket installation, to final bolt torques and function tests. Every section is structured to give mechanics the insight needed to confidently and correctly rebuild the MG-5091.
Cleaning and Preparation for Twin Disc MG-5091 Marine Gear

Before reassembly begins, all parts — whether reused or replaced — must be thoroughly cleaned and inspected. Cleanliness is one of the most important factors in transmission rebuilding. Residual dirt, metal shavings, old sealants, or oil sludge can compromise pressure lines, scar sealing surfaces, and shorten component life.
Parts Washing
All disassembled components must be washed in clean solvent or parts washer fluid. The goal is to remove:
- Oil sludge and varnish
- Clutch debris
- Metal shavings or rust
- Dirt or old gasket remnants
Cleaning Process:
- Initial Degreasing:
- Use a parts washer or solvent tank with flow-through brush.
- For smaller parts, ultrasonic cleaning is ideal.
- Soak Heavy Components:
- Let housing, shafts, and large covers soak for 15–30 minutes if heavily contaminated.
- Let housing, shafts, and large covers soak for 15–30 minutes if heavily contaminated.
- Use Nylon Brushes:
- Avoid wire brushes on machined surfaces to prevent scoring.
- Use pipe brushes for internal galleries and oil ports.
- Compressed Air Drying:
- Blow off all moisture, especially in blind holes, bearing bores, and internal passages.
- Blow off all moisture, especially in blind holes, bearing bores, and internal passages.
- Final Wipe Down:
- Use lint-free cloths to remove residue.
- Use lint-free cloths to remove residue.
Pro Tip: Clean parts should be stored on clean shop towels or rubber mats, never placed directly on workbenches where grit can be picked up.
Inspection Before Reuse
Clean parts must be visually and dimensionally inspected again before reassembly, even if they were inspected during teardown.
Reinspect the Following:
| Part | What to Check |
| Clutch plates | Flatness, wear limit, glazing |
| Shafts | Journal scoring, runout, endplay |
| Bearings | Smoothness, preload clearance |
| Gears | Tooth condition, pitting, backlash fit |
| Housings | Flat sealing surfaces, no cracks |
| Snap rings | No distortion or loss of spring tension |
| Keyways | No rounding, proper key fit |
| Threads | No galling or stretch, clean bolt holes |
If a component is marginal, replace it — rebuilding a marine transmission is not the time to take shortcuts.
Gasket and Seal Installation for Twin Disc MG-5091 Marine Gear
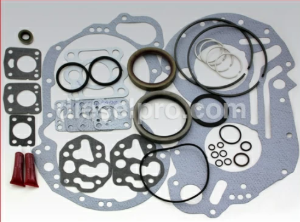
Once the parts are clean and inspected, begin installing seals, O-rings, and gaskets. These are critical in preventing oil leaks, maintaining hydraulic pressure, and ensuring clutch actuation.
Always use new gaskets and seals during a rebuild, even if the old ones appear undamaged.
Recommended Sealants
Sealants are used to support mechanical sealing surfaces and fill microscopic imperfections between metal surfaces.
Use these sealants in the MG-5091:
| Location | Sealant Type | Recommended Products |
| Flange joints | Anaerobic flange sealant | Loctite 518, Permatex Anaerobic |
| Pipe threads | Thread sealant with PTFE | Loctite 545, RectorSeal T Plus 2 |
| Bearing caps | RTV silicone (sparingly) | Permatex Ultra Black |
| Gasket surfaces | Gasket adhesive spray (optional) | Permatex High Tack Spray |
Avoid silicone sealants on hydraulic ports or near clutch surfaces. Use anaerobic or OEM sealants only.
Seal and Gasket Installation Techniques
Shaft Seals:
- Use seal installer tools or deep sockets of matching diameter.
- Pre-lubricate lips with assembly grease or ATF.
- Install seals flush or slightly recessed (per OEM spec).
- Always install seals square to bore — crooked seals leak immediately.
Gaskets:
- Clean and dry all gasket mating surfaces.
- Apply light coating of sealant spray or gasket adhesive to hold in place.
- Use alignment dowels if available.
- Never overtighten fasteners — torque to spec to avoid gasket squeeze-out.
O-Rings:
- Always coat O-rings with oil or assembly lube.
- Verify the correct size and hardness (durometer).
- Do not stretch excessively — damaged O-rings will leak under pressure.
Final Assembly and Testing for Twin Disc MG-5091 Marine Gear
With all seals and gaskets installed, begin the final mechanical reassembly of the MG-5091. This step must be completed methodically, using factory torque specs and lubrication techniques to ensure the gearbox is structurally sound and pressure-tight.
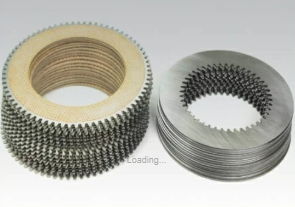
Clutch Pack Reassembly
- Install clutch hub or piston into drum.
- Begin stacking friction and steel plates, alternating as per spec.
- Use transmission assembly grease to pre-lube each plate lightly.
- Ensure tab alignment — some plates are directional.
- Install retaining ring using snap ring pliers.
Check clutch pack end clearance — usually between 0.015″ and 0.030″, depending on model. Too tight and the clutch drags; too loose and it slips.
Bearing and Shaft Installation
- Apply clean gear oil or assembly grease to shaft journals.
- Use a dead-blow hammer to gently seat shafts into place.
- Install new bearings and torque retainers:
- Torque values: see service manual; common values are 50–90 ft-lbs for bearing retainers.
- Torque values: see service manual; common values are 50–90 ft-lbs for bearing retainers.
- Rotate shaft by hand to confirm:
- Smooth movement
- No binding
- Correct endplay (measured with dial indicator)
Gear and Planetary Assembly
- Install planetary gear set (if applicable) into carrier.
- Apply gear oil or moly lube to gear teeth.
- Verify backlash between gear pairs:
- Acceptable range: 0.004″ to 0.010″
- Use dial indicator to measure backlash
- Install thrust washers and gear spacers as needed.
- Use new retaining hardware and apply thread locker (Loctite 242 or 271).
Final Housing Reassembly
- Clean flange faces one final time.
- Apply anaerobic sealant to housing flange (continuous bead).
- Carefully lower upper housing onto lower case using dowels.
- Install housing bolts and torque in cross pattern.
Typical Housing Bolt Torque:
| Bolt Size | Torque Range |
| 3/8”-16 | 30–35 ft-lbs |
| 7/16”-14 | 50–55 ft-lbs |
| 1/2”-13 | 75–85 ft-lbs |
Retorque bolts after 1 hour if using anaerobic sealant.
Control Valve and Cover Installation
- Install valve body or manual shift lever with clean O-rings.
- Torque valve fasteners per spec (typically 60–80 in-lbs).
- Reinstall pressure switches or solenoids and apply thread sealant.
- Use a torque screwdriver if required to avoid over-tightening.
Dipstick, Breather, and Cooler Line Reinstallation
- Replace dipstick O-ring if swollen or cracked.
- Install new breather cap.
- Flush cooler lines before reattaching — debris can contaminate fresh oil.
- Tighten hydraulic fittings with thread sealant to 20–30 ft-lbs.
Pre-Lube and Fill
- Add oil to the transmission until dipstick reads full.
- Rotate input shaft by hand several revolutions to circulate oil.
- Allow system to sit for 10 minutes, then recheck oil level.
Function Testing the Reassembled MG-5091
Before reinstalling the gearbox in the vessel, perform bench tests and static pressure tests to verify proper operation.
Static Pressure Test
- Connect a hydraulic pressure test gauge to the shift port.
- Manually actuate shift lever (or energize solenoid).
- Confirm engagement pressure:
- Forward/Reverse: 120–250 psi (depending on load spec)
- Neutral: 40–60 psi
- Watch for pressure decay — indicates internal leakage.
Gear Engagement Test
- With shift lever in forward or reverse, rotate input shaft.
- Output shaft should turn smoothly in proper direction.
- Return to neutral and check for free movement of input shaft.
No load should be felt in neutral. Binding = misalignment or clutch drag.
No-Leak Test
- Let the transmission sit fully assembled with oil for 24 hours.
- Check all flanges, plugs, and shaft seals for drips.
- Rotate shafts again and check for wetness at seal lips.
Vibration Check (Post-Install)
After installation in the vessel:
- Run engine at idle for 5–10 minutes
- Check for:
- Oil pressure rise
- Smooth clutch engagement
- No metallic sounds
- No oil seepage
Recheck bolt torques and alignment after first 10 hours of operation.
Summary
Reassembly Procedures for Twin Disc MG-5091 Marine Gear
Rebuilding and reassembling the Twin Disc MG-5091 requires more than mechanical skill — it requires precision, discipline, and a commitment to cleanliness and accuracy. When done right, the result is a transmission that delivers years of high-performance service in the harshest marine environments.
Key Reassembly Steps:
- ✅ Clean and inspect all components — reuse only within tolerance
- ✅ Use only new gaskets, seals, and clutch plates
- ✅ Apply proper sealants and pre-lube techniques
- ✅ Torque bolts in proper sequence using calibrated tools
- ✅ Pressure test clutch engagement and monitor for leaks before install
- ✅ Recheck fluid level, alignment, and performance after initial run
By following these procedures carefully, you’ll reduce risk, minimize comebacks, and restore the MG-5091 to like-new performance — whether in a tugboat, trawler, or industrial support vessel.
Rebuilt Twin Disc MG5091 Marine Transmissions
Plate Kit For Twin Disc MG5091 Marine Transmission
Gasket Kits For Twin Disc MG5091 Marine Transmission
Videos About Twin Disc Transmissions
6 Reasons Your Twin Disc Transmission Has Low Oil Pressure
7 Reasons Your Twin Disc Transmission Is Overheating
3 Reasons Your Clutch Plates in Your Twin Disc Transmission Are Making Excessive Noise
Bull Gear On A Twin Disc Transmission
Rebuilt Twin Disc Transmissions