

 Free US Calls: 1-888-433-4735
 International: 305-545-5588
The Twin Disc MG506 Marine Gear is built for strength, durability, and performance in marine environments. However, even with regular maintenance and careful operation, wear and tear are inevitable over time. A complete rebuild or overhaul becomes essential when the transmission shows significant signs of deterioration, including performance issues, fluid leaks, or internal component wear.
This comprehensive guide will cover all aspects of rebuilding and overhauling the MG506, including identifying symptoms, gathering the right tools, disassembling and inspecting components, replacing worn parts, and reassembling the transmission for reliable long-term performance.
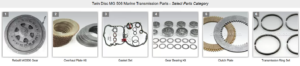
Parts Catalog for Twin Disc MG506 Marine Transmissions
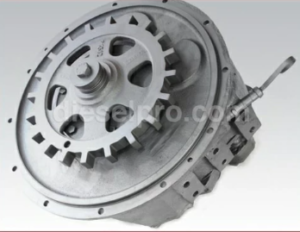
Rebuilt Twin Disc MG506 Marine Transmissions
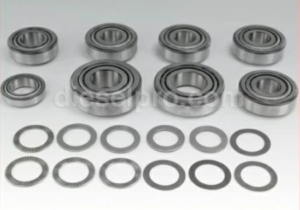
Bearings For Twin Disc MG506 Marine Transmissions
Plate Kit For Twin Disc MG506 Marine Transmission
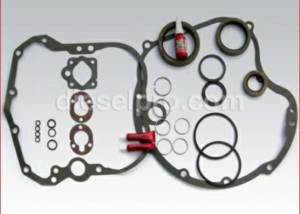
Gasket Kits For Twin Disc MG506 Marine Transmission
Symptoms Indicating Rebuild Requirements
Before committing to an overhaul, it’s essential to recognize when the Twin Disc MG506 Marine Gear requires a rebuild. Operating a failing transmission can lead to catastrophic damage, higher repair costs, and vessel downtime. The following symptoms are key indicators that a rebuild is necessary.
1. Persistent Fluid Leaks
- Repeated Leaks: If fluid leaks persist despite replacing seals and tightening connections, it may indicate worn internal seals or damaged housing components.
- Severe Loss: Rapid and significant fluid loss can damage internal components due to insufficient lubrication.
2. Difficulty Shifting Gears
- Hard Shifting: Resistance when shifting into Forward, Neutral, or Reverse may indicate internal wear on synchronizers or clutch components.
- Delayed Engagement: If the transmission takes longer than usual to engage a gear, internal hydraulic or mechanical components may be worn.
3. Frequent Slippage
- Gear Slippage: If the transmission slips out of gear or cannot maintain consistent propulsion under load, this is a sign of internal clutch wear or fluid pressure issues.
4. Overheating During Normal Operation
- Consistent Overheating: Persistent overheating, even after fluid changes or cooling system maintenance, may indicate internal blockages or damage that requires disassembly for thorough inspection.
- Burnt Fluid Smell: This can indicate excessive friction or overheating within the clutch assembly.
5. Unusual Noises
- Grinding or Knocking Sounds: Repeated grinding, knocking, or whining noises indicate internal component failure, such as worn gears or bearings.
- Vibration Noises: Excessive vibration during operation often points to misalignment or worn dampening components.
6. Metal Shavings in Fluid
- Contaminated Fluid: Discovering metal shavings during fluid changes is a strong sign of internal wear. Continued operation will accelerate damage.
Required Tools and Setup
Successfully rebuilding the Twin Disc MG506 Marine Gear requires the right tools, workspace, and preparation. This section outlines the essential equipment and setup recommendations.
1. Basic Tools

- Socket set (metric and standard sizes)
- Torque wrench (calibrated for accuracy)
- Open-end and box-end wrenches
- Screwdrivers (flathead and Phillips)
- Allen wrenches or hex keys
- Snap ring pliers
2. Specialized Tools

- Bearing Pullers: Essential for removing internal bearings without damaging them.
- Seal Drivers: For the safe installation of seals.
- Dial Indicator: To check shaft runout and alignment.
- Feeler Gauges: For precise measurements of tolerances.
- Hydraulic Press: For pressing in bearings and bushings.
3. Safety Equipment

- Safety glasses
- Protective gloves
- Hearing protection (for using power tools)
- Steel-toe boots
4. Workspace Setup

- Clean Surface: Work in a clean, organized, and well-lit environment.
- Parts Table: Use a dedicated table for organizing components during disassembly.
- Parts Cleaner: Use a solvent tank or ultrasonic cleaner for removing contaminants.
- Labeled Storage: Keep bolts and smaller parts in labeled containers to avoid confusion during reassembly.
Component Disassembly Overview
Careful disassembly is crucial for both assessing component conditions and ensuring accurate reassembly. The process should be performed methodically, keeping track of parts and configurations.
1. Prepare the Transmission for Disassembly
- Drain Fluid: Remove the drain plug and allow all fluid to drain completely.
- Clean Exterior: Remove dirt and debris to prevent contamination during disassembly.
- Inspect for External Wear: Check for obvious damage or wear that could influence disassembly procedures.
2. Remove External Components
- Disconnect Fluid Lines: Detach any hydraulic lines connected to the oil cooler or other components.
- Remove Control Linkages: Carefully remove linkage assemblies, ensuring no parts are bent or damaged.
- Detach Mounting Brackets: Remove the mounting bolts, taking care to support the transmission with a lift or jack.
3. Disassemble Major Components
- Clutch Assemblies:
- Remove covers and inspect clutches for wear, burning, or damage.
- Use snap ring pliers to remove retaining rings.
- Remove clutch discs and inspect each for damage.
-
Gears and Bearings:
- Carefully remove gear assemblies using a puller if necessary.
- Inspect gear teeth for chipping, wear, or deformation.
- Remove bearings with a press or puller. Check for scoring or uneven wear.
-
Seals and Gaskets:
- Pry out old seals and discard them.
- Remove all gaskets carefully to avoid damage to the sealing surfaces.
4. Organize and Label Parts
- Arrange all removed components in sequence to aid reassembly.
- Label similar parts to avoid confusion.
- Note any irregularities or signs of wear for replacement consideration.
Parts Inspection and Replacement Guidelines
Thorough inspection of each component is crucial to determining whether it can be reused or requires replacement.
1. Clutch Components

- Clutch Plates: Inspect for scoring, discoloration, or excessive wear. Replace if worn beyond manufacturer specifications.
- Springs and Retainers: Replace any weak or deformed springs.
2. Bearings and Bushings
- Visual Inspection: Look for pitting, scoring, or deformation.
- Rotation Check: Spin each bearing by hand. Any roughness indicates the need for replacement.
- Fitment Check: Ensure each bearing fits correctly into its housing without excessive play.
3. Gears and Shafts
- Check Gear Teeth: Replace gears showing chipping, cracking, or severe wear.
- Inspect Shafts: Replace shafts that are bent, cracked, or worn.
4. Seals and Gaskets
- Replace All Seals: Always use new, manufacturer-approved seals.
- Inspect Gasket Surfaces: Replace gaskets and ensure mating surfaces are clean and free of debris.
5. Fasteners and Bolts
- Replace any damaged or corroded fasteners.
- Use manufacturer-approved torque specifications for all replacements.
Reassembly Procedures
Correct reassembly is essential to restore the MG506 to optimal working condition.
1. Clean Components
- Wash all parts with a solvent and ensure they are thoroughly dried.
- Remove any debris, oil residues, or corrosion before proceeding.
2. Install Bearings and Gears
- Press new bearings into place using a hydraulic press.
- Install gears, ensuring they are properly aligned and seated.
- Lubricate moving parts to prevent dry starts.
3. Assemble Clutch Components
- Install clutch plates in the correct sequence.
- Ensure all retaining rings and springs are correctly seated.
4. Install Seals and Gaskets
- Apply a light coat of lubricant to seals before installation.
- Fit gaskets carefully to ensure proper alignment.
5. Reconnect External Components
- Attach fluid lines, control linkages, and mounting brackets.
- Secure all bolts to the manufacturer’s torque specifications.
Post-Rebuild Testing and Adjustments
Testing the MG506 after reassembly ensures it performs reliably before being returned to service.
1. Initial Testing
- Start Engine: Run the engine at idle to circulate fluid.
- Monitor for Leaks: Check all seals, gaskets, and fittings.
- Check Fluid Levels: Top off as necessary.
2. Operational Testing
- Shift through Forward, Neutral, and Reverse to confirm smooth engagement.
- Monitor fluid pressure, temperature, and vibration levels.
3. Make Final Adjustments
- Adjust linkage as needed for smooth shifting.
- Tighten any components that show signs of loosening.
4. Long-Term Monitoring
- After the first 50–100 hours, conduct a follow-up inspection.
- Check for fluid leaks, gear noise, and smooth operation.
Conclusion
A thorough rebuild of the Twin Disc MG506 Marine Gear restores its functionality and extends its lifespan. By following detailed disassembly, inspection, replacement, and reassembly procedures, operators can ensure the transmission returns to peak performance. Proper post-rebuild testing confirms that the overhaul is successful, reducing the risk of failure during critical operations.
Rebuilt Twin Disc MG506 Marine Transmissions
Bearings For Twin Disc MG506 Marine Transmissions
Plate Kit For Twin Disc MG506 Marine Transmission
Gasket Kits For Twin Disc MG506 Marine Transmission
Videos About Twin Disc Transmissions
6 Reasons Your Twin Disc Transmission Has Low Oil Pressure
7 Reasons Your Twin Disc Transmission Is Overheating
3 Reasons Your Clutch Plates in Your Twin Disc Transmission Are Making Excessive Noise
Bull Gear On A Twin Disc Transmission
Rebuilt Twin Disc Transmissions