

 Free US Calls: 1-888-433-4735
 International: 305-545-5588

The Twin Disc MG507 Marine Gear is renowned for its durability and performance in marine applications. However, like all mechanical systems, it may require repairs due to wear, environmental factors, or operational stresses. Proper repair procedures are crucial to restore functionality and extend the lifespan of the equipment.
This comprehensive guide covers the disassembly process and key considerations, component inspection and replacement guidelines, reassembly instructions, and torque specifications and alignment tips for the Twin Disc MG507 Marine Gear.
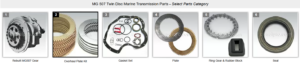
Parts Catalog for Twin Disc MG507 Marine Transmissions
Rebuilt Twin Disc MG507 Marine Transmissions
Plate Kit For Twin Disc MG507 Marine Transmission
Gasket Kits For Twin Disc MG507 Marine Transmission
Disassembly Process and Key Considerations
Disassembling the Twin Disc MG507 Marine Gear requires meticulous attention to detail to prevent damage and ensure successful reassembly. The following steps outline the disassembly process, highlighting critical considerations at each stage.
1. Preparation
- Gather Necessary Tools and Equipment:
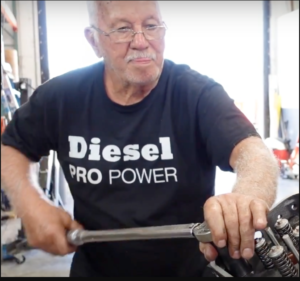
Technician uses a torque wrench
- Standard and Metric Wrenches and Sockets: For various bolt and nut sizes.
- Torque Wrench: To ensure proper torque application during reassembly.
- Pry Bars and Pullers: For removing tightly fitted components.
- Soft Mallet: To gently tap components without causing damage.
- Seal Pullers and Bearing Extractors: For removing seals and bearings.
- Clean Work Area: A spacious, clean, and well-lit area to organize parts systematically.
- Safety Precautions:

Technician With Proper Eye & Ear Protection
- Personal Protective Equipment (PPE): Safety glasses, gloves, and steel-toed boots.
- Lockout/Tagout Procedures: Ensure the engine is off, and the power source is disconnected to prevent accidental engagement.
- Environmental Considerations: Use spill containment measures to manage oil and fluid leakage.
2. Draining Fluids
Before disassembly, drain all fluids to prevent spills and facilitate a cleaner work environment.
- Drain Transmission Oil:
- Locate the Drain Plug: Positioned at the lowest point of the transmission casing.
- Remove the Plug: Use the appropriate socket or wrench.
- Collect the Oil: Allow the oil to drain into a suitable container for proper disposal or recycling.
- Drain Hydraulic Fluid:
- Access Hydraulic Reservoir: Identify and open the reservoir drain valve or plug.
- Drain the Fluid: Ensure complete drainage to avoid contamination during disassembly.
3. Removing External Components
Detach external components to access the internal parts of the marine gear.
- Disconnect Control Linkages:
- Shift and Throttle Linkages: Mark their positions for accurate reassembly and disconnect them carefully.
- Remove Cooling Lines:
- Oil Cooler Connections: Disconnect inlet and outlet lines, capping them to prevent contamination.
- Detach Electrical Connections:
- Sensors and Wiring Harnesses: Label each connection to ensure correct reassembly.
4. Separating the Marine Gear from the Engine
Isolate the marine gear from the engine to facilitate internal component access.
- Support the Marine Gear:
- Use a Hoist or Jack: Support the weight of the marine gear to prevent strain on mounting bolts.
- Remove Mounting Bolts:
- Engine Bell Housing Bolts: Loosen and remove bolts connecting the marine gear to the engine.
- Slide the Marine Gear Away:
- Careful Separation: Gently separate the marine gear from the engine, ensuring not to damage the input shaft.
5. Disassembling the Marine Gear Housing
Open the housing to access internal components.
- Remove the Rear Cover:
- Unbolt the Cover: Use the appropriate tools to remove bolts securing the rear cover.
- Pry Gently: If necessary, use a soft mallet to tap and loosen the cover.
- Extract Internal Assemblies:
- Clutch Packs, Gears, and Shafts: Carefully remove each component, noting their orientation and assembly order.
- Label and Organize Parts:
- Systematic Arrangement: Place components on a clean surface in the order of removal, labeling them for reference during reassembly.
Component Inspection and Replacement Guidelines
Thorough inspection of each component is vital to identify wear or damage and determine the need for replacement. The following guidelines assist in evaluating the condition of the marine gear’s parts.
1. Clutch Assemblies
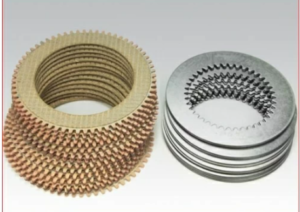
- Friction Plates:
- Check for Wear: Measure thickness against manufacturer specifications.
- Inspect for Glazing or Burn Marks: Indications of overheating or slippage.
- Steel Plates:
- Look for Warping or Scoring: Deformations can affect clutch performance.
- Springs and Retainers:
- Assess for Fatigue or Damage: Replace if deformed or weakened.
2. Gears and Shafts
- Gear Teeth:
- Examine for Pitting, Chipping, or Excessive Wear: Damaged gears can lead to operational failures.
- Bearings:
- Rotate to Detect Roughness or Play: Replace bearings exhibiting wear or damage.
- Shafts:
- Inspect for Bends or Surface Damage: Ensure shafts are straight and free from defects.
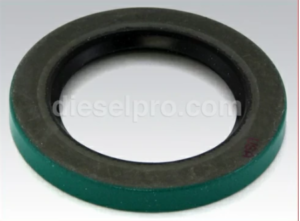
3. Seals and Gaskets
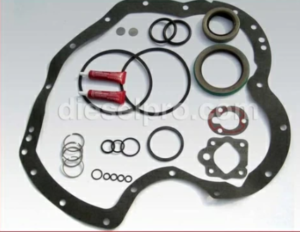
- Oil Seals:
- Check for Hardening, Cracks, or Leaks: Replace compromised seals to prevent fluid loss.
- Gaskets:
- Inspect for Tears or Deformations: Ensure gaskets can provide proper sealing upon reassembly.
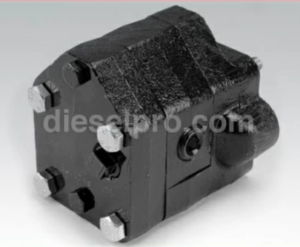
4. Hydraulic Components
- Pumps:
- Test for Proper Functioning: Verify pressure output meets specifications.
- Valves:
- Check for Blockages or Wear: Clean or replace as necessary.
5. Housing and Covers
- Inspect for Cracks or Corrosion:
- Structural Integrity: Ensure the housing is free from defects that could compromise strength.
- Check Mating Surfaces:
- Ensure Flatness and Cleanliness: Proper sealing requires clean, flat surfaces.
Reassembly Instructions
Reassembling the Twin Disc MG507 Marine Gear requires precision and adherence to manufacturer guidelines to ensure optimal performance. The following steps outline the reassembly process.
1. Preparing Components
- Clean All Parts:
- Remove Debris and Contaminants: Use appropriate cleaning agents to ensure all components are free from dirt and old lubricants.
- Replace Worn Components:
- Install New Seals, Gaskets, and Bearings: Replace any parts identified as worn or damaged during inspection.
2. Assembling Internal Components
- Install Gears and Shafts:
- Follow Manufacturer’s Sequence: Refer to the service manual for the correct order of installation.
- Ensure Proper Engagement: Align gears and shafts accurately to prevent misalignment.
- Assemble Clutch Packs:
- Alternate Friction and Steel Plates: Stack according to specifications, ensuring correct orientation.
- Install Springs and Retainers: Secure components as per guidelines.
3. Sealing the Housing
Proper sealing is critical to prevent oil leaks and ensure the integrity of the marine gear assembly. Follow these steps to ensure accurate sealing of the Twin Disc MG507 Marine Gear housing.
- Apply Gaskets and Seals:
- Position Accurately: Ensure that all gaskets and seals are correctly aligned on their designated surfaces. Misaligned gaskets can lead to leaks.
- Use Sealant if Necessary: Apply a thin layer of manufacturer-approved sealant to gasket surfaces where specified. Avoid excessive use, as surplus material can enter the internal system and cause blockages.
- Inspect Sealing Surfaces: Check that all surfaces are clean, dry, and free from debris or oil before sealing.
- Attach Rear Cover:
- Align the Rear Cover Correctly: Carefully align the rear cover to the main housing to avoid pinching the gasket.
- Insert Bolts: Place the bolts through the rear cover into their respective holes.
- Hand-Tighten Bolts: Start by hand-tightening the bolts to ensure correct threading.
- Torque Bolts Gradually: Using a torque wrench, tighten the bolts in a crisscross pattern to evenly distribute pressure. Refer to the manufacturer’s torque specifications for accuracy.
- Check Sealing Integrity:
- After tightening, inspect the joint for any visible gaps or misalignments.
- If using sealant, allow the recommended curing time before proceeding.
4. Reconnecting External Components
With the internal components properly sealed, it’s time to reconnect the external components.
- Reattach Cooling Lines:
- Inspect Hoses and Fittings: Replace any worn or damaged hoses.
- Reconnect Inlet and Outlet Lines: Securely tighten the oil cooler’s inlet and outlet connections.
- Check for Leaks: Pressurize the cooling system and observe for leaks.
- Reconnect Hydraulic Lines:
- Attach Hoses: Secure hydraulic hoses to their respective ports.
- Check for Alignment: Ensure that the hoses are free from kinks or bends that could impede flow.
- Tighten Fittings: Use appropriate tools to ensure leak-free connections.
- Reinstall Control Linkages:
- Align Linkages to Original Marks: Refer to the markings made during disassembly for accurate repositioning.
- Secure with Fasteners: Tighten all bolts and check for smooth, responsive movement.
- Reconnect Electrical Connections:
- Attach Sensors and Wiring Harnesses: Securely connect each wire and verify continuity.
- Check for Corrosion: Clean contacts if necessary to ensure strong electrical connections.
5. Refilling Fluids and Initial System Check
With the marine gear reassembled, it’s essential to refill the necessary fluids and conduct an initial system check.
-
Refill with Lubrication Oil:
- Use Recommended Oil: Fill the gear housing with the specified type and quantity of lubrication oil.
- Check Oil Level: Use the dipstick to confirm the correct level. Avoid overfilling.
- Inspect for Leaks: Observe the sealed areas and fittings for any signs of leaks during the filling process.
- Refill Hydraulic System:
- Use Approved Hydraulic Fluid: Fill the hydraulic system to the correct level using manufacturer-specified fluid.
- Bleed the System: Remove air from the system to ensure smooth hydraulic operation.
- Refill Cooling System:
- Top Up Coolant: Ensure that the cooling system is filled with clean, uncontaminated coolant.
- Check Flow: Verify that the coolant circulates freely and there are no blockages.
- Initial Operation Check:
- Rotate Shafts by Hand: Before starting the engine, rotate the propeller shaft manually to check for smooth movement.
- Start Engine and Observe: Run the engine at idle and monitor the marine gear for oil pressure, leaks, and unusual noises.
- Check Oil Temperature: Confirm that the oil reaches optimal operating temperature without overheating.
Torque Specifications and Alignment Tips
Adhering to correct torque specifications and ensuring precise alignment are essential to preventing mechanical failures.
1. Torque Specifications
Incorrect torque can lead to component failure, leaks, or operational inefficiencies. Always use a calibrated torque wrench and follow the manufacturer’s specifications.
| Component | Torque Specification |
| Housing Bolts | 85-95 ft-lbs |
| Rear Cover Bolts | 70-80 ft-lbs |
| Hydraulic Fittings | 40-50 ft-lbs |
| Coupling Bolts | 100-110 ft-lbs |
| Control Linkage Fasteners | 50-60 ft-lbs |
Note: Always consult the OEM manual for the most accurate and up-to-date torque specifications.
2. Alignment Tips
Proper alignment is critical to reducing vibration, enhancing performance, and preventing premature wear.
- Propeller Shaft Alignment:
- Check Using a Dial Indicator: Measure for radial and axial misalignment. Tolerances should be within 0.002 inches for marine applications.
- Adjust as Necessary: Use shims under the mounts to correct misalignment.
- Recheck After Tightening: After securing bolts, remeasure to confirm alignment.
- Coupling Alignment:
- Use a Straight Edge: Place across the coupling faces to ensure flatness.
- Measure Gap Around Coupling: Use feeler gauges to measure the gap, ensuring it is consistent across all sides.
- Engine to Gear Alignment:
- Measure Using Dial Indicators: Ensure the engine and marine gear are aligned within the manufacturer’s specified tolerances.
- Adjust Mounts: Correct discrepancies by adjusting the engine or gear mounts.
3. Final Alignment Check
- Perform a Rotational Test: Run the gear at low speeds and monitor for vibrations.
- Check for Noise: Unusual sounds can indicate misalignment or improperly torqued bolts.
- Re-Verify Fluid Levels: After the initial test, recheck all fluid levels and top off if necessary.
Post-Reassembly Maintenance Tips
Ensuring longevity after reassembly is just as important as the repair process itself.
- Regular Inspections:
- Inspect Seals and Connections: Frequently check for leaks or loose fittings.
- Monitor Fluid Levels: Maintain proper oil, hydraulic, and coolant levels.
- Scheduled Fluid Changes:
- Replace oil and hydraulic fluid based on operational hours or at least every six months.
- Monitor for Noise and Vibration:
- Conduct regular operational tests to detect any early signs of misalignment or component wear.
- Keep Detailed Logs:
- Record all repair actions, torque values, and fluid specifications for future reference.
Disclaimer
For more detailed specifications, diagrams, and advanced repair techniques, always refer to the OEM service manual.
Rebuilt Twin Disc MG507 Marine Transmissions
Plate Kit For Twin Disc MG507 Marine Transmission
Gasket Kits For Twin Disc MG507 Marine Transmission
Videos About Twin Disc Transmissions
6 Reasons Your Twin Disc Transmission Has Low Oil Pressure
7 Reasons Your Twin Disc Transmission Is Overheating
3 Reasons Your Clutch Plates in Your Twin Disc Transmission Are Making Excessive Noise
Bull Gear On A Twin Disc Transmission
Rebuilt Twin Disc Transmissions