April 3, 2025
Introduction: Why Bearing and Gear Inspection Matters in the MG-5090A Marine Gear
When and Why to Perform a Bearing and Gear Inspection
Recommended Service Interval
Common Indicators That an Internal Inspection Is Needed
Overview of Gears and Bearings Inside the MG-5090A
Gear Types:
Bearings:
Tools and Supplies Required for Inspection
Basic Tools:
Inspection Supplies:
Step-by-Step Internal Access and Disassembly for MG-5090A
Step 1: Drain the Transmission Oil
Step 2: Remove External Covers
Step 3: Remove Input Shaft Housing
Step 4: Mark All Components Before Removal
Step 5: Remove Gears and Shafts
Gear Inspection Guidelines for MG-5090A
Visual Gear Tooth Inspection
Backlash and Alignment
Bearing Inspection Guidelines for MG-5090A
Visual and Tactile Inspection
Axial and Radial Play
Replacing Bearings and Gears with a Rebuild Kit
Installation Best Practices:
Reassembly Procedure
Step 1: Clean and Prep Components
Step 2: Install Bearings and Gears
Step 3: Reinstall Shafts and Housings
Step 4: Replace Gaskets and Covers
Step 5: Fill with New Oil and Test
When to Choose Remanufactured MG-5090A vs. Rebuilding
Consider Ordering a Remanufactured MG-5090A If:
Summary: Bearing and Gear Inspection Is Critical at the 3,000-Hour Interval
Quick Inspection Checklist
Component
What to Check
Warning Signs
Videos About Twin Disc Transmissions
Read More
April 3, 2025
Introduction: Why Control Systems Matter for the MG-5090A Marine Transmission
Control System Overview for Twin Disc MG-5090A Marine Gear
Mechanical vs. Electronic Control Systems
Function of the Control Lever
Visual Inspection of Mechanical Linkages
Step 1: Identify All Linkage Components
Step 2: Disconnect and Test Lever Movement by Hand
Step 3: Inspect Cable for Wear and Binding
Step 4: Lubricate the Mechanical Linkage
Checking and Adjusting Lever Travel
Step 1: Verify Full Lever Travel
Step 2: Adjust Cable Endpoints
Step 3: Inspect Control Brackets and Bushings
Electronic Control System Checks (e.g., Twin Disc EC300)
Step 1: Run System Diagnostics
Step 2: Observe Shifting Behavior
Step 3: Calibrate Shift Points
Step 4: Check Electrical Connections
Detent Mechanism Inspection and Adjustment
Step 1: Inspect Detent Action
Step 2: Troubleshoot Weak Detent
Step 3: Verify Hold Strength
Final Test and Adjustment Checklist
Mechanical System Test:
Electronic System Test:
Final Adjustments:
Troubleshooting Control System Symptoms
Pro Tips to Prevent Control Issues on the MG-5090A
Diesel Pro Power Control Support and Replacement Parts
Summary: Control Systems = Transmission Health on the MG-5090A
Quick Reference Inspection Chart
Component
Check Frequency
Inspection Criteria
Videos About Twin Disc Transmissions
Read More
April 3, 2025
Introduction: Understanding Clutch Adjustment in the MG-5090A Marine Transmission
How the Clutch System Works in the Twin Disc MG-5090A
Hydraulic Clutch Operation:
Key Advantages of Hydraulic Clutches:
Common Symptoms of Clutch Issues in MG-5090A Marine Gear
1. Clutch Slipping
2. Delayed Engagement
3. Harsh or Shuddering Engagement
4. Overheating
Tools and Equipment Required for Clutch Pressure Testing
Required Tools:
Optional Tools:
Step-by-Step Hydraulic Pressure Testing for MG-5090A Clutch Engagement
Step 1: Locate the Hydraulic Test Port
Step 2: Warm the Transmission
Step 3: Install the Pressure Gauge
Step 4: Run the Pressure Test
Normal Pressure Range:
Step 5: Interpret the Results
Diagnosing Pressure Loss in the MG-5090A Clutch System
Low Pressure Causes:
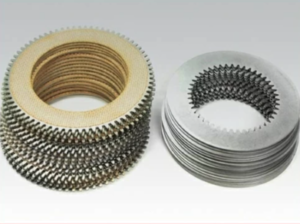
Disassembling the Clutch Pack: When and How
When to Disassemble:
Clutch Pack Disassembly Tools:
Step-by-Step Clutch Pack Inspection
Rebuilding the Clutch Assembly with a Rebuild Kit
Clutch Rebuild Procedure:
Post-Rebuild Testing and Final Verification
When to Replace vs. Rebuild
Tips to Prevent Clutch Wear in the MG-5090A
Summary: Proper Clutch Inspection = MG-5090A Reliability
Clutch Adjustment and Inspection Quick Reference
Task
Interval
Tool Required
Notes
Videos About Twin Disc Transmissions
Read More
April 3, 2025
Introduction: Why Cooler Maintenance Is Critical for Twin Disc MG-5090A Marine Gear
Function of the Oil Cooler in the MG-5090A Transmission
Key Roles of the Cooler:
Signs Your Cooler Needs Maintenance or Replacement
Maintenance Frequency and Best Practices for MG-5090A Cooler
Ideal Maintenance Timing:
Tools and Supplies Required for MG-5090A Cooler Maintenance
Tools:
Supplies:
Step-by-Step Cooler Maintenance Procedure for Twin Disc MG-5090A
Step 1: Prepare for Cooler Removal
Step 2: Isolate and Remove the Oil Cooler
Step 3: Inspect Cooler for Obvious Damage
Step 4: Flush With Fresh Water
Step 5: Apply Descaling Solution
Step 6: Flush the Oil Side (If Separate)
Step 7: Perform a Pressure Test
Step 8: Inspect and Replace Supporting Hardware
Step 9: Reinstall Cooler
Step 10: Start Engine and Inspect Operation
Troubleshooting Common Cooler Issues on the MG-5090A
Overheating Despite Cooler Service
Water in Oil
Coolant Leaks at Hose Ends
Reduced Cooling Performance After Descaling
Replacement Recommendations
Pro Tips for Cooler Longevity
Summary: Cooler Maintenance Is a Non-Negotiable for MG-5090A Health
Quick Reference Maintenance Chart:
Maintenance Task
Frequency
Tools Needed
Critical Notes
Videos About Twin Disc Transmissions
Read More
April 3, 2025
Introduction: Why Oil Filter Replacement Matters for the Twin Disc MG-5090A Marine Gear
The Function of the Oil Filter in the MG-5090A Marine Transmission
Recommended Filter Replacement Interval for Twin Disc MG-5090A Marine Gear
Adjustments for Harsh Conditions:
Filter Type and Location in the MG-5090A Marine Gear
Filter Type:
Location:
Tools and Supplies Required for Filter Replacement on the MG-5090A
Tools:
Supplies:
Step-by-Step Oil Filter Replacement Procedure for Twin Disc MG-5090A Marine Gear
Step 1: Warm the Oil and Shut Down the Engine
Step 2: Locate the Filter and Prepare the Area
Step 3: Remove the Old Filter
Step 4: Inspect and Clean the Filter Mounting Surface
Step 5: Prepare the New Oil Filter
Step 6: Install the New Filter
Step 7: Restart the Engine and Inspect for Leaks
Step 8: Check and Adjust Oil Level
Troubleshooting Filter Installation Issues
Oil Leak Around New Filter:
Oil Pressure Drop After Filter Change:
Filter Won’t Come Off:
Advanced Filter Inspection and Oil Analysis
What to Look For:
Sourcing Filters and Gaskets from Diesel Pro Power
Filter Compatibility:
Professional Tips for Long-Term Filter Maintenance Success
Summary: Clean Filtration = Clean Operation for the MG-5090A
Quick Reference Checklist for Filter Replacement:
Step
Action Summary
Videos About Twin Disc Transmissions
Read More
April 3, 2025
Introduction: The Importance of Oil Changes for Twin Disc MG-5090A Marine Gear
Why Regular Oil Changes Are Critical for the MG-5090A Transmission
Functions of Oil in the MG-5090A:
Risks of Delayed Oil Changes:
Required Tools and Supplies for an MG-5090A Oil Change
Tools:
Supplies:
Step-by-Step Oil Change Procedure for Twin Disc MG-5090A Marine Gear
Step 1: Warm the Transmission Oil to Operating Temperature
Step 2: Shut Down and Secure the Vessel
Step 3: Locate and Remove the Drain Plug
Step 4: Remove the Inspection Cover (Optional but Recommended)
Step 5: Replace the Drain Plug and Washer
Step 6: Remove the Old Oil Filter
Step 7: Prepare and Install the New Oil Filter
Step 8: Add New Transmission Oil
Step 9: Start Engine and Check Oil Level in Neutral
Oil Level Zones:
Step 10: Inspect for Leaks and Test Function
Post-Service Checklist and Documentation
Suggested Log Entry Format:
Date
Engine Hours
Service Performed
Oil Type Used
Filter Part #
Notes
Troubleshooting Common Oil Change Issues
1. Oil Foaming or Aeration
2. Oil Leak After Filter Change
3. Pressure Drop After Oil Change
Summary: Proper Oil Change = Peak Performance for MG-5090A
Key Takeaways:
Videos About Twin Disc Transmissions
Read More


 Free US Calls: 1-888-433-4735
 International: 305-545-5588