

 Free US Calls: 1-888-433-4735
 International: 305-545-5588
Servicing the Twin Disc MG520 Marine Gear requires more than just mechanical knowledge — it demands the right tools, a clean and efficient workspace, and a deep understanding of safe handling procedures. Whether you’re performing a full overhaul or routine maintenance, preparing the proper environment will not only make your work easier and faster, but also safer and more effective.
This section provides a comprehensive breakdown of the tools needed, both general and specialized, as well as lifting and hoisting best practices specific to the MG520 unit. Consider this your master checklist before turning a single bolt.
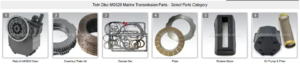
Parts Catalog for Twin Disc MG520 Marine Transmissions
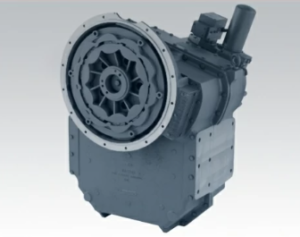
Rebuilt Twin Disc MG520 Marine Transmissions
Plate Kit For Twin Disc MG520 Marine Transmission
Gasket Kits For Twin Disc MG520 Marine Transmission
Required Tools For Twin Disc MG520 Marine Gear
Specialty Tools
While many aspects of MG520 service can be performed with standard shop tools, certain procedures—especially internal disassembly and reassembly—require specialized tools designed for precision and safety.
1. Bearing Pullers and Splitters
- The MG520 contains several deep-set bearings that cannot be removed safely with conventional pry bars or hammers.
- Bearing pullers and splitters allow for safe extraction without damaging the bearing journals or adjacent components.
- Always use pullers with adjustable arms and a central forcing screw.
- In some cases, hydraulic bearing pullers may be required, especially for the main input/output shafts or reduction gear bearings.
2. Alignment Tools
Proper alignment of the MG520 with the engine and propeller shaft is critical for long-term performance.
- Shaft Alignment Tool Kits: These include dial indicators, straightedges, and mounting brackets. Accurate to within 0.002” of parallelism.
- Laser Shaft Alignment Tools (optional): For those seeking digital precision, laser alignment tools speed up the alignment process and reduce manual measuring errors.
3. Seal and Bushing Drivers
- Proper installation of seals and bushings is essential to prevent oil leaks and premature wear.
- Universal seal driver kits with interchangeable discs can accommodate the various seal sizes in the MG520.
- Avoid improvising with sockets or metal objects; a damaged seal lip can lead to contamination or failure.
4. Dial Indicator with Magnetic Base
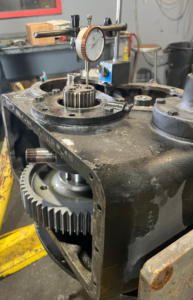
- Used to measure shaft endplay, gear backlash, and coupling runout.
- Essential during both disassembly (for diagnostics) and reassembly (for clearance checks).
5. Snap Ring Pliers
- Several internal components, such as the clutch pack and gear sets, are retained by snap rings or spiral rings.
- Using improper tools risks distorting or damaging these critical retainers.
6. Feeler Gauge Set
- Used to measure shim gaps, gear lash, and friction plate spacing.
- Ensure a gauge range of at least 0.001” to 0.100” in both straight and offset blades.
7. Oil Sampling Pump (Optional)
- Before disassembly, you may want to sample the transmission oil for analysis.
- This can reveal early signs of gear or bearing wear through the presence of metal particles or elevated acidity.
Common Tools
Most marine shops will already have the following tools, but it’s worth double-checking they’re available and in good condition.
1. Torque Wrenches

- Essential for applying proper clamping force on critical bolts, particularly:
- Housing bolts
- Clutch assembly fasteners
- Mounting brackets
- Recommended torque range: 30 to 300 ft-lbs
- Digital or click-style torque wrenches offer the best accuracy and usability.
2. Standard and Metric Socket/Wrench Sets
- MG520 components can feature both imperial and metric bolts, so you’ll need both.
- Include deep sockets, offset box wrenches, and 12-point sockets for tight or recessed spaces.
- Long breaker bars are also helpful for removing high-torque fasteners.
3. Pry Bars and Soft Mallets
- Used for separating gear case sections or aligning heavy components.
- Always use a rubber or plastic dead-blow hammer when tapping housings to avoid cracking or distorting surfaces.
4. Screwdrivers and Picks
- For gasket removal, inspection ports, and retaining clips.
- Use non-marring picks for delicate gasket or O-ring removal.
5. Inspection Mirror and Flashlight
- Crucial for visual inspections in confined spaces or hard-to-see locations behind components.
6. Thread Chasers and Tap Sets
- When reinstalling bolts, especially those torqued into cast iron or aluminum, it’s vital to clean threads.
- Use appropriate thread chasers or taps to restore damaged threads before reassembly.
7. Gasket Scraper
- Removes old gasket material from housing flanges.
- Use plastic or brass blades to avoid damaging machined surfaces.
Lifting & Hoisting Equipment For Twin Disc MG520 Marine Gear
The Twin Disc MG520 is a substantial transmission—depending on its configuration and accessories, the unit can weigh between 700 to over 1,200 pounds (318 to 544 kg). Improper lifting can damage the gear or cause severe injury.
This makes it absolutely critical to follow best practices when lifting or moving the unit.
Recommended Lift Points on MG520
Twin Disc provides designated lifting eyes or threaded holes on the transmission housing specifically for hoisting the unit safely. These points are typically located:
- Near the top of the housing, front and rear
- On either side of the bellhousing or input shaft casing
- At the PTO or auxiliary ports if equipped
⚠️ Do not lift the unit by the oil cooler, control cables, or output coupling. These parts are not load-bearing and can be easily damaged.
Installation of Lifting Eyes
- Use Grade 8 or higher lifting bolts and secure them firmly into the factory threaded holes.
- Ensure that the lifting hardware is rated for at least 1.5 times the weight of the transmission.
- Cross-check the thread size and depth in the Twin Disc manual before installation.
Engine Hoists and Lifting Devices
1. Chain Hoists
- Heavy-duty chain hoists mounted to an overhead I-beam or gantry crane are commonly used in shipyards and engine rooms.
- Use a dual-point sling system to keep the MG520 balanced during lifting.
- Add a leveling beam or spreader bar if lifting with multiple points to avoid strain on the housing.
2. Engine Hoists (Cherry Pickers)
- For smaller workspaces or land-based operations, a mobile engine hoist is often sufficient.
- Ensure the lift arm is extended only as far as needed, and that its weight rating covers the full load.
- Lock wheels and secure the boom before lifting.
3. Forklifts (with Care)
- If using a forklift, ensure the forks are evenly spaced and padded.
- Never insert forks under the oil pan or cooling lines.
- Use lifting straps or a cradle to avoid side loading.
Safety Practices During Lifting
- Perform a Visual Inspection of All Rigging Equipment
Check for worn slings, frayed chains, damaged hooks, and missing safety latches before lifting.
- Establish a Clear Drop Zone
No personnel should be beneath the suspended load at any time.
- Use Spotters
Always have a second person guide the load from a safe distance during lifting, positioning, or lowering.
- Control Swing and Movement
Use guide ropes or tag lines to prevent uncontrolled swinging, especially in windy or confined spaces.
- Avoid Shock Loading
Lift the unit gradually. Abrupt tension on chains or slings can exceed load ratings and cause failure.
- Lower Onto Stable Supports
Once the MG520 is positioned, lower it onto flat, padded wooden blocks or a custom cradle to avoid stressing the housing.
- Use Proper Crating for Transport
If shipping or moving the unit, secure it in a well-braced crate with support under the full width of the base.
Workstation Setup for MG520 Overhaul
In addition to tools and lifting equipment, a well-prepared work environment is crucial for success.
1. Clean Workbenches
- Use a dedicated transmission workbench, preferably with a metal top and drip lip.
- Include a magnetic parts tray, labeled bins, and parts diagrams to keep things organized.
2. Controlled Environment
- Avoid outdoor or dusty environments.
- Install fans, dehumidifiers, or air curtains in humid climates to reduce condensation or corrosion during long repairs.
3. Access to Manuals and Diagrams
- Keep a printed or digital copy of the MG520 exploded diagrams and service specifications nearby.
- Mark off each step as you go to prevent missed components.
4. Dedicated Cleaning Area
- Use a parts washer with low-VOC solvents for cleaning internal components.
- Never use compressed air to dry bearings; it can cause micro-pitting or premature failure.
- Lay out cleaned parts on clean shop towels or hang them to dry completely.
Conclusion: Prepare Like a Pro for Successful MG520 Service
Working on the Twin Disc MG520 is not a job you can improvise. From specialty tools and heavy-duty lifting gear to workspace layout and safety controls, your preparation determines the quality of the final outcome.
By investing the time and resources into a proper tools and workspace setup, you:
- Prevent damage to critical components
- Ensure personal safety
- Reduce repair times
- Improve precision and reliability
- Maintain compliance with industry standards
Parts Catalog for Twin Disc MG520 Marine Transmissions
Rebuilt Twin Disc MG520 Marine Transmissions
Plate Kit For Twin Disc MG520 Marine Transmission
Gasket Kits For Twin Disc MG520 Marine Transmission
Videos About Twin Disc Transmissions
6 Reasons Your Twin Disc Transmission Has Low Oil Pressure
7 Reasons Your Twin Disc Transmission Is Overheating
3 Reasons Your Clutch Plates in Your Twin Disc Transmission Are Making Excessive Noise
Bull Gear On A Twin Disc Transmission
Rebuilt Twin Disc Transmissions