

 Free US Calls: 1-888-433-4735
 International: 305-545-5588
Introduction
The Cummins N14 engine is known for its durability and reliability, but like any mechanical system, it can experience issues over time. Understanding how to diagnose and troubleshoot common problems will help prevent costly repairs and reduce downtime.
This guide will expand on common troubleshooting scenarios, providing detailed step-by-step diagnostics, potential causes, and recommended solutions for issues such as starting problems, excessive smoke, overheating, and low oil pressure.
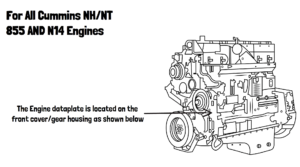
Parts Catalog for N14 Cummins Industrial Engines
Engine Won’t Start
Common Causes of a No-Start Condition
When your Cummins N14 engine won’t start, several underlying factors could be preventing it from firing up. Here are the most common causes:
- Battery Issues
- Weak or dead battery
- Loose or corroded battery terminals
- Faulty alternator not charging the battery
- Starter Motor Problems
- Worn-out starter motor
- Faulty solenoid preventing engagement
- Bad starter relay
- Fuel Delivery Issues
- Air in fuel lines, preventing proper combustion
- Clogged fuel filters, restricting fuel flow
- Faulty fuel pump, failing to provide necessary fuel pressure
- Electronic Control Module (ECM) Malfunction
- Software issues or faulty ECM components
- Damaged wiring harness or corroded connectors
- Ignition and Timing Problems
- Incorrect fuel timing settings
- Faulty injectors failing to spray fuel properly
- Compression loss due to worn piston rings or valve issues
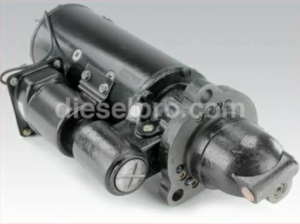
Starter & Related Components for Cummins N14 Industrial Engine
Step-by-Step Troubleshooting Process
1. Check the Battery and Electrical System
- Inspect battery terminals for corrosion and tighten connections.
- Test battery voltage with a multimeter (should be 12.6V or higher when fully charged).
- If the battery is weak, jump-start the engine or replace the battery.
- Check alternator output voltage (should be 13.5-14.5V when running).
2. Inspect the Starter Motor
- Listen for clicking sounds when turning the key (a click with no crank may indicate a bad starter solenoid).
- Check the starter relay and fuses.
- If the starter motor is slow or grinding, it may need replacement.
3. Check Fuel System for Air or Blockages
- Prime the fuel system using the manual primer pump if available.
- Replace clogged fuel filters.
- Check for leaking fuel lines (air can enter the system and cause starting issues).
4. Verify ECM Functionality
- Ensure ECM receives power and is properly grounded.
- Scan for fault codes using diagnostic tools.
- If ECM is suspected to be faulty, consider reprogramming or replacing it.
5. Check for Compression Issues
- Perform a compression test on each cylinder (should be above 350 psi).
- If compression is low, inspect for worn piston rings, leaking valves, or a failed head gasket.
Excessive Smoke from the Exhaust
Types of Smoke and Their Causes
- Black Smoke: Overfueling or Air Restriction
- Clogged air filter → Restricts airflow, causing incomplete combustion.
- Faulty injectors → Deliver too much fuel, creating excess black smoke.
- Turbocharger failure → Reduces air intake, leading to a rich fuel mixture.
- White Smoke: Fuel Timing or Coolant Issues
- Incorrect fuel injection timing → Late fuel injection results in unburned fuel vapor.
- Low compression → Worn rings or valves prevent complete combustion.
- Coolant entering the combustion chamber → Head gasket failure or cracked cylinder head.
- Blue Smoke: Oil Burning Due to Engine Wear
- Worn piston rings or cylinder liners → Oil leaks into the combustion chamber.
- Valve seal damage → Allows oil to seep past the valve guides.
- Overfilled crankcase → Excess oil gets burned in the engine.
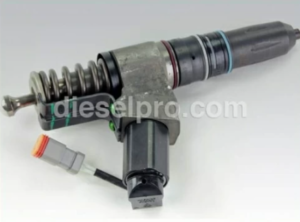
Injector & Related Components for Cummins N14 Industrial Engine
Step-by-Step Troubleshooting Process
1. Diagnosing Black Smoke (Overfueling)
- Remove and inspect the air filter (replace if dirty).
- Check turbocharger for excessive shaft play or boost leaks.
- Test fuel injectors for leaks or excessive fuel delivery.
- Scan ECM for fault codes related to air/fuel mixture.
2. Diagnosing White Smoke (Fuel or Coolant Issues)
- Check for coolant loss or contamination in the oil (milky residue on dipstick).
- Perform a cylinder compression test (low readings indicate internal wear).
- Inspect fuel injectors and adjust injection timing if necessary.
3. Diagnosing Blue Smoke (Oil Consumption)
- Check engine oil level (overfilled crankcase can cause oil burning).
- Inspect for oil leaks around valve seals and turbocharger.
- Perform a crankcase pressure test to detect excessive blowby.
Engine Overheating
Common Causes of Overheating
- Low Coolant Levels or Leaks
- Radiator or coolant hose leaks
- Worn water pump seals
- Blown head gasket allowing coolant loss
- Faulty Thermostat
- Stuck closed → Prevents coolant circulation, leading to overheating.
- Stuck closed → Prevents coolant circulation, leading to overheating.
- Radiator or Intercooler Blockage
- External debris or internal scale buildup reducing heat dissipation.
- External debris or internal scale buildup reducing heat dissipation.
- Malfunctioning Water Pump
- Broken impeller or belt failure preventing coolant circulation.
- Broken impeller or belt failure preventing coolant circulation.
- Faulty Fan Clutch or Cooling System Sensors
- Cooling fan not engaging at high temperatures.
- Cooling fan not engaging at high temperatures.
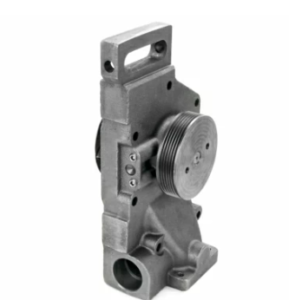
Fresh Water Pump & Related Components for Cummins N14 Industrial Engine
Step-by-Step Troubleshooting Process
1. Check Coolant Level and Leaks
- Inspect radiator, hoses, and water pump for visible leaks.
- Check for coolant contamination (oily residue in coolant indicates a head gasket issue).
2. Inspect the Thermostat
- Remove the thermostat and place it in hot water (190-200°F / 88-93°C).
- If it fails to open, replace it.
3. Test the Water Pump
- Look for coolant circulation in the radiator when the engine is running.
- If coolant is stagnant, the pump may be faulty.
4. Check for Radiator Blockages
- Flush the cooling system with a radiator cleaning solution.
- Inspect for bent or clogged fins reducing airflow.
5. Verify Fan Operation
- Check the fan clutch for proper engagement.
- Inspect cooling system sensors for malfunctions.
Low Oil Pressure
Common Causes of Low Oil Pressure
- Low Oil Levels
- Engine oil is too low, reducing pressure.
- Engine oil is too low, reducing pressure.
- Worn-Out Oil Pump
- The pump is unable to maintain proper flow and pressure.
- The pump is unable to maintain proper flow and pressure.
- Blocked Oil Filters or Galleries
- Dirty or clogged filters restrict oil circulation.
- Dirty or clogged filters restrict oil circulation.
- Excessive Bearing Wear
- Increased clearance between bearings results in reduced pressure.
- Increased clearance between bearings results in reduced pressure.
Step-by-Step Troubleshooting Process
1. Check Oil Levels and Quality
- Verify oil level on dipstick and refill if necessary.
- Ensure the correct oil viscosity is used (e.g., 15W-40 for most applications).
2. Inspect the Oil Pump
- Test oil pressure using a mechanical oil pressure gauge.
- If pressure is below 20 PSI at idle, the pump may be faulty.
3. Replace Oil Filter
- Remove the old filter and check for metal particles, which indicate bearing wear.
- Install a new high-quality oil filter.
4. Check Bearings for Excess Wear
- Inspect main and rod bearings if oil pressure remains low.
- Replace worn bearings to restore proper clearance.
Lubrication System & Related Components for Cummins N14 Industrial Engine
Conclusion
Troubleshooting the Cummins N14 engine requires systematic diagnosis and step-by-step verification of potential issues.
By following these detailed troubleshooting methods, you can identify and resolve starting problems, excessive smoke, overheating, and low oil pressure, ensuring that your Cummins N14 engine remains in peak operating condition.
Parts Catalog for N14 Cummins Industrial Engines