

 Free US Calls: 1-888-433-4735
 International: 305-545-5588

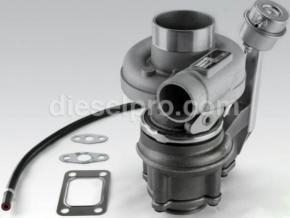
The turbocharger is a key component in Cummins ISB and QSB engines, responsible for improving engine performance by forcing more air into the combustion chamber, allowing for better fuel combustion, increased power output, and improved fuel efficiency. Like all mechanical parts, turbochargers are subject to wear and tear, especially under heavy-duty conditions. This guide will cover common symptoms of turbocharger failure, as well as detailed instructions on how to remove and inspect the turbocharger to ensure optimal performance.
Parts Catalog Main Page for Cummins ISB Marine Engine
Turbocharger & Related Components for Cummins ISB 4.5 Engine
Turbocharger & Related Components for Cummins ISB 5.9 Engine
Turbocharger & Related Components for Cummins ISB 6.7 Engine
Parts Catalog Main page for Cummins QSB Marine Engine
Turbocharger & Related Components for Cummins QSB 4.5 Engine
Turbocharger & Related Components for Cummins QSB 5.9 Engine
Turbocharger & Related Components for Cummins QSB 6.7 Engine
Turbocharger & Related Components for Cummins QSB 7.0 Engine
1. Symptoms of Turbocharger Failure
Recognizing the early signs of turbocharger problems is critical. A failing turbo can lead to reduced engine efficiency, increased emissions, and even severe engine damage if not addressed promptly.
A. Common Symptoms of Turbocharger Issues
1. Loss of Power
- Symptoms: The engine feels sluggish, acceleration is weak, and the vehicle struggles under load.
- Cause: A faulty turbocharger cannot produce enough boost pressure, reducing the air entering the engine and decreasing power output.
2. Excessive Exhaust Smoke
- Symptoms: Unusual smoke from the exhaust in different colors:
- Blue Smoke: Indicates oil is leaking into the combustion chamber due to worn turbo seals.
- Black Smoke: Suggests an improper air-to-fuel ratio, often caused by a failing turbo failing to supply enough air.
- White Smoke: May indicate coolant leakage, which could be related to turbo issues in some cases.
3. Increased Oil Consumption
- Symptoms: Frequent need to top off engine oil without visible external leaks.
- Cause: Oil leaking past the turbo seals into the intake or exhaust system, often burning off during operation.
4. Unusual Noises from the Turbocharger
- Symptoms: High-pitched whining, siren-like sounds, or metallic grinding noises that increase with engine speed.
- Cause: Damaged bearings, worn turbine/compressor wheels, or contact between the rotating parts and the housing.
5. Check Engine Light or Warning Codes
- Symptoms: The check engine light illuminates, and diagnostic codes related to boost pressure or airflow are stored in the ECM.
- Cause: Sensors detect abnormal boost levels, indicating turbocharger issues.
6. Poor Fuel Efficiency
- Symptoms: Increased fuel consumption without a corresponding increase in power output.
- Cause: A malfunctioning turbo reduces engine efficiency, causing the engine to burn more fuel to compensate.
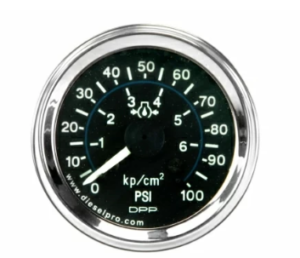
7. Boost Pressure Loss
- Symptoms: A noticeable drop in turbo boost pressure, often observed using a boost gauge.
- Cause: Boost leaks in intercooler piping, wastegate malfunctions, or turbocharger failure.
B. Causes of Turbocharger Failure
Understanding what causes turbo failure can help prevent issues before they occur.
- Oil Starvation or Contamination
The turbo relies on clean, high-pressure oil for lubrication. Lack of oil or dirty oil causes bearing wear and shaft damage.
- Foreign Object Damage
Debris entering the intake or exhaust system can damage the turbo’s compressor or turbine blades.
- Excessive Exhaust Temperatures
Overheating from improper fueling, EGR issues, or blocked exhaust can damage the turbo’s internal components.
- Improper Shutdown Procedures
Shutting the engine off immediately after heavy use can cause oil coking within the turbo, reducing its lifespan.
- Poor Maintenance
Neglecting regular oil changes and air filter maintenance accelerates turbo wear.
2. How to Remove and Inspect the Turbocharger

When turbocharger issues are suspected, it’s essential to remove and inspect the unit properly to diagnose the root cause and prevent further damage.
A. Tools and Equipment Needed

- Socket set and wrenches
- Torque wrench
- Screwdrivers
- Penetrating oil (for rusty or seized bolts)
- Inspection mirror
- Feeler gauge (for shaft play measurement)
- Clean rags
- Safety equipment (gloves and eye protection)
B. Safety Precautions

- Allow the Engine to Cool: Turbochargers operate at extremely high temperatures. Wait until the engine is completely cool to avoid burns.
- Disconnect the Battery: Prevents accidental starts during the removal process.
- Wear Safety Gear: Use gloves to protect your hands from sharp edges and eye protection to guard against debris.
C. Step-by-Step Turbocharger Removal Process
Step 1: Preparation
- Park on a Level Surface: Ensure the vehicle or equipment is stable.
- Gather Tools: Organize all necessary tools for easy access.
Step 2: Disconnect the Air Intake and Exhaust System
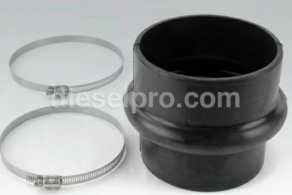
- Remove the Intake Hose:
- Loosen the clamps securing the intake hose to the turbocharger.
- Carefully disconnect the hose, inspecting for oil residue or debris.
- Disconnect the Exhaust Pipe:
- Unbolt the flange or clamp connecting the exhaust system to the turbo.
- Use penetrating oil if bolts are rusted.
Step 3: Disconnect Oil and Coolant Lines
- Oil Feed Line:
- Carefully loosen the fitting and remove the oil supply line to the turbo.
- Cap the line to prevent contamination.
- Oil Return Line:
- Disconnect the oil return line at the turbocharger.
- Inspect for signs of oil restriction or blockages.
- Coolant Lines (if applicable):
- Some turbochargers are water-cooled. Disconnect the coolant lines, draining any remaining coolant as needed.
- Some turbochargers are water-cooled. Disconnect the coolant lines, draining any remaining coolant as needed.
Step 4: Remove the Turbocharger
- Unbolt the Turbo from the Manifold:
- Remove the bolts securing the turbo to the exhaust manifold or mounting bracket.
- Support the turbo to prevent it from falling once unbolted.
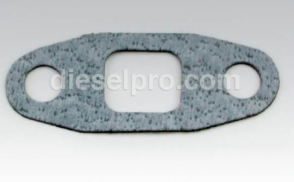
- Inspect Gaskets and Hardware:
- Remove old gaskets and inspect for signs of leakage or damage.
- Keep track of hardware for reassembly.
D. Turbocharger Inspection Process

With the turbo removed, a thorough inspection can help determine the cause of failure.
1. Visual Inspection
- Compressor and Turbine Blades:
- Check for chips, cracks, or missing material on the blades.
- Inspect for signs of foreign object damage.
- Oil Residue:
- Look for oil inside the compressor housing, which may indicate seal failure.
- Look for oil inside the compressor housing, which may indicate seal failure.
- Exhaust Side:
- Check for excessive carbon buildup, cracks, or signs of overheating.
- Check for excessive carbon buildup, cracks, or signs of overheating.
2. Check for Shaft Play
- Axial Play (In-and-Out Movement):
- Some slight axial movement is normal.
- Excessive play indicates worn thrust bearings.
- Radial Play (Side-to-Side Movement):
- Use a feeler gauge to measure the clearance between the shaft and housing.
- If the blades contact the housing or clearance exceeds specifications, the bearings are worn.
3. Spin the Shaft
- Manually spin the turbo shaft.
- It should rotate smoothly without resistance, grinding, or wobbling.
4. Check for Oil Leaks
- Inspect the oil feed and return ports for signs of leaks.
- Look for oil buildup inside the compressor and turbine housings.
E. Common Turbocharger Issues Identified During Inspection
- Worn Bearings:
- Cause: Oil starvation or contamination.
- Symptoms: Excessive shaft play, whining noises, or smoking.
- Damaged Blades:
- Cause: Foreign object ingestion.
- Symptoms: Loss of boost pressure, strange noises, or vibrations.
- Oil Seal Failure:
- Cause: High crankcase pressure, poor oil return, or bearing wear.
- Symptoms: Blue smoke from exhaust, oil leaks in intake or exhaust.
- Cracked Housing:
- Cause: Overheating from high exhaust temperatures.
- Symptoms: Boost loss, exhaust leaks, or rattling sounds.
F. Turbocharger Repair or Replacement
1. When to Repair:
- Minor Issues: Seal replacements, bearing kits, or cleaning can restore function.
- Availability of Parts: If rebuild kits are accessible, a skilled technician can refurbish the turbo.
2. When to Replace:
- Severe Damage: Cracked housings, broken turbine blades, or catastrophic bearing failure require replacement.
- Cost vs. Benefit: Sometimes, the cost of parts and labor exceeds that of a new turbocharger.
G. Turbocharger Reinstallation Process
If the turbocharger is repairable or has been replaced, follow these steps to reinstall it correctly.
Step 1: Clean Mating Surfaces
- Ensure the turbo flange, exhaust manifold, and oil line surfaces are clean and free of debris.
Step 2: Install New Gaskets
- Always use new gaskets to prevent leaks.
Step 3: Mount the Turbocharger
- Position the turbo on the manifold.
- Tighten the mounting bolts to the manufacturer’s torque specifications.
Step 4: Reconnect Oil and Coolant Lines
- Oil Feed and Return Lines:
- Check for blockages and ensure proper alignment.
- Replace any damaged seals or crush washers.
- Coolant Lines:
- Reconnect securely if the turbo is water-cooled.
- Reconnect securely if the turbo is water-cooled.
Step 5: Reconnect Intake and Exhaust Systems
- Secure the intake hose and exhaust pipe with proper clamps and bolts.
Step 6: Prime the Turbo
- Before starting the engine, pour a small amount of clean engine oil into the turbo’s oil inlet to prevent dry startup.
H. Post-Installation Checks

- Start the Engine:
- Allow the engine to idle for a few minutes.
- Check for unusual noises, leaks, or warning lights.
- Monitor Boost Pressure:
- Use a boost gauge or diagnostic tool to verify proper turbo function.
- Use a boost gauge or diagnostic tool to verify proper turbo function.
- Check for Oil Leaks:
- Inspect all connections for signs of oil seepage.
- Inspect all connections for signs of oil seepage.
- Test Drive:
- Perform a controlled test drive to ensure smooth acceleration and proper boost levels.
- Perform a controlled test drive to ensure smooth acceleration and proper boost levels.
3. Preventive Maintenance for Turbocharger Longevity
Proper maintenance practices can significantly extend the life of your turbocharger.
- Regular Oil Changes
- Use high-quality oil and filters to prevent contamination that wears turbo bearings.
- Use high-quality oil and filters to prevent contamination that wears turbo bearings.
- Allow for Cool-Down Periods
- After heavy use, idle the engine for a few minutes before shutting it off to allow the turbo to cool.
- After heavy use, idle the engine for a few minutes before shutting it off to allow the turbo to cool.
- Inspect Air Filters Regularly
- A clean air filter prevents debris from entering the turbocharger.
- A clean air filter prevents debris from entering the turbocharger.
- Monitor Exhaust Temperatures
- Excessive exhaust gas temperatures (EGTs) can damage the turbo. Install an EGT gauge if towing or operating under heavy loads.
- Excessive exhaust gas temperatures (EGTs) can damage the turbo. Install an EGT gauge if towing or operating under heavy loads.
- Address Oil Leaks Promptly
- Oil starvation or contamination is the leading cause of turbo failures.
- Oil starvation or contamination is the leading cause of turbo failures.
Conclusion
The turbocharger is a critical component of Cummins ISB and QSB engines, enhancing performance, fuel efficiency, and emissions control. Understanding the symptoms of turbocharger failure and knowing how to remove, inspect, and reinstall the turbo can help prevent costly repairs and extend the life of the engine. Regular maintenance, early detection of issues, and adherence to Cummins’ service guidelines will ensure your turbocharger operates reliably for years to come. Always consult the manufacturer’s specifications for torque settings, clearances, and procedures specific to your engine model.
Parts Catalog Main Page for Cummins ISB Marine Engine
Turbocharger & Related Components for Cummins ISB 4.5 Engine
Turbocharger & Related Components for Cummins ISB 5.9 Engine
Turbocharger & Related Components for Cummins ISB 6.7 Engine
Parts Catalog Main page for Cummins QSB Marine Engine
Turbocharger & Related Components for Cummins QSB 4.5 Engine
Turbocharger & Related Components for Cummins QSB 5.9 Engine
Turbocharger & Related Components for Cummins QSB 6.7 Engine
Turbocharger & Related Components for Cummins QSB 7.0 Engine