July 16, 2025
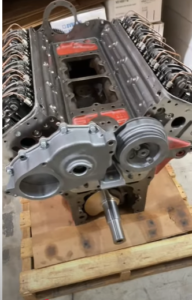
The Detroit Diesel 16V149: The Ultimate Heavy-Duty Engine
What Makes the 16V149 Special
Where You’ll Find These Titans
Why Finding Overhaul Kits for the 16V149 is Practically Impossible
The Engine is Out of Regular Production
Turbo vs. Non-Turbo Adds Another Layer of Difficulty
The Diesel Pro Power Difference: One of the Only Companies in the World With These Kits In Stock
Why This Matters: The Real Cost of Downtime
What’s Actually In Our 16V149 Overhaul Kits
Each Diesel Pro Power 16V149 Kit Includes:
Why Most Companies Don’t Stock These Kits — and Why We Do
The Financial Risk is Too Big for Most Distributors
It’s Logistically Complex
Turbocharged vs. Non-Turbo: We Stock Both — Because They’re Not the Same
Trusted By Marine and Industrial Operators Worldwide
Technical Expertise You Won’t Find Anywhere Else
Two-Stroke Engine Demands
Compression Matching
Fast Shipping, Worldwide — Because Downtime is the Real Enemy
Protect Your Rebuild — Why We Only Use Premium Components
Conclusion: The Only Real Choice for Detroit Diesel 16V149 Overhauls
Other Parts Diesel Pro Power Carries For The Detroit Diesel 16V149
Additional Resources For The Detroit Diesel 149 Series
Read More

July 16, 2025
Why Diesel Pro Power is the Only True Source for Detroit Diesel 12V149 Overhaul Kits — In Stock and Ready to Ship
The Detroit Diesel 12V149: A Legend of Industrial Power
Key Specs That Made History
Where You’ll Find Them Today
Why the 12V149 is So Difficult to Support
These Engines are Rare and Out of Regular Production
Turbo and Non-Turbo Differences Add Complexity
Why Diesel Pro Power is Different: The World’s True Stocking Source
Why This Matters for Your Operation
What’s Inside Our Detroit Diesel 12V149 Overhaul Kits
Premium Components Include:
Turbo vs. Non-Turbo: We Stock Both
Why Most Companies Can’t — or Won’t — Stock These Kits
Enormous Inventory Risk
Complex Global Logistics
The Diesel Pro Power Difference: Why We’re Trusted Worldwide
Actual In-Stock Inventory
Fast Shipping, Global Reach
Unmatched Technical Support
Avoid the Disaster of Mismatched or Delayed Kits
Serving the World’s Most Demanding Industries
A Few Words on Why We Only Stock Premium Kits
Conclusion: If You Operate a Detroit Diesel 12V149, You Can’t Afford to Wait
Other Parts That We Carry For Detroit Diesel 12V149
Additional Resources For The Detroit Diesel 12V149
Read More

July 16, 2025
Understanding Marine Diesel Piston Compression: What It Means for Cummins, Detroit Diesel, and Caterpillar Engines
What Is Piston Compression in a Marine Diesel Engine?
Why Compression Matters in Marine Diesel Engines
Power and Efficiency
Cold Starting Reliability
Emission Control and Smoke
Engine Longevity
How Compression Works in Cummins, Detroit Diesel, and Caterpillar Engines
Cummins Marine Engines
Detroit Diesel Marine Engines
Caterpillar Marine Engines
What Causes Compression Loss in Marine Diesels?
Worn or Broken Piston Rings
Scored or Glazed Cylinder Walls
Valve Leakage
Head Gasket Failure
Cracked Heads or Blocks
Signs Your Engine Has Low Compression
How to Test Marine Diesel Compression
Fixing Low Compression: Options and Repairs
Replacing Rings and Liners
Valve Work
Head Gaskets or Cracks
How to Maintain Strong Compression
Why Compression Needs Are Different in Marine Engines vs. Trucks
Conclusion: Keep Compression Strong, Keep Your Vessel Reliable
Read More
June 18, 2025
What Is a Core Charge?
Think of it Like a Bottle Deposit
Why Core Charges Exist
How Core Charges Help Lower the Price of Your Blower
The Core Charge Is Temporary
The Role of Core Charges in Keeping Blowers Available
Your Core Helps Others, Too
What Makes a Blower Core Rebuildable?
What Doesn't Matter:
Telltale Signs That Your Blower Core May Be Unacceptable
How to Return Your Core the Right Way
What Happens After You Send Your Core?
Inside the Rebuilding Process: How Blower Cores Are Remanufactured
Common Customer Questions About Core Charges
Misconceptions About Core Charges
Final Thoughts: Why Core Returns Benefit Everyone
Read More
March 27, 2025
In the video above a technician installs the timing gears on a Detroit Diesel 6-71 long block.
Detroit Diesel 6-71 Engine Variants – Specifications & Applications
Overview
Detroit Diesel 6-71 Non-Turbo – 2-Valve Head Type
Technical Specifications
Applications
Marine Industry
Industrial Applications
Ground-Based Equipment
Key Traits
Detroit Diesel 6-71 Non-Turbo – 4-Valve Head Type
Technical Specifications
Applications
Marine Use
Commercial Equipment
Key Traits
Detroit Diesel 6-71 Turbocharged (6-71T)
Technical Specifications
Applications
Marine Use
Industrial Use
On-Highway and Defense Use
Key Traits
Side-by-Side Comparison Table
Choosing the Right Variant
When to Choose 2-Valve Non-Turbo
When to Choose 4-Valve Non-Turbo
When to Choose Turbocharged 6-71 (6-71T)
Additional Resources For The Detroit Diesel 6-71:
Read More
March 27, 2025
Detroit Diesel 8V71 Engine Specifications & Applications
Overview of the Detroit Diesel 8V71 Engine
Technical Specifications: Detroit Diesel 8V71 Engine (Turbo & Non-Turbo)
8V71 Naturally Aspirated vs. Turbocharged Versions
8V71 Naturally Aspirated (8V71N)
8V71 Turbocharged (8V71T / 8V71TA)
Applications of the Detroit Diesel 8V71 Engine
Marine Applications
Industrial & Stationary Applications
Additional Resources
Read More
Page 1 of 7412345...102030...»Last »


 Free US Calls: 1-888-433-4735
 International: 305-545-5588