

 Free US Calls: 1-888-433-4735
 International: 305-545-5588
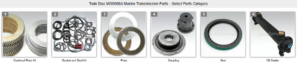
Parts catalog for Twin Disc MG50590A Marine Transmissions
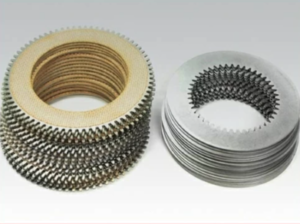
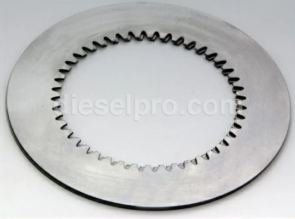
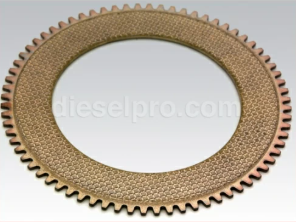
Overhaul Plate Kit For Twin Disc MG5090A Marine Transmission
Gasket Kits For Twin Disc MG5090A Marine Transmission
Introduction: Understanding Clutch Adjustment in the MG-5090A Marine Transmission
The Twin Disc MG-5090A marine gear is a hydraulically actuated marine transmission that provides smooth, reliable forward and reverse propulsion through its clutch pack systems. Unlike mechanical clutches that require routine physical adjustment, the MG-5090A relies on hydraulic pressure to engage or disengage clutch assemblies. While this system is largely self-regulating, symptoms such as slipping, delayed engagement, or harsh shifting can indicate an underlying issue that may require attention.
This guide provides a deep dive into clutch performance inspection, pressure testing, clutch pack teardown, troubleshooting, and rebuild recommendations, with clear step-by-step instructions and supporting detail.
Whether you’re a boat owner, marine technician, or fleet operator, this guide will help you identify problems early and make informed decisions regarding clutch service and potential transmission replacement.
How the Clutch System Works in the Twin Disc MG-5090A
Before we address adjustment or diagnostics, it’s essential to understand how the clutch system functions in the MG-5090A.
Hydraulic Clutch Operation:
- When the operator selects forward or reverse, a hydraulic signal is sent via the control valve.
- The corresponding clutch pack piston receives pressurized oil.
- This pressure compresses the stack of friction plates and steel separator plates, locking the clutch assembly.
- Torque from the engine is transferred through the locked clutch to the output shaft.
- When the control is moved to neutral, pressure is released, and return springs disengage the clutch.
Key Advantages of Hydraulic Clutches:
- No manual linkage adjustment required
- Smooth engagement and disengagement
- Reduced wear and longer lifespan when serviced properly
- Pressure-regulated engagement minimizes operator error
Despite these benefits, several issues can affect performance—and most are tied to oil pressure or internal wear.
Common Symptoms of Clutch Issues in MG-5090A Marine Gear
Identifying clutch-related problems early prevents full transmission failure. Here are the most common signs that indicate attention is needed:
1. Clutch Slipping
- Engine RPM increases but vessel speed does not
- Occurs under load or after a long idle period
- May worsen as oil temperature rises
2. Delayed Engagement
- Lag of 2–3 seconds or more between shift selection and propulsion
- Occurs after start-up or after idle
- Typically indicates low hydraulic pressure or leaking piston seals
3. Harsh or Shuddering Engagement
- Abrupt shift into gear
- Vibration or lurching on engagement
- Often a sign of warped steel plates or contaminated oil
4. Overheating
- Transmission oil temps exceed 190–200°F
- Can be caused by slipping clutch generating excess friction
If any of these symptoms are present, hydraulic pressure testing is your first step.
Tools and Equipment Required for Clutch Pressure Testing
Required Tools:
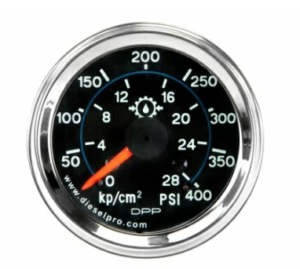
- Hydraulic pressure gauge (0–300 PSI range)
- Tee fitting and compatible hydraulic hose
- Thread sealant or PTFE tape
- Clean rags and inspection tools
- Infrared thermometer (for monitoring oil temp)
- Service manual (to locate test ports and reference specifications)
Optional Tools:
- Oil sampling kit (to check for clutch material)
- Borescope (to inspect clutch housing through inspection cover)
Diesel Pro Power stocks hydraulic testing kits and fittings specifically compatible with the MG-5090A.
Step-by-Step Hydraulic Pressure Testing for MG-5090A Clutch Engagement
Step 1: Locate the Hydraulic Test Port
- Consult the Twin Disc MG-5090A manual or tag diagram.
- Most test ports are found on the control valve block or clutch housing.
- Label may indicate “FWD,” “REV,” or “CLUTCH ENGAGE.”
Step 2: Warm the Transmission
- Run the engine for 10–15 minutes to bring the oil to operating temperature.
- Shift between forward and reverse several times to circulate oil.
Step 3: Install the Pressure Gauge
- Use a tee fitting to avoid blocking pressure paths.
- Apply thread sealant or PTFE tape to prevent leaks.
- Hand-tighten fittings, then secure snugly with a wrench.
Step 4: Run the Pressure Test
- Start the engine and shift into forward (or reverse).
- Read the gauge with engine idling in gear.
- Repeat for the opposite clutch pack.
Normal Pressure Range:
| Mode | PSI Range |
| Forward | 250–300 PSI |
| Reverse | 250–300 PSI |
| Neutral | < 100 PSI |
Step 5: Interpret the Results
- Below 250 PSI: Pressure loss—check pump, regulator valve, or leaking seals.
- Above 320 PSI: Potential regulator failure or restriction—risk of overheating or harsh shifting.
- Fluctuating Pressure: Contaminated oil, clogged filter, or aerated oil
Caution: Never attempt clutch rebuild or pressure adjustments without first testing the hydraulic circuit.
Diagnosing Pressure Loss in the MG-5090A Clutch System
If clutch pressure is out of spec, use the following diagnostic tree:
Low Pressure Causes:
- Oil Pump Wear or Failure
- Check for gear damage or low volume
- Confirm oil pickup is clear
- Regulator Valve Malfunction
- Sticking spool valve
- Worn seat or spring
- Internal Oil Leaks
- Damaged clutch piston seals
- Cracked oil passages
- Contaminated Oil
- Foaming reduces pressure and can cause clutch glazing
- Foaming reduces pressure and can cause clutch glazing
- Clogged Filter or Cooler
- Restricted flow leads to starvation at control valves
Disassembling the Clutch Pack: When and How
If pressure is within range but symptoms persist, disassemble the clutch pack for internal inspection.
When to Disassemble:
- Slipping persists despite clean oil and proper pressure
- Visible debris in the oil
- History of overheating
- Delay in gear engagement despite correct hydraulic readings
Clutch Pack Disassembly Tools:
- Snap ring pliers
- Bearing pullers (if required)
- Feeler gauges
- Torque wrench
- Parts cleaning tank or solvent
- Seal puller and installer
Step-by-Step Clutch Pack Inspection
Step 1: Remove Inspection Cover
- Drain transmission oil
- Remove inspection cover using appropriate tools
- Clean area to prevent contamination
Step 2: Disassemble Clutch Pack
- Remove retaining snap rings
- Extract clutch piston and spring assembly
- Remove friction and steel plates in order
Important: Record order of plates and shims for correct reassembly.
Step 3: Inspect Clutch Discs and Steel Plates
Check for:
- Glazing – shiny, smooth surfaces that reduce grip
- Scorching or Burn Marks – from slippage or overheating
- Cracking or Warping – especially in steel plates
- Uneven Wear or Contaminant Scoring
Step 4: Inspect Piston Seals and Springs
- Look for hardened or torn seals
- Replace springs if deformed, fatigued, or rusted
Step 5: Inspect Clutch Drum and Housing
- Examine internal splines for wear
- Check housing for scoring, pitting, or oil residue
Rebuilding the Clutch Assembly with a Rebuild Kit
If any clutch components are out of spec, replace them with a clutch rebuild kit. Diesel Pro Power offers MG-5090A rebuild kits including:
- OEM-quality friction discs
- Steel separator plates
- Piston seals and O-rings
- Return springs
- Housing gaskets and snap rings
Clutch Rebuild Procedure:
- Clean all surfaces with parts cleaner—no debris or oil
- Install new piston seals
- Stack new clutch discs and plates in alternating sequence
- Reinstall springs and piston
- Secure snap ring using pliers—ensure proper seating
- Torque cover bolts to spec
- Fill with new transmission oil
- Test with engine running and monitor pressure
Tip: Always soak new friction discs in oil for 30 minutes before installation.
Post-Rebuild Testing and Final Verification
After reassembly:
- Start the engine and check for leaks
- Shift through forward, neutral, and reverse
- Confirm smooth engagement
- Retest hydraulic pressure
- Conduct sea trial to verify under-load performance
When to Replace vs. Rebuild
Not every situation warrants a rebuild. Consider full transmission replacement if:
- Housing is cracked or scored
- Multiple clutch rebuilds have failed
- Gear noise or bearing failure is present
- Downtime is a critical factor
Diesel Pro Power offers fully rebuilt MG-5090A transmissions, tested, warrantied, and ready to ship worldwide. This is a strong option for operators unable to conduct in-depth clutch repairs or those looking for a faster turnaround.
Tips to Prevent Clutch Wear in the MG-5090A
- Use approved transmission oil only
- Replace oil and filter every 1,000 hours or annually
- Avoid excessive idling in gear
- Shift smoothly—avoid rapid forward/reverse transitions
- Flush oil coolers annually to maintain thermal balance
- Monitor engagement pressure at every major service
- Check for leaks or pressure drops regularly
Summary: Proper Clutch Inspection = MG-5090A Reliability
Although the Twin Disc MG-5090A uses a hydraulically self-adjusting clutch system, regular inspection, pressure testing, and internal component checks are essential to ensure peak performance. Ignoring symptoms like slippage, overheating, or delayed engagement can lead to catastrophic failure.
With the right tools, procedures, and support from Diesel Pro Power—whether through rebuild kits or full transmission replacements—you can keep your MG-5090A operating smoothly and reliably for thousands of hours.
Clutch Adjustment and Inspection Quick Reference
Task |
Interval |
Tool Required |
Notes |
| Pressure test | Every 1,000 hours | 0–300 PSI gauge, tee fitting | Check FWD and REV engagement pressures |
| Clutch pack inspection | As needed (slipping) | Snap ring pliers, feeler gauge | Inspect plates for wear or damage |
| Oil and filter replacement | Every 1,000 hours | Oil wrench, drain pan | Use only OEM-spec oil and filters |
| Clutch rebuild | Every 3,000 hours or as required | Rebuild kit, service tools | Replace all worn components |
Overhaul Plate Kit For Twin Disc MG5090A Marine Transmission
Gasket Kits For Twin Disc MG5090A Marine Transmission
Videos About Twin Disc Transmissions
6 Reasons Your Twin Disc Transmission Has Low Oil Pressure
7 Reasons Your Twin Disc Transmission Is Overheating
3 Reasons Your Clutch Plates in Your Twin Disc Transmission Are Making Excessive Noise
Bull Gear On A Twin Disc Transmission
Rebuilt Twin Disc Transmissions