

 Free US Calls: 1-888-433-4735
 International: 305-545-5588
Introduction
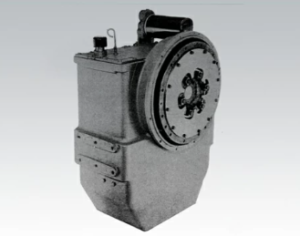
The Twin Disc MG516 and MG5161 marine transmissions are renowned for their high-capacity clutch packs and precision-cut gears that deliver consistent performance in even the harshest marine conditions. Whether operating a commercial fishing vessel, tugboat, or offshore support craft, proper inspection of the clutch and gear system is vital for minimizing downtime and preventing catastrophic failure.
Rebuilt Twin Disc MG516 Marine Transmissions
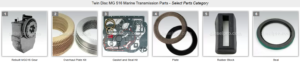
Plate Kit For Twin Disc MG516 Marine Transmission
Gasket Kits For Twin Disc MG516 Marine Transmission
This section covers everything you need to know about inspecting the clutch packs and gear train, including:
- Wear indicators and disassembly procedures
- Clutch pack clearance checks and replacement guidelines
- Gear tooth inspection, pitting, scuffing, and damage signs
- Measuring gear backlash and understanding tolerance limits
Disclaimer: For exact measurements, part tolerances, and service specifications, refer to the OEM Twin Disc service manual. This guide is designed for field mechanics and marine engineers requiring a comprehensive service framework.
Clutch Pack Inspection for Twin Disc MG516 Marine Gear
The MG516 uses wet multi-disc clutch packs to transmit torque in both forward and reverse. These clutches are hydraulically actuated, oil-cooled, and designed for high-duty cycles. However, over time, friction material wears down, plates warp, and clearances can exceed tolerance.
When to Inspect the Clutch Packs
- During routine transmission service (every 1,000–2,000 hours)
- When there’s slipping under load
- If you experience delayed or harsh engagement
- After detecting abnormal hydraulic pressure loss
- Following contaminated oil events or high-temperature shutdowns
- Before full rebuild or overhaul
Tools and Supplies You’ll Need
- Full transmission seal and friction disc kit
- Dial indicator (0.001″ resolution)
- Feeler gauges
- Snap ring pliers
- Digital caliper
- Torque wrench
- Non-chlorinated brake cleaner
- Micrometer (for plate thickness)
- Assembly lube or transmission oil
- Inspection mirror and LED light
Accessing the Clutch Packs
1. Remove the Gear Housing Access Cover
- Disconnect all lines, cables, and electrical connectors
- Remove mounting bolts using cross-pattern sequence
- Gently pry open the access cover using non-marring tool
- Remove old gasket and clean all surfaces
2. Disassemble the Clutch Assembly
- Begin with the snap rings holding the pressure plates in place
- Slide out clutch pistons and retainers
- Keep all clutch discs and steels in order for measurement
Understanding the Clutch Stack
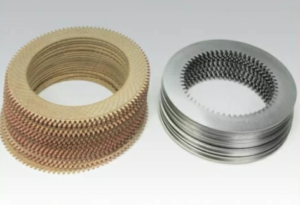
Each clutch pack typically includes:
- Pressure Plate
- Friction Discs (steel-backed with friction material)
- Steel Separator Plates
- Retaining Plate and Snap Ring
The number of discs may vary by gear ratio and transmission model. Always count and match when replacing.
Wear Indicators to Watch For
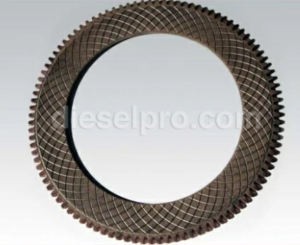
✅ Friction Discs:
- Minimum thickness should match OEM spec (e.g., 0.098″ / 2.5mm typical)
- Grooves should be visible and not polished smooth
- Discs that are glazed, burned, chipped, or worn unevenly must be replaced
✅ Steel Plates:
- Should be flat with no warping
- Use a straight edge and feeler gauge (warp limit ~0.002″ / 0.05mm)
- Blue discoloration indicates overheating
✅ Pressure Plate:
- Check for scoring, grooves, and burn marks
- Surface must be smooth and flat
- Resurface or replace as needed
✅ Clutch Piston Seals:
- Cracks, swelling, or cuts render them unusable
- Replace all seals during inspection
Measuring Clutch Pack Clearance
Proper clearance is vital for quick and firm engagement. Too much clearance = slippage. Too little = drag or binding.
Step-by-Step:
- Reassemble clutch pack without oil
- Mount dial indicator on pressure plate
- Compress pack gently with specified preload
- Measure travel distance during actuation
- Compare to OEM tolerance (e.g., 0.040″–0.060″ / 1.0–1.5mm)
If clearance is too wide, add thicker discs or shims. Too tight? Replace warped or swollen plates.
Reassembly Tips
- Soak new friction discs in transmission oil for at least 30 minutes
- Use assembly lube or oil on seals and grooves
- Torque fasteners in OEM sequence and values
- Replace gaskets and O-rings with new components
- Check alignment dowels before reseating the housing
Break-In Procedure for New Clutches
- Fill with fresh oil
- Run in neutral at idle for 10 minutes
- Cycle forward/reverse engagement at low RPM
- Do not apply full load for first 2–3 hours of operation
Gear Train and Tooth Wear Inspection for Twin Disc MG516 Marine Gear
The gear train in the MG516 is comprised of precision-ground helical or spur gears, transmitting engine torque to the propeller shaft with efficiency and minimal noise. Wear, tooth damage, and improper backlash can all cause transmission noise, vibration, and failure.
When to Inspect Gears
- During full transmission teardown
- After abnormal noise or grinding
- When metal particles are found in the oil
- If backlash increases or shifting becomes erratic
- Following oil loss or overheat events
Components in the Gear Train
- Input shaft and drive gear
- Countershaft and intermediate gears
- Output shaft gear
- Bearings and thrust washers
- Shift collars or dog clutches (in some configurations)
Gear Tooth Wear Types and Identification
1. Pitting
- Small craters or pits on gear tooth surfaces
- Usually caused by oil breakdown and metal-to-metal contact
- Indicates need for oil type review or earlier changes
2. Scuffing
- Visible smearing or streaking on tooth flanks
- Due to excessive heat or poor lubrication
- Severe scuffing = replace the gear
3. Spalling
- Large flakes or chips of surface material separating from the gear
- Caused by repeated overload or misalignment
- Immediate replacement required
4. Chipping
- Tooth corners missing
- Often due to shock loading or foreign object damage
- Inspect for missing components and bearings
5. Tooth Wear
- Even, shiny surfaces indicate normal wear
- Asymmetric wear = misalignment or shaft deflection
How to Inspect Gear Condition
- Clean gear surfaces thoroughly
- Use bright LED light and magnifying glass
- Rotate gears slowly while inspecting each tooth
- Use feeler gauge to check tooth spacing and backlash
- Document damage with photos for maintenance records
Gear Pitch and Contact Pattern Testing
Using a Prussian blue or gear marking compound, rotate gears to examine the contact pattern.
- Ideal contact is centered and even across tooth face
- High contact on one end = misalignment
- Contact near root = excessive clearance
- Edge contact = housing deflection or bearing wear
Measuring Gear Backlash in Twin Disc MG516 Marine Gear

Backlash is the amount of play between mating gear teeth. Excess backlash causes rattle and poor engagement. Too little can lead to heat buildup and tooth stress.
Tools Required
- Dial indicator (0.001″ or better)
- Magnetic base
- Gear lock tool or shaft brake
- Feeler gauges
Measurement Procedure
- Mount dial indicator on transmission case
- Set pointer against gear tooth or flange
- Lock the driven gear using brake or block
- Rotate drive gear back and forth by hand
- Record the total movement of indicator
Typical Backlash Tolerance
| Gear Type | Acceptable Range |
| Spur Gears | 0.003″–0.007″ (0.08–0.18 mm) |
| Helical Gears | 0.004″–0.010″ (0.10–0.25 mm) |
Always consult the OEM spec for your gear set. Excessive backlash = worn teeth, bearings, or housing misalignment.
What Causes Backlash Problems?
- Bearing wear or endplay
- Shaft misalignment
- Gear tooth wear or pitting
- Worn thrust washers
- Improper bearing pre-load
- Improper shimming during rebuild
Gear and Shaft Inspection Best Practices
- Measure shaft runout using dial indicator (should be <0.0015″)
- Use micrometer to inspect bearing journal diameter
- Replace bearings if scoring, pitting, or looseness is present
- Replace any cracked or heat-blued gears
- Replace thrust washers showing more than 10% thickness loss
Shaft Endplay Measurement
- Use dial indicator on shaft end
- Move shaft axially by hand
- Acceptable range typically <0.005″ (check manual)
Bearing and Race Inspection
- Remove all bearings
- Inspect for discoloration, roughness, and race pitting
- Replace as a set if wear is found
Rebuilding the Gear Train
If gear wear is significant, rebuilding may be more cost-effective than repair. Diesel Pro Power offers:
- Individual gear sets
- Output shaft and bearing kits
- Rebuild kits with shims, seals, and thrust plates
- Professionally remanufactured MG516 transmissions
Real-World Gear Failure Examples
Case Study 1: Offshore Crew Boat with Metallic Noise
- Symptoms: High-pitched whine at cruising speed
- Inspection: Found gear pitting and uneven wear pattern
- Fix: Replaced input shaft and countershaft gear set
- Result: Smooth operation restored, lower vibration
Case Study 2: Trawler with Gearbox Overheating
- Symptoms: High temp and delayed shifts
- Cause: Improper clutch clearance and gear scuffing
- Fix: Full clutch pack and intermediate gear replacement
- Post-Service: No further overheating reported
Maintenance Intervals for Gear and Clutch Inspection
| Task | Interval |
| Clutch clearance check | 1,000 hours or annual |
| Clutch pack inspection | 1,500–2,000 hours |
| Gear tooth visual inspection | At every teardown |
| Backlash check | Every overhaul |
| Bearing check | Every teardown or 3,000 hours |
| Oil analysis (wear metals) | Every 250 hours |
Final Inspection Checklist
✅ Friction disc thickness within tolerance
✅ Steel plates flat with no burn marks
✅ Clutch clearance measured and confirmed
✅ Gears free from cracks, chips, or scuffing
✅ Backlash measured and documented
✅ Shaft runout under 0.0015″
✅ New seals, gaskets, and fasteners used
✅ All measurements logged and saved
Summary: Why Clutch and Gear Inspection Matters
The Twin Disc MG516 Marine Gear is built for durability—but like any mechanical system, it depends on the condition of its internal components. Routine inspection of clutch packs and gear trains allows you to:
- Detect early signs of failure
- Prevent unplanned outages
- Maintain performance and responsiveness
- Extend overall transmission lifespan
- Improve vessel safety and reliability
By learning how to inspect clutch wear patterns, measure gear backlash, and understand the interaction between seals, bearings, and shafts, marine technicians and operators can reduce cost of ownership and avoid the consequences of mechanical breakdowns at sea.
Rebuilt Twin Disc MG516 Marine Transmissions
Plate Kit For Twin Disc MG516 Marine Transmission
Gasket Kits For Twin Disc MG516 Marine Transmission
Videos About Twin Disc Transmissions
6 Reasons Your Twin Disc Transmission Has Low Oil Pressure
7 Reasons Your Twin Disc Transmission Is Overheating
3 Reasons Your Clutch Plates in Your Twin Disc Transmission Are Making Excessive Noise
Bull Gear On A Twin Disc Transmission
Rebuilt Twin Disc Transmissions