

 Free US Calls: 1-888-433-4735
 International: 305-545-5588
Introduction
Disassembling and assembling a Cummins QSC 8.3 or QSL 9 engine requires technical expertise, proper tools, and strict adherence to best practices to prevent damage and ensure optimal performance. Whether performing a complete overhaul, component replacement, or troubleshooting, understanding the correct procedures will help avoid costly mistakes and extend the engine’s lifespan.
This guide provides a detailed, step-by-step breakdown of the disassembly and assembly process, including required tools, best practices, and precautions to follow when working on these engines.
Parts Catalog for QSC 8.3 Cummins Marine and Industrial Engines
Parts Catalog for QSL 9 Cummins Marine and Industrial Engines
1. Preparation for Engine Disassembly and Assembly
1.1 Understanding the Engine Layout
Before beginning the disassembly process, it is essential to familiarize yourself with the engine layout. The Cummins QSC 8.3 and QSL 9 are inline-six, four-stroke, turbocharged, aftercooled diesel engines. Their major components include:
- Cylinder head
- Valve train assembly
- Turbocharger and air intake system
- Fuel system (high-pressure common rail injectors and pump)
- Cooling system (water pump, radiator, thermostat, and hoses)
- Lubrication system (oil pump, filters, and passages)
- Crankshaft and connecting rods
- Camshaft and timing gears
1.2 Tools Required for Disassembly and Assembly
Proper tools are critical for an efficient and damage-free process. Using incorrect tools can cause component failure, stripped bolts, or improper assembly.
Essential Tools for Engine Disassembly
- Socket and wrench set (metric and standard)
- Torque wrenches (for precise tightening specifications)
- Breaker bar (for removing stubborn bolts)
- Pry bars (for separating parts safely)
- Rubber mallet (for tapping components without damage)
- Allen wrenches and Torx bits (for specialty fasteners)
- Oil filter wrench (for safe removal of oil filters)
- Injector puller (for safely extracting fuel injectors)
- Seal puller and installer (for removing and replacing crankshaft and camshaft seals)
Additional Tools for Reassembly
- Feeler gauges (for valve lash adjustments)
- Dial indicator (for measuring crankshaft and camshaft runout)
- Thread chasers (to clean bolt holes before reinstallation)
- Gasket scraper (for removing old gasket material)
- Sealant and lubricants (for gaskets and moving parts)
- Parts cleaner and degreaser (for cleaning reusable parts)
2. Step-by-Step Breakdown of Engine Disassembly
2.1 Pre-Disassembly Preparation
- Ensure the engine is turned off, completely cool, and disconnected from all power sources.
- Drain all fluids – oil, coolant, and fuel must be fully drained before removing components.
- Label hoses, wires, and connectors to avoid confusion during reassembly.
- Remove all belts and external accessories such as the alternator, power steering pump, and AC compressor.
2.2 Cylinder Head and Valve Train Disassembly
- Remove the valve cover.
- Use a socket wrench to loosen the valve cover bolts.
- Carefully lift the cover to avoid damaging the gasket.
- Loosen and remove rocker arms and pushrods.
- Loosen rocker arm bolts evenly to prevent warping.
- Remove pushrods and keep them in order for reassembly.
- Remove the camshaft (if necessary).
- Rotate the crankshaft to align timing marks.
- Unbolt the camshaft retaining bolts and carefully slide out the camshaft.
- Remove the cylinder head.
- Loosen cylinder head bolts in the reverse order of tightening sequence to prevent warping.
- Lift the cylinder head using an engine hoist if needed.
- Inspect for cracks or warping before reuse.
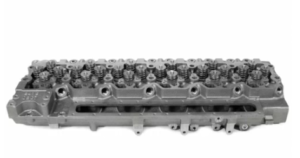
Cylinder Head & Related Components for Cummins QSC Engine
Cylinder Head & Related Components for Cummins QSL Engine
2.3 Turbocharger, Air Intake, and Exhaust System Removal
- Disconnect the air intake piping.
- Loosen hose clamps and remove intake tubes.
- Loosen hose clamps and remove intake tubes.
- Remove the turbocharger.
- Unbolt the exhaust manifold from the turbocharger.
- Carefully disconnect the oil supply and return lines.
- Remove the turbocharger and inspect for damage.
- Detach the exhaust manifold.
- Loosen and remove manifold bolts.
- Check for cracks or gasket damage.
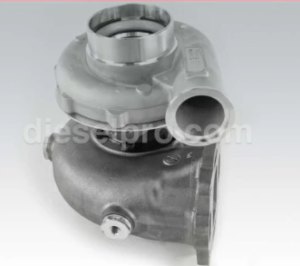
Turbocharger & Related Components for Cummins QSC Engine
Turbocharger & Related Components for Cummins QSL Engine
2.4 Fuel System Removal

- Disconnect and remove the fuel injectors.
- Use a specialty injector puller to avoid damage.
- Label injectors if they will be reused.
- Remove the high-pressure fuel pump.
- Disconnect fuel lines and high-pressure fittings.
- Unbolt and carefully remove the pump from its mounting.
- Drain and remove fuel rails.
- Loosen high-pressure lines gradually to relieve fuel pressure.
- Loosen high-pressure lines gradually to relieve fuel pressure.
Fuel Pump & Related Components for Cummins QSC Engine
Fuel Pump & Related Components for Cummins QSL Engine
2.5 Crankshaft, Pistons, and Internal Components Disassembly
- Remove the oil pan.
- Unbolt the oil pan and drain any remaining oil.
- Unbolt the oil pan and drain any remaining oil.
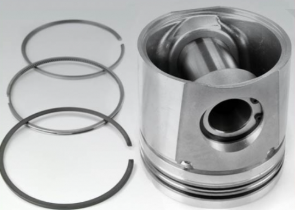
- Remove the connecting rods and pistons.
- Rotate the crankshaft to align each piston at TDC.
- Loosen and remove connecting rod bolts.
- Carefully push each piston out of the cylinder bore.
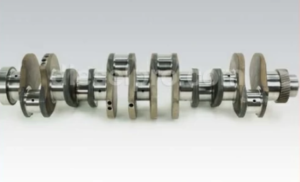
- Remove the crankshaft.
- Unbolt and remove the main bearing caps.
- Lift the crankshaft out with an engine hoist if necessary.
3. Best Practices to Avoid Damage During Disassembly
- Always loosen bolts gradually and evenly to avoid warping components.
- Use proper pullers to remove injectors and bearings instead of prying.
- Store components in order for correct reassembly.
- Clean all parts before reinstallation to remove contaminants.
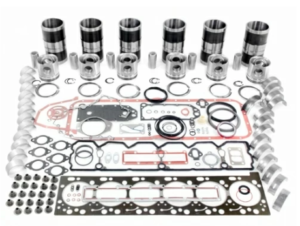
Crankshaft & Related Components for Cummins QSC Engine
Crankshaft & Related Components for Cummins QSL Engine
4. Step-by-Step Breakdown of Engine Assembly
4.1 Preparing for Assembly
- Clean all reusable components thoroughly.
- Inspect cylinder bores, pistons, and crankshaft for wear.
- Lubricate all moving parts before installation.
- Use new gaskets and seals to prevent leaks.
4.2 Crankshaft and Piston Installation
- Install the crankshaft
- Apply assembly lubricant to bearings.
- Tighten main caps to manufacturer torque specs.
Crankshaft & Related Components for Cummins QSC Engine
Crankshaft & Related Components for Cummins QSL Engine
- Install pistons and connecting rods
- Ensure correct piston orientation.
- Lubricate piston rings and cylinder walls.
- Tighten connecting rod bolts gradually and evenly.
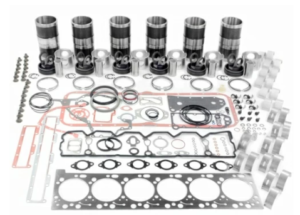
Piston Kit & Related Components for Cummins QSC Engine
Piston Kit & Related Components for Cummins QSL Engine
4.3 Reinstalling Fuel System Components

- Install fuel injectors carefully using new seals.
- Reconnect high-pressure fuel lines and torque to spec.
- Reinstall the fuel pump and ensure timing alignment.
4.4 Cylinder Head and Valve Train Assembly
- Install a new head gasket and position the cylinder head.
- Torque cylinder head bolts in the proper sequence.
- Reinstall rocker arms and adjust valve lash.
4.5 Turbocharger, Air Intake, and Exhaust Installation
- Reattach the exhaust manifold using new gaskets.
- Reconnect the turbocharger oil lines and intake piping.
- Ensure proper clamp torque on intake hoses.
4.6 Final Assembly and Start-Up Procedure
- Refill fluids – oil, coolant, and fuel.
- Reconnect all wiring and sensors.
- Prime the fuel system to prevent airlocks.
- Start the engine and check for leaks, noises, and proper operation.
5. Best Practices to Avoid Damage During Assembly
- Always use torque specifications to prevent over-tightening.
- Double-check gasket alignments to avoid leaks.
- Use clean lubricants on all moving components.
- Rotate the engine manually before starting to ensure free movement.
Conclusion
Proper disassembly and assembly of Cummins QSC 8.3 and QSL 9 engines ensures longevity, efficiency, and reliability. By following best practices, using the right tools, and carefully installing components, engine repairs and rebuilds can be performed safely and effectively.
For OEM-quality aftermarket parts, rebuild kits, and technical support, visit Diesel Pro Power for expert assistance.
Parts Catalog for QSC 8.3 Cummins Marine and Industrial Engines
Parts Catalog for QSL 9 Cummins Marine and Industrial Engines