

 Free US Calls: 1-888-433-4735
 International: 305-545-5588

The cylinder head and valve system are essential components of Cummins B Series engines, ensuring proper combustion, fuel efficiency, and overall engine performance. A well-maintained cylinder head and proper valve adjustment can prevent power loss, excessive fuel consumption, and major mechanical failures.
Cylinder Head & Related Components for Cummins 6B Marine and Industrial Engines
Cylinder Head & Related Components for Cummins 6BT Marine and Industrial Engines
Cylinder Head & Related Components for Cummins 6BTA Marine and Industrial Engines
Cylinder Head & Related Components for Cummins 4B Marine and Industrial Engines
Cylinder Head & Related Components for Cummins 4BT Marine and Industrial Engines
Cylinder Head & Related Components for Cummins 4BTA Marine and Industrial Engines
This guide will cover:
✔ Why regular valve adjustments are important for engine longevity.
✔ A step-by-step guide to adjusting valves on Cummins B Series engines.
✔ Common cylinder head issues and how to diagnose and fix them.
By following routine valve and cylinder head maintenance, you can maximize engine performance, prevent costly repairs, and extend engine life.
Importance of Regular Valve Adjustments
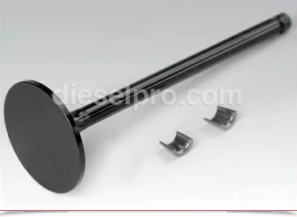
The valves in a diesel engine regulate air intake and exhaust flow, ensuring proper combustion and efficiency. Over time, the valve lash (clearance between the rocker arm and valve stem) can increase or decrease, leading to engine inefficiencies and potential damage.
Why Are Valve Adjustments Necessary?
✔ Prevents Power Loss: Excessive valve clearance reduces the intake and exhaust efficiency, leading to lower performance.
✔ Improves Fuel Economy: A properly adjusted valve system optimizes combustion, reducing fuel waste and unburned fuel emissions.
✔ Extends Engine Life: Incorrect valve lash can cause valve seat wear, overheating, and even valve breakage, leading to costly repairs.
✔ Reduces Engine Noise: Incorrectly adjusted valves can cause excessive clicking or knocking sounds, indicating poor valve function.
✔ Protects Cylinder Head Components: Maintaining proper valve lash prevents valve overheating, improper seating, and rocker arm wear.
How Often Should You Adjust the Valves?
| Application Type | Valve Adjustment Interval |
| Light-Duty (Trucks, Pickups, Small Equipment) | Every 150,000 miles or 5,000 hours |
| Heavy-Duty (Trucking, Construction, Marine, Industrial) | Every 100,000 miles or 3,000 hours |
| High-Performance or Marine Applications | Every 50,000 miles or 1,500 hours |
✔ Marine engines and high-performance applications require more frequent adjustments due to constant high loads and varying RPM conditions.
Step-by-Step Guide to Adjusting Valves on Cummins B Series Engines
Tools and Equipment Needed:

✔ Feeler gauge (0.010″ for intake, 0.020″ for exhaust)
✔ Socket wrench set
✔ Torque wrench
✔ Flathead screwdriver
✔ Service manual (for reference to torque specs)
Step 1: Prepare the Engine for Valve Adjustment
- Ensure the engine is cool to prevent metal expansion from affecting measurements.
- Disconnect
the battery for safety.
- Remove the valve cover by unbolting it from the cylinder head.
Step 2: Set the Engine to Top Dead Center (TDC)
- Rotate the crankshaft clockwise until cylinder #1 is at TDC on the compression stroke.
- Verify TDC alignment using the timing marks on the damper pulley.
Step 3: Identify the Adjustment Sequence
- Cummins engines use a specific valve adjustment sequence, ensuring proper clearance across all cylinders.
- Typically, you will adjust half the valves at TDC for cylinder #1, then rotate the crankshaft 360 degrees and adjust the remaining valves.
Step 4: Adjust Intake Valves
- Insert the feeler gauge (0.010″) between the rocker arm and valve stem.
- Loosen the adjusting screw slightly using a flathead screwdriver.
- Adjust the clearance by tightening or loosening the screw until slight resistance is felt when sliding the feeler gauge.
- Tighten the locking nut while holding the adjusting screw in place.
Step 5: Adjust Exhaust Valves
- Use a 0.020″ feeler gauge for the exhaust valves.
- Repeat the adjustment process, ensuring proper clearance.
Step 6: Rotate the Crankshaft and Adjust the Remaining Valves
- Rotate the crankshaft 360 degrees to position cylinder #6 at TDC on the compression stroke.
- Adjust the remaining intake and exhaust valves following the same process.
Step 7: Reassemble and Test
- Reinstall the valve cover and tighten it according to factory torque specs.
- Reconnect the battery and start the engine.
- Listen for any unusual noises and check for smooth idling and acceleration.
✔ A correctly adjusted valve system ensures maximum efficiency, smooth operation, and extended engine life.
Signs of Cylinder Head Issues and How to Address Them
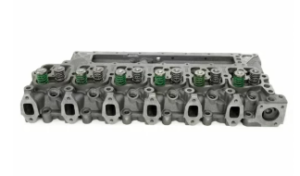
The cylinder head is a critical engine component, housing the valves, injectors, and combustion chambers. Over time, wear, overheating, or improper maintenance can lead to serious issues requiring repairs or replacement.
Common Cylinder Head Problems
| Issue | Symptoms | Causes | Solutions |
| Blown Head Gasket | Overheating, coolant in oil, white smoke | Overheating, improper torque | Replace head gasket, resurface cylinder head |
| Cracked Cylinder Head | Coolant loss, rough idle, engine misfire | Extreme heat, poor coolant maintenance | Inspect with pressure test, replace cylinder head |
| Warped Cylinder Head | Poor compression, oil leaks | Excessive engine heat | Machine or replace head |
| Excessive Valve Wear | Power loss, clicking noise | Poor lubrication, infrequent valve adjustments | Adjust valves, replace worn components |
✔ Detecting cylinder head issues early prevents major engine damage and expensive overhauls.
How to Diagnose Cylinder Head Issues
1. Check for Coolant Leaks or Overheating
- A blown head gasket or cracked cylinder head can allow coolant to leak into combustion chambers.
- Look for white smoke from the exhaust, which indicates coolant burning in the cylinders.
2. Inspect Oil Condition
- If the oil appears milky or foamy, it may contain coolant, suggesting a head gasket failure.
- Perform an oil analysis to detect coolant contamination.
3. Perform a Compression or Leak-Down Test
- A compression test can determine if cylinders are sealing properly.
- A leak-down test pinpoints air escaping through a cracked head or worn valves.
4. Listen for Valve Train Noise
- Clicking, knocking, or excessive ticking could indicate loose valves or worn rocker arms.
- Adjusting the valves and checking for excessive play helps diagnose issues early.
✔ Routine inspections and compression testing can detect cylinder head problems before they cause catastrophic failure.
Preventing Cylinder Head and Valve Issues
✔ Follow proper valve adjustment intervals to prevent excessive wear.
✔ Use high-quality coolant and maintain the cooling system to prevent head gasket failures.
✔ Torque cylinder head bolts correctly to prevent warping and leaks.
✔ Monitor engine temperature regularly to avoid overheating.
✔ Use high-quality diesel engine oil to lubricate valve train components effectively.
✔ Preventive maintenance ensures long-term durability and performance.
Final Thoughts
Proper cylinder head and valve maintenance are essential for Cummins 6B, 6BT, 6BTA, 4B, 4BT, and 4BTA enginesto ensure optimal performance, efficiency, and longevity. By performing regular valve adjustments, inspecting cylinder heads for wear, and diagnosing issues early, you can:
✔ Prevent major engine failures and expensive repairs.
✔ Improve fuel efficiency and power output.
✔ Extend engine lifespan beyond 500,000+ miles.
Cylinder Head & Related Components for Cummins 6B Marine and Industrial Engines
Cylinder Head & Related Components for Cummins 6BT Marine and Industrial Engines
Cylinder Head & Related Components for Cummins 6BTA Marine and Industrial Engines
Cylinder Head & Related Components for Cummins 4B Marine and Industrial Engines
Cylinder Head & Related Components for Cummins 4BT Marine and Industrial Engines
Cylinder Head & Related Components for Cummins 4BTA Marine and Industrial Engines