

 Free US Calls: 1-888-433-4735
 International: 305-545-5588

Cylinder Head Removal, Installation, and Valve and Seat Service
The cylinder head of the Cummins ISM, ISMe, and QSM11 engines plays a critical role in combustion efficiency, air-fuel mixture control, and engine cooling. Proper removal, installation, and servicing of the valves and seats are essential for maintaining optimal performance, fuel efficiency, and longevity.
This guide provides step-by-step procedures for removing and installing the cylinder head, inspecting components, servicing valves and seats, and performing final assembly checks.
For exact torque values, valve clearance settings, and service tolerances, consult an OEM service manual or reach out to Diesel Pro Power for expert assistance.
Parts Catalog for ISM Cummins Marine and Industrial Engines
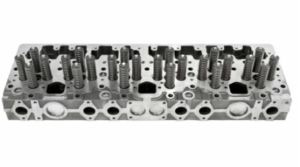
Cylinder Head & Related Components for Cummins ISM engine
Parts Catalog for QSM Cummins Marine and Industrial Engines
Cylinder Head & Related Components for Cummins QSM11 engine
Safety and Preparation Before Cylinder Head Service
Servicing a cylinder head requires attention to detail, precise measurements, and proper handling techniques to avoid gasket failures, warping, or improper valve operation.
Personal Protective Equipment (PPE)

✔ Safety glasses – Protects against debris and metal shavings.
✔ Mechanic gloves – Prevents cuts and chemical exposure.
✔ Steel-toe boots – Protects against heavy falling parts.
✔ Hearing protection – Recommended when using grinders or impact tools.
Work Area and Tool Preparation
- Ensure a clean workspace free from contaminants.
- Have all tools and measuring instruments properly calibrated.
- Use an engine hoist to safely remove and install the cylinder head.
Essential Tools for Cylinder Head Service

✔ Torque wrench – For proper bolt tightening.
✔ Valve spring compressor – For removing and reinstalling valve assemblies.
✔ Feeler gauges – For measuring valve clearance settings.
✔ Dial indicator – For checking valve seat concentricity.
✔ Cylinder head straightedge – For measuring deck surface flatness.
Step-by-Step Cylinder Head Removal and Installation
Step 1: Preparing for Cylinder Head Removal
- Drain the Engine Coolant and Oil
- Open the radiator drain valve and allow coolant to fully exit.
- Drain the engine oil completely before removing the head.
- Disconnect Air Intake, Exhaust, and Fuel System Components
- Remove air intake piping and turbocharger connections.
- Unbolt the exhaust manifold and disconnect the downpipe.
- Detach fuel lines and injectors, labeling them for reinstallation.
- Remove the Valve Cover and Rocker Assembly
- Unbolt the valve cover and lift it off.
- Remove rocker arms, pushrods, and injectors in the correct order.
Step 2: Cylinder Head Removal Procedure

- Loosen Cylinder Head Bolts in Sequence
- Use a crisscross pattern to prevent warping or cracking.
- Start from the outer bolts and work toward the center.
- Lift the Cylinder Head Using an Engine Hoist
- Secure lifting points evenly to prevent stress on the head.
- Lift the head straight up and place it on a clean workbench.
- Inspect the Cylinder Head for Damage
- Check for cracks, warping, or blown gasket areas.
- Use a straightedge and feeler gauge to measure deck flatness.
Step 3: Cylinder Head Inspection and Cleaning

- Clean the Cylinder Head Thoroughly
- Remove carbon deposits, oil residue, and gasket material.
- Use a soft wire brush to clean combustion chambers.
- Check for Warping and Deck Surface Flatness
- Place a precision straightedge across the head.
- Use feeler gauges to check for gaps—warping beyond 0.003 inches (0.08mm) requires resurfacing.
- Inspect Coolant Passages for Blockages
- Use a borescope or flashlight to check for corrosion or debris.
- Use a borescope or flashlight to check for corrosion or debris.
Cylinder Head & Related Components for Cummins ISM engine
Cylinder Head & Related Components for Cummins QSM11 engine
Valve and Seat Service for Cummins ISM, ISMe, and QSM11
The valves and seats control the air-fuel mixture intake and exhaust gas flow. Proper servicing ensures tight sealing, optimal compression, and reduced wear.
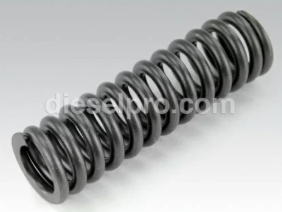
Step 1: Removing Valves and Springs

- Use a Valve Spring Compressor
- Compress the valve springs and remove the keepers.
- Carefully lift out valves, springs, and retainers.
- Inspect Valve Faces and Stems for Wear
- Look for burn marks, cracks, or erosion.
- Check valve stem diameter for excessive wear.
- Measure Valve Seat Width and Contact Area
- Use a dial indicator to check seat concentricity.
- If wear exceeds specifications, the valve seats must be re-machined.
Step 2: Reconditioning Valves and Seats

- Resurface Valve Faces Using a Valve Grinder
- Remove minimal material to restore a flat sealing surface.
- Remove minimal material to restore a flat sealing surface.
- Cut and Lap Valve Seats
- Use seat-cutting tools to restore seat angles.
- Lap the valves using lapping compound to achieve a perfect seal.
- Verify Seat Contact Width
- Seat width should be between 1.5mm and 2.5mm.
- If the seat is too wide, narrow it with a seat-cutting tool.
Step 3: Installing Valves and Springs
- Lubricate Valve Stems and Install Valves
- Apply clean engine oil to valve stems before installation.
- Insert valves carefully into their respective guides.
- Install Valve Springs, Retainers, and Keepers
- Use a valve spring compressor to seat the retainers properly.
- Ensure keepers are fully seated before releasing spring tension.
- Check Valve Seating and Stem Clearance
- Rotate the valve by hand to verify smooth movement.
- Check stem-to-guide clearance using a dial indicator.
Cylinder Head Installation Procedures
After valve servicing, the cylinder head must be installed correctly to prevent gasket failures and coolant leaks.
Step 1: Preparing for Cylinder Head Installation
- Clean the Cylinder Block Deck Surface
- Remove old gasket residue using a plastic scraper.
- Ensure bolt holes are clean and free of debris.
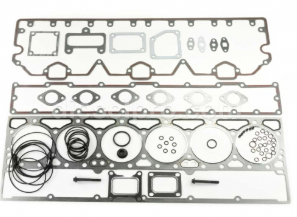
- Install a New Head Gasket
- Place the gasket on the block and align coolant and oil passages.
- Place the gasket on the block and align coolant and oil passages.
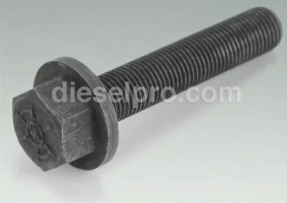
Step 2: Cylinder Head Bolt Tightening Procedure
- Lower the Cylinder Head Evenly onto the Block
- Use an engine hoist to prevent misalignment.
- Use an engine hoist to prevent misalignment.
- Torque Cylinder Head Bolts in Stages
- Tighten bolts in a specified sequence (usually from center outward).
- Apply proper torque in multiple passes following OEM specifications.
- Reinstall Rocker Arms, Pushrods, and Injectors
- Adjust valve lash to proper clearance settings.
- Secure the injectors and reconnect fuel lines.
Step 3: Final System Checks
- Reattach Coolant Hoses and Fill with Proper Coolant
- Use Cummins-approved coolant to prevent corrosion and scaling.
- Use Cummins-approved coolant to prevent corrosion and scaling.
- Reconnect Air Intake, Turbo, and Exhaust Components
- Secure all clamps and gaskets properly.
- Secure all clamps and gaskets properly.
- Start Engine and Perform Initial Tests
- Check for oil leaks, coolant leaks, and unusual noises.
- Verify engine performance and valve operation.
Final Notes on Cylinder Head Maintenance for Cummins ISM, ISMe, and QSM11
✔ Always follow proper torque sequences to prevent warping.
✔ Use precision measuring tools to verify valve and seat clearances.
✔ Ensure clean assembly to prevent oil or coolant contamination.
✔ Consult an OEM manual or Diesel Pro Power for expert guidance.
By following these best practices for cylinder head removal, valve servicing, and reinstallation, you ensure optimal engine performance and long-term reliability for Cummins ISM, ISMe, and QSM11 engines.
Parts Catalog for ISM Cummins Marine and Industrial Engines
Cylinder Head & Related Components for Cummins ISM engine
Parts Catalog for QSM Cummins Marine and Industrial Engines
Cylinder Head & Related Components for Cummins QSM11 engine