

 Free US Calls: 1-888-433-4735
 International: 305-545-5588

Detailed Guidance on How to Properly Reassemble Components For Series 71 Inline Engines (271, 371, 471, 671)

Proper reassembly is critical to ensuring the long-term performance and reliability of the Detroit Diesel Series 71 engine. Each component must be handled with care, thoroughly cleaned, inspected, and assembled according to manufacturer specifications to avoid issues such as leaks, improper seating, or part failure.
Parts Catalog for Detroit Diesel 271 Marine Engine
Parts Catalog for Detroit Diesel 371 Marine Engine
Parts Catalog for Detroit Diesel 471 Marine Engine
Parts Catalog for Detroit Diesel 671 Marine Engine
1. Cleanliness and Preparation

- Ensure a Clean Work Area: Before reassembly, make sure your work area is free of dirt, dust, and debris. Contaminants can interfere with sealing surfaces, causing leaks or damaging internal components.
- Thoroughly Clean All Parts: Every part that is being reassembled should be thoroughly cleaned to remove oil, dirt, carbon buildup, or any foreign material. Use a degreaser for stubborn grime, and ensure parts are completely dry before installation.
- Use Lint-Free Cloths: When cleaning surfaces, use lint-free cloths to avoid introducing particles into critical engine areas.
- Organize Parts: Lay out all components in the order they will be reassembled to avoid confusion and ensure no part is left out. Organize bolts and other fasteners by size and purpose, especially for components that require specific torque values.
2. Component Inspection

Before reassembling, inspect every component carefully:
- Inspect Sealing Surfaces: Ensure that all mating surfaces are smooth and free of scratches, gouges, or debris. Even small imperfections can lead to oil or coolant leaks.
- Check for Wear or Damage: Examine all critical components (e.g., fuel lines, gaskets, manifolds, cylinder heads) for signs of wear, cracks, or deformation. Replace any part that shows signs of damage to prevent future failures.
- Test Moving Parts: Ensure that any parts with moving elements, such as valves or springs, function properly without binding or excessive play.
- Replace Old Gaskets and Seals: Always install new gaskets, seals, and O-rings during reassembly. Reusing old gaskets can lead to improper sealing, oil leaks, and premature engine wear.
3. Reassembling Fuel Lines

- Ensure Fuel System Cleanliness: Before reattaching any fuel lines, make sure they are completely free from contaminants. Any debris in the lines can clog injectors or cause fuel delivery issues.
- Align Fuel Lines Properly: Ensure that fuel lines are properly aligned with their respective fittings on the fuel pump, injectors, and fuel rails. Cross-threading or misalignment can damage the fittings, leading to fuel leaks.
- Tighten the Fittings Securely: Hand-tighten all fuel line connections first, then use a fuel line wrench or flare nut wrench to secure the fittings. Be careful not to over-tighten, as this can strip threads or distort the fittings.

Socket To Install & Remove Injector Fuel Lines For Detroit Diesel 671
- Test for Leaks: After reassembling the fuel system, pressurize the fuel lines and check for any leaks. Fix leaks immediately to avoid fuel loss or engine damage.
Parts Catalog for Injectors, Fuel Lines & Related Components for Detroit Diesel & Industrial Engines
Parts Catalog for Fuel Pump & Related Components for Detroit Diesel & Industrial Engines
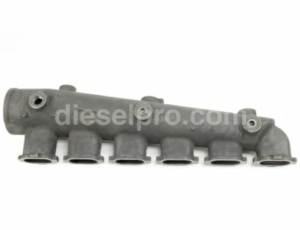
4. Reinstalling the Exhaust Manifold
-
- Clean the Exhaust Ports: Before installing the exhaust manifold, clean the exhaust ports on the cylinder head to ensure proper seating and prevent exhaust leaks.
- Install New Gaskets: Always use new exhaust manifold gaskets to ensure proper sealing. Position the gaskets carefully to avoid misalignment, which can lead to leaks.
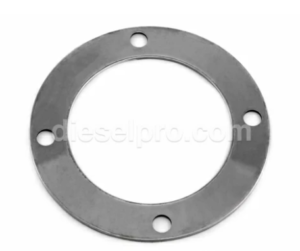
Gasket for Detroit Diesel 671 Marine Manifold Flange
Head to Manifold Gasket for Detroit Diesel 671

Head to Manifold Gasket for Detroit Diesel 471 and 671
- Tighten the Bolts Evenly: Start by hand-tightening the exhaust manifold bolts, then tighten them in a criss-cross pattern to ensure even clamping force. Use a torque wrench to tighten the bolts to the manufacturer’s specified torque of 30-35 lb-ft (41-47 N·m).
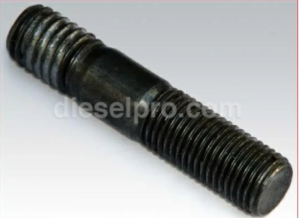
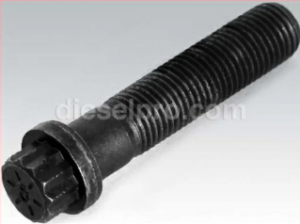
Manifold stud for Detroit Diesel 671
- Check for Exhaust Leaks: After reassembly, run the engine and inspect the exhaust manifold for any signs of leaks. If you detect leaks, recheck the bolt tightness or replace damaged gaskets.
Exhaust & Related Components for Detroit Diesel Marine Engine
- Clean the Exhaust Ports: Before installing the exhaust manifold, clean the exhaust ports on the cylinder head to ensure proper seating and prevent exhaust leaks.
5. Reassembling the Cylinder Head
- Clean and Inspect the Cylinder Head: Before reassembly, thoroughly clean the cylinder head and inspect it for cracks, warping, or damaged valve seats. Use a straight edge to check for warping on the head’s mating surface.
- Install New Head Gasket: Place a new head gasket onto the engine block, ensuring proper alignment with the cylinder head. Double-check the gasket’s positioning to avoid misfires or leaks.

Technician Installing All Gaskets Needed For The Detroit Diesel 671 Cylinder Head
- Reinstall the Cylinder Head: Carefully position the cylinder head onto the engine block. Hand-tighten the head bolts first to ensure alignment, then tighten them in stages using a criss-cross pattern. Use the following torque specifications for tightening the cylinder head bolts:
- First pass: 50 lb-ft (68 N·m)
- Final pass: Tighten the bolts to 170-180 lb-ft (231-244 N·m), ensuring you follow the proper tightening sequence.

In This Photo The Technician Lines Up The Cylinder Head With Two Bolts & Lowers It Onto The Cylinder Block Of A Detroit Diesel 671
- Adjust Valve Clearance: After the cylinder head is installed, adjust the valve clearances according to the engine’s specifications:
- Valve clearance: 0.015 inches for intake and exhaust valves when cold.

Technician Using A Feeler Gauge To Set The Exhaust Valve Clearance & Tightening The Bolt To Set To Hold It At That Clearance
- Valve clearance: 0.015 inches for intake and exhaust valves when cold.
- Check for Coolant and Oil Leaks: Once reassembled, run the engine and check the area around the cylinder head for any coolant or oil leaks. Re-torque the head bolts if necessary.
This ensures a comprehensive and accurate process for cylinder head reassembly, including critical torque specs and valve clearance.
Cylinder Head & Related Components for Detroit Diesel Marine Engine
The Importance of Following Torque Specifications

Adhering to the correct torque specifications is crucial when reassembling the Detroit Diesel 71 Series engines. Overtightening or undertightening fasteners can lead to mechanical failure, engine damage, or leakage. Every fastener used in these engines must be tightened to the manufacturer’s recommended values to ensure a safe and efficient assembly.
See All Torque Specification for Detroit Diesel 71 Series Inline Engines 271, 371, 471 and 671
Use a Torque Wrench
Always use a calibrated torque wrench to achieve the specified torque. Avoid using manual estimates or “by feel,” as inaccuracies can lead to misalignment, loose components, or damage to the threads.
See All Torque Specification for Detroit Diesel 71 Series Inline Engines 271, 371, 471 and 671
Follow Manufacturer’s Guidelines
Every component has a specified torque value, based on the bolt size and material. These guidelines are based on extensive testing to ensure optimal engine performance.
Tighten in Stages
For critical components like the cylinder head, manifold, and flywheel bolts, tightening should be done in stages using a criss-cross pattern. This method ensures even pressure distribution and reduces the risk of warping or stress on the components.

Comprehensive Torque Specifications:
1. Cylinder Head Bolts
- Thread Size: 5/8-11
- Torque Specification: 170-180 lb-ft (237-244 N·m)
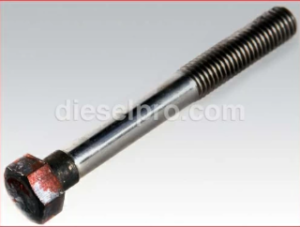
Cylinder Head Bolt For Detroit Diesel 71 Series Inline Engines
2. Main Bearing Cap Bolts
- Thread Size: 5/8-11
- Torque Specification:
- Assembly: 190-200 lb-ft (258-272 N·m)
- Bolting: 165-175 lb-ft (224-238 N·m)
3. Connecting Rod Bolts
- Thread Size: 7/16-20For One-Piece Piston:
- Torque Specification:
- Lubrite Nuts: 60-70 lb-ft (81-95 N·m)
- Castellated Nuts: 65-75 lb-ft (88-102 N·m)
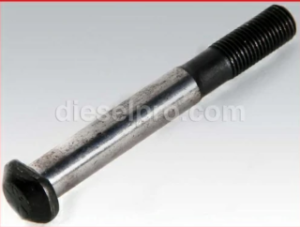
Connecting Rod One Piece Bolt for Detroit Diesel 671
For Two-Piece (Crosshead) Piston:
- Torque Specification:
- Attaching Bolts to Piston Pin: 55-60 lb-ft (75-81 N·m)
- Connecting Rod Cap Bolts:
- Lubrite Nuts: 60-70 lb-ft (81-95 N·m)
- Castellated Nuts: 65-75 lb-ft (88-102 N·m)
Bolt for two piece connecting rod for Detroit Diesel 671
4. Injector Clamp Bolts
- Thread Size: 3/8-16
- Torque Specification: 20-25 lb-ft (27-34 N·m)
5. Rocker Arm Shaft Bracket Bolts
- Thread Size: 1/2-13
- Torque Specification: 90-100 lb-ft (122-136 N·m)

Rocker arm brackets Bolt for Detroit Diesel 671
6. Flywheel Housing Bolts
- Thread Size: 1/2-13
- Torque Specification: 90-100 lb-ft (122-136 N·m)
7. Exhaust Manifold Bolts
- Thread Size: 3/8-16
- Torque Specification: 30-35 lb-ft (41-47 N·m)
8. Oil Pump Mounting Bolts
- Thread Size: 3/8-16
- Torque Specification: 35-39 lb-ft (47-53 N·m)
9. Crankshaft Pulley Bolt
- Thread Size: 3/4-16
- Torque Specification: 240-250 lb-ft (325-339 N·m)
10. Water Pump Mounting Bolts
1. Freshwater Pump Mounting Bolts
- Thread Size: 3/8-16
- Torque Specification: 35-40 lb-ft (47-54 N·m)
This applies to the freshwater pump that circulates coolant within the closed-loop cooling system of the engine.
Freshwater Pump & Related Components for Detroit Diesel Marine Engines
2. Raw Water Pump Mounting Bolts (Jabsco/JMP Pump)
- Thread Size: 5/16-18
- Torque Specification: 14-16 lb-ft (19-22 N·m)
This torque is specific to the bolts that secure the Jabsco/JMP raw water pump, commonly used to draw seawater or external water for cooling the heat exchanger.
Raw Water Pump & Related Components for Detroit Diesel Marine Engines
Overtightening and Undertightening
- Overtightening can cause bolts or studs to stretch beyond their yield point, weakening the material and potentially leading to fracture or engine failure.
- Undertightening can allow components to shift under stress, leading to vibrations, leaks, or even catastrophic failure.
Final Checks
Once assembly is complete, it’s crucial to conduct a final check. This includes rechecking all torque values and monitoring for any signs of leaks or misalignment. Torque should be applied in stages to avoid uneven pressure or damage to components.
By following these guidelines and using the specified torque values, you can ensure that the Detroit Diesel 71 Series engines are assembled safely and efficiently.
Recommended Sealants and Techniques to Prevent Leaks After Assembly

Proper sealing is critical for the longevity and performance of the Detroit Diesel 71 Series engine. Using the correct sealant, ensuring gaskets are new and properly installed, and preparing mating surfaces effectively are all crucial steps to prevent oil, coolant, or air leaks after assembly. Following these practices ensures that the engine operates efficiently without the risk of component failure or contamination.
Use the Correct Sealant
Using the appropriate sealant for specific engine components is key to ensuring proper sealing. Different parts of the engine require different types of sealants based on factors such as heat resistance, pressure tolerance, and chemical exposure.
- Manufacturer Recommendations:
Always follow the manufacturer’s recommendations for the type of sealant to use on specific components. For example, Loctite or Teflon-based sealants are often used for certain fasteners or fittings that require additional sealing beyond a gasket.
- Application:
Apply sealant evenly and sparingly. Over-applying can lead to excess sealant squeezing into the engine, potentially clogging oil or coolant passages, while under-applying can leave areas exposed, leading to leaks.
- Avoiding Excess Sealant:
Especially for fasteners that pass into oil or coolant galleries, apply sealant sparingly to prevent excess from entering these vital fluid pathways. Ensure that the threads are clean and free of debris before applying any sealant to ensure an even bond.
- Heat-Resistant Sealants:
Certain areas, such as the exhaust manifold or turbocharger connections, may require heat-resistant sealants that can withstand high temperatures without breaking down. Make sure to use sealants rated for high-temperature applications in these areas.
Install New Gaskets
It’s essential to use new gaskets during engine reassembly to ensure a proper seal between mating surfaces. Reusing old gaskets can lead to poor sealing, leaks, and reduced engine performance.
- Replace Old Gaskets: Never reuse old gaskets, as they often deform once used and can no longer provide the necessary seal. Cracked, brittle, or compressed gaskets should be replaced with new ones designed specifically for the engine component in question.
- Choose High-Quality Gaskets: Use high-quality, manufacturer-approved gaskets that are made for the specific application. Cheaper or incorrect gaskets may not provide an adequate seal, especially under high pressure or temperature conditions.
- Ensure Proper Gasket Fitment: Always ensure the gasket is properly aligned with the component before securing it. Misaligned gaskets can lead to fluid leaks, air intake issues, or exhaust gas leaks, which can reduce engine efficiency and increase wear on components.
- Light Coat of Sealant: For some applications, a very light coat of sealant may be applied to gaskets to ensure they stay in place during assembly and to provide an extra layer of protection. However, this should only be done if specified by the manufacturer, as overusing sealant on gaskets can reduce their effectiveness.
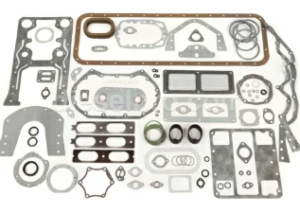
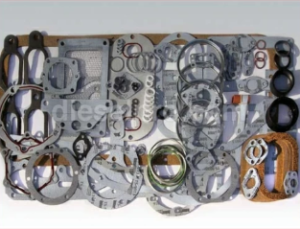
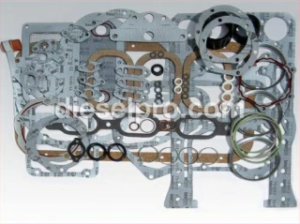
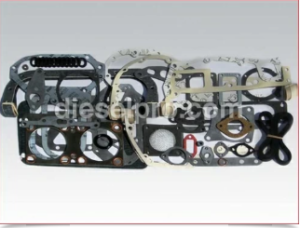
Gasket Kit & Related Components for Detroit Diesel Marine & Industrial Engines
Ensure Proper Mating of Surfaces

Before reassembly, it is essential to clean and inspect the mating surfaces to ensure that they are smooth, free from debris, and capable of forming a proper seal when clamped together.
- Surface Cleaning: Thoroughly clean the mating surfaces of both the engine block and components like cylinder heads, exhaust manifolds, or oil pans. Use a scraper or gasket remover to clear off any remaining old gasket material, sealant, or debris. Even small pieces of dirt or gasket residue can prevent proper sealing and lead to leaks.
- Smooth and Even Surfaces: Inspect the mating surfaces for any scratches, warping, or gouges. Imperfections in the surface can lead to leaks or improper sealing. If necessary, use a straight edge to check the surface flatness. Surfaces that are warped may need to be machined flat before reassembly.
- Use Proper Fastening Technique: Tighten fasteners in the correct sequence, typically in a criss-cross pattern, to ensure even pressure across the mating surfaces. This prevents one side from being over-compressed and causing leaks on the opposite side. Also, be sure to tighten bolts to the manufacturer’s specified torque values.
Final Checks for Leaks
After completing assembly and running the engine, it is important to perform a thorough inspection for leaks. This ensures that all seals and gaskets are working properly and that no fluid or pressure is escaping from the system.
- Initial Engine Run: Once the engine is reassembled and filled with oil, coolant, and other fluids, start the engine and allow it to reach operating temperature. Monitor the engine during the initial run for signs of leaks, particularly around critical areas like the cylinder head, oil pan, and exhaust manifold.
- Visual Inspection: Check for signs of oil, coolant, or fuel leaks around the mating surfaces, gaskets, and fasteners. Leaks may appear as drops of fluid or wet spots near the sealing surfaces. Inspect areas such as the valve cover, exhaust manifold, turbocharger connections, oil lines, and water pumps.
- Re-Torque Fasteners: In some cases, particularly after initial engine operation, bolts may need to be re-torqued to ensure proper sealing. This is particularly important for components like the cylinder head, which may expand with heat. Follow the manufacturer’s guidelines for re-torquing after the initial run.
- Pressure Testing: Perform a pressure test on systems such as the cooling system or fuel system to detect any leaks that may not be visible during a standard inspection. Use appropriate testing equipment to check for pressure loss and pinpoint any areas that may be leaking.
Parts Catalog for Detroit Diesel 271 Marine Engine
Parts Catalog for Detroit Diesel 371 Marine Engine