

 Free US Calls: 1-888-433-4735
 International: 305-545-5588

The assembly of Cummins ISM, ISMe, and QSM11 engines requires precision, attention to detail, and strict adherence to specifications to ensure reliability, durability, and optimal performance. Proper torque values, sequence procedures, and cleanliness are essential for avoiding premature wear, oil leaks, or mechanical failure.
This guide provides a step-by-step process for assembling a Cummins ISM, ISMe, or QSM11 engine, covering tools, safety precautions, pre-assembly checks, lubrication points, and component installation.
For exact torque specifications, component tolerances, and technical guidance, consult an OEM service manual or reach out to Diesel Pro Power for expert assistance.
Parts Catalog for ISM Cummins Marine and Industrial Engines
Parts Catalog for QSM11 Cummins Marine and Industrial Engines
Safety and Preparation Before Engine Assembly
Proper preparation before assembling an engine reduces the risk of misalignment, part failure, or contamination.
Work Area and Tools Preparation
✔ Ensure a clean and organized workspace free of dust and debris.
✔ Use an engine stand or secure mounting platform to support the engine block.
✔ Keep all fasteners and small parts labeled for easy identification.
✔ Use only Cummins-approved lubricants, sealants, and assembly tools.
Personal Protective Equipment (PPE)

✔ Safety glasses – Protects eyes from metal shavings, oil, and debris.
✔ Nitrile gloves – Keeps hands clean and prevents contamination.
✔ Steel-toe boots – Protects against heavy falling components.
Step-by-Step Engine Assembly Procedures
Engine assembly should follow a structured process, ensuring each component is installed correctly and torqued to the correct specifications.
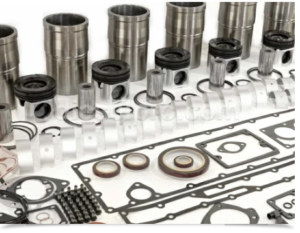
Step 1: Preparing the Cylinder Block
- Clean and Inspect the Block
- Ensure the block is free of oil residue, dirt, and debris.
- Use compressed air to remove any metal particles from oil galleries and coolant passages.
- Install Main Bearings and Bearing Caps
- Apply assembly lubricant to all bearing surfaces.
- Install upper and lower main bearings into the block.
- Position the main bearing caps and hand-tighten fasteners.
- Torque main cap bolts to specification in the correct sequence.
Torque Specs for Cummins Engines
- Install the Rear Main Seal
- Apply a thin coat of oil on the rear main seal lip.
- Press the seal evenly into place using a seal driver.
- Ensure proper alignment to prevent oil leaks.
Step 2: Crankshaft Installation
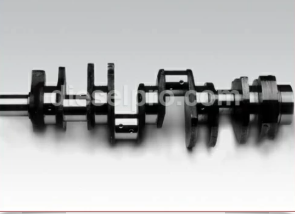
- Lubricate and Install the Crankshaft
- Apply assembly oil to all bearing journals.
- Lower the crankshaft into the main bearings carefully.
- Torque Main Bearing Caps
- Follow the correct sequence and torque values from the center outward.
- Use a dial bore gauge to verify bearing clearances.
- Check Crankshaft Rotation
- Rotate the crankshaft by hand to ensure smooth movement.
- If resistance is felt, check for bearing misalignment or interference.
Crankshaft & Related Components for Cummins ISM engine
Crankshaft & Related Components for Cummins QSM11 engine
Step 3: Piston and Connecting Rod Assembly
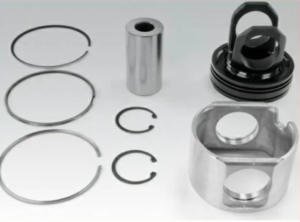
- Install Piston Rings

Piston ring assemby tool
- Check ring end gaps and ensure they meet OEM specifications.
- Install rings in the correct order and position gaps according to specifications.
- Lubricate Pistons and Cylinder Walls
- Apply a thin layer of clean engine oil to the piston skirts and cylinder bores.
- Apply a thin layer of clean engine oil to the piston skirts and cylinder bores.
- Install Pistons and Connecting Rods
- Use a ring compressor tool to carefully insert each piston into the cylinder bore.
- Ensure correct piston orientation to prevent improper combustion.
- Attach connecting rods to the crankshaft and secure with rod cap bolts.
- Torque Connecting Rod Caps
- Tighten rod bolts in stages, following the correct torque sequence.
- Verify bearing clearances using Plastigage™ before final tightening.
Torque Specs for Cummins Engines
- Rotate the Crankshaft to Check for Free Movement
- Ensure the crankshaft rotates smoothly without resistance.
- Ensure the crankshaft rotates smoothly without resistance.
Piston Kit & Related Components for Cummins ISM engine
Piston Kit & Related Components for Cummins QSM11 engine
Step 4: Camshaft and Timing Gear Installation
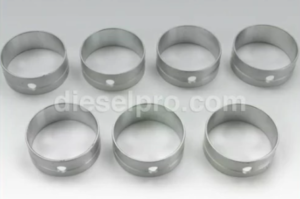
- Lubricate and Install the Camshaft
- Apply assembly lube to the cam lobes and journals.
- Slide the camshaft into the block carefully, ensuring alignment with cam bearings.
- Install Timing Gears
- Align timing marks on the camshaft and crankshaft gears.
- Use a dial indicator to verify proper cam timing alignment.
- Torque Camshaft Retainer Bolts
- Secure retainer bolts to manufacturer specifications.
- Rotate the camshaft by hand to check for smooth movement.
Camshaft & Related Components for Cummins ISM engine
Camshaft & Related Components for Cummins QSM11 engine
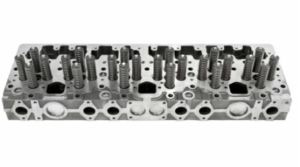
Step 5: Cylinder Head Installation
- Prepare the Cylinder Head Surface
- Ensure mating surfaces are free of oil, debris, or old gasket material.
- Inspect the head gasket for defects before installation.
- Install the Head Gasket
- Place the new gasket on the cylinder block.
- Align coolant and oil passages properly.
- Lower the Cylinder Head onto the Block
- Use an engine hoist to carefully position the cylinder head.
- Ensure perfect alignment before inserting head bolts.
- Torque Cylinder Head Bolts in Stages
- Follow OEM-recommended torque sequences in multiple passes.
- Verify head bolt stretch specifications to ensure proper clamping force.
Torque Specs for Cummins Engines
Cylinder Head & Related Components for Cummins ISM engine
Cylinder Head & Related Components for Cummins QSM11 engine
Step 6: Valve Train Assembly

- Install Pushrods and Rocker Arms
- Lubricate pushrod ends and rocker arm pivots.
- Ensure proper alignment before securing rocker arms.
- Set Initial Valve Lash
- Adjust intake and exhaust valve clearance based on OEM specifications.
- Rotate the engine manually to verify proper valve operation.
Valve & Related Components for Cummins ISM engine
Valve & Related Components for Cummins QSM11 engine
Step 7: Fuel System Installation

- Install Fuel Injectors
- Ensure injector bores are clean.
- Apply a small amount of lubricant to injector seals.
- Secure injectors using the correct torque settings.
- Connect Fuel Lines and Rail
- Tighten fuel rail bolts and fuel line fittings to prevent leaks.
- Prime the fuel system before initial startup.
Fuel Filter & Related Components for Cummins ISM engine
Fuel Filter & Related Components for Cummins QSM11 engine
Step 8: Oil and Cooling System Installation
- Install Oil Pump and Pickup Tube

New oil pump, for use in Cummins M11, ISM and QSM11 engines.
- Ensure oil passages are free of debris.
- Secure pump bolts to OEM torque specifications.
Oil Pump & Related Components for Cummins ISM engine
Oil Pump & Related Components for Cummins QSM11 engine
- Install the Water Pump and Coolant Hoses

Fresh Water Pump for Cummins ISM and QSM11 engines
- Ensure hoses are properly clamped.
- Fill the cooling system with Cummins-approved coolant.
Fresh Water Pump & Related Components for Cummins ISM engine
Fresh Water Pump & Related Components for Cummins QSM11 engine
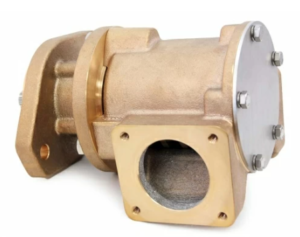
Marine Raw Watrer Pump & Related Components for Cummins QSM11 engine
Step 9: Final Assembly and Pre-Start Checks
- Attach the Timing Cover and Oil Pan
- Apply sealant to prevent leaks.
- Secure fasteners evenly.
- Install Turbocharger and Exhaust System
- Ensure proper alignment of turbo components.
- Tighten exhaust manifold bolts in sequence.
- Fill Engine with Oil and Coolant
- Use the correct viscosity oil.
- Check for fluid leaks before startup.
- Manually Rotate the Engine
- Verify all components move freely before engaging the starter.
- Verify all components move freely before engaging the starter.
Final Notes on Cummins ISM, ISMe, and QSM11 Engine Assembly
✔ Follow proper torque sequences to prevent failures.
✔ Ensure all gaskets and seals are correctly placed to avoid leaks.
✔ Pre-lubricate all moving components to prevent dry starts.
✔ Consult an OEM manual for exact specifications.
By carefully assembling the engine, you ensure long-term reliability, efficiency, and peak performance of the Cummins ISM, ISMe, and QSM11 engines.
Parts Catalog for ISM Cummins Marine and Industrial Engines
Parts Catalog for QSM11 Cummins Marine and Industrial Engines