

 Free US Calls: 1-888-433-4735
 International: 305-545-5588
Introduction
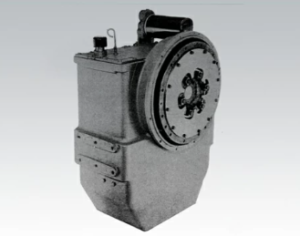
The output shaft and rear housing of the Twin Disc MG516 and MG5161 marine transmissions are critical components responsible for transferring rotational torque from the gear assembly to the propeller shaft. This system operates under extreme mechanical and thermal stress—often in corrosive saltwater environments and under fluctuating load conditions. Proper maintenance of the output shaft, rear bearing sets, and associated seals is essential to prevent oil leaks, alignment issues, shaft failure, and costly downtime.
Rebuilt Twin Disc MG516 Marine Transmissions
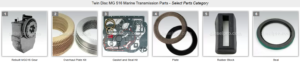
Plate Kit For Twin Disc MG516 Marine Transmission
Gasket Kits For Twin Disc MG516 Marine Transmission
In this comprehensive maintenance guide, you will learn:
- How to inspect output shaft bearings and seals
- When and how to replace critical wear components
- How to measure shaft runout and correct misalignment
- What symptoms to watch for that indicate rear housing service is needed
Disclaimer: Always refer to the official Twin Disc service manual for model-specific torque values, part numbers, tolerances, and disassembly procedures. This guide is intended to support hands-on marine mechanics, commercial operators, and rebuild technicians working on the MG516 series.
Rear Output Assembly Overview for Twin Disc MG516 Marine Gear
The rear assembly of the MG516 transmission contains the following primary components:
- Output shaft
- Output shaft bearings (tapered roller or spherical, depending on version)
- Rear housing casting
- Output oil seal
- Shaft coupling flange
- Mounting foot and dowels
- Rear case-to-housing gasket or O-ring
These parts work together to deliver final drive torque from the gearset to the propeller shaft. Failure in this area can manifest as:
- Oil leaks at the shaft seal
- Vibration or drumming noise under load
- Overheating or bearing seizure
- Coupling misalignment or flange wear
- Shaft-to-housing contact or endplay
Bearing and Seal Inspection for Twin Disc MG516 Marine Gear
When to Inspect the Output Shaft Bearings and Seal
| Condition | Action |
| Every 2,000–3,000 hours | Routine bearing check during teardown |
| Oil leak from rear housing | Replace rear shaft seal |
| Excessive vibration or noise | Inspect bearings and shaft alignment |
| Coupling failure | Check bearing preload and shaft runout |
| After major overheat event | Replace bearings and check shaft condition |
Tools and Supplies Needed
- Seal puller and installer kit
- Bearing puller or press
- Torque wrench
- Digital caliper and micrometer
- Dial indicator and magnetic base
- Prussian blue compound (for contact check)
- Non-chlorinated brake cleaner
- Marine-grade seal lubricant
- Gasket scraper
- Replacement oil seal and bearing set (OEM or aftermarket)
Diesel Pro Power offers aftermarket bearing and seal kits for the MG516 that match or exceed OEM durability specs.
Rear Bearing Types and Function
The output shaft is supported by:
- Main taper or roller bearing at the rear housing
- Intermediate roller bearing near the clutch drum
- Thrust washer or spacer to manage axial load
These bearings must:
- Maintain shaft centerline
- Absorb radial and axial loads
- Withstand vibration and heat
- Retain lubrication and resist saltwater corrosion
How to Inspect Output Shaft Bearings
1. Remove Rear Housing
- Drain all oil
- Disconnect output coupling flange
- Remove bolts securing rear housing
- Gently tap housing with a soft mallet to break gasket seal
- Pull straight back to avoid shaft damage
2. Clean and Inspect Bearings
- Wipe bearing surfaces with lint-free rag
- Inspect inner and outer race for:
- Pitting
- Spalling
- Blue discoloration
- Grooving
- Flaking
- Scoring
If any of the above is present, replace the bearing set.
3. Check Bearing Fit and Play
- Use a feeler gauge to inspect radial play
- Rotate bearing manually; it should feel smooth and silent
- No “gritty” feeling, resistance, or notchiness
- Any endplay movement >0.005″ is suspect
4. Check Bearing Retainer and Lock Ring
- Ensure no signs of cracks or deformation
- Lock ring should seat firmly and not rotate freely
- If distorted, replace during reassembly
When to Replace Bearings
| Observation | Action |
| Heat discoloration | Replace bearings immediately |
| Pitting or grooves | Replace bearings and inspect shaft |
| Noise during spin test | Replace and inspect housing bore |
| Loose fit in bore | Replace bearing and measure housing ID |
| Endplay beyond spec | Replace thrust washer or shim properly |
Output Shaft Seal Inspection and Replacement
The output shaft oil seal prevents fluid leakage from the rear housing. A worn or hardened seal will leak under load or when the system heats up.
Signs of Seal Failure
- Oil drip at the flange area
- Oil trails along the shaft
- Low oil pressure or foaming
- Visible cracks in seal lip
- Shaft groove wear or scoring
How to Replace the Output Shaft Seal
Step-by-Step:
- Remove Output Coupling Flange
- Use flange puller if press-fit
- Mark orientation before removal
- Extract Old Seal
- Use seal puller to pry out without damaging bore
- Clean seal cavity with solvent
- Inspect Shaft Surface
- Use micrometer to measure wear groove depth
- If groove >0.003″, install a shaft repair sleeve
- Install New Seal
- Lubricate inner lip with transmission oil
- Use seal driver tool or large socket to press evenly
- Lip should face inward toward oil cavity
- Reinstall Flange and Torque
- Use anti-seize on threads
- Torque per Twin Disc spec (~180–220 ft-lbs typical)
- Use thread locker if specified
Preventing Premature Seal Wear
- Keep oil clean and properly filtered
- Avoid shaft misalignment with engine
- Replace seal during each major transmission rebuild
- Inspect for corrosion or pitting on shaft journal
- Replace with marine-grade nitrile or Viton seals only
Shaft Alignment and Runout for Twin Disc MG516 Marine Gear
Why Alignment Matters
The MG516 output shaft must remain perfectly aligned with:
- Rear bearing centerline
- Rear housing bore
- Propeller shaft via flange coupling
Misalignment causes:
- Uneven clutch engagement
- Accelerated bearing and seal wear
- Transmission vibration
- Flange bolt loosening
- Shaft whip and coupling failure
Measuring Shaft Runout
Runout is the measure of shaft deviation or wobble as it rotates. Even slight runout can result in high wear rates and instability.
Tools Required
- Dial indicator with 0.001″ resolution
- Magnetic base
- Shaft brake or alignment clamp
- Feeler gauge set
- Straightedge
Runout Check Procedure
- Mount dial indicator base on transmission housing
- Place dial tip against output shaft surface (not the flange)
- Rotate shaft slowly by hand
- Observe maximum deviation from zero
- Typical tolerance: <0.002″ total indicated runout (TIR)
If Runout Is Out of Spec:
- Inspect shaft for bends or damage
- Verify rear bearing preload and fit
- Check for worn or corroded shaft journals
- Replace shaft if runout cannot be corrected
Shaft Alignment to Propeller Shaft
Misalignment at the coupling flange can destroy the transmission and the driveline. Always check alignment when reinstalling the transmission or after shaft work.
Alignment Types:
- Vertical Alignment: Top-to-bottom level of flange faces
- Horizontal Alignment: Side-to-side flange offset
- Angular Alignment: Difference in flange face parallelism
How to Perform Alignment Check
- Secure flange with bolts hand-tight
- Use feeler gauges at 12, 3, 6, and 9 o’clock positions
- Rotate the output shaft 180° and repeat
- No point should vary more than 0.002″–0.004″
Fixing Misalignment
- Shim transmission feet with stainless steel shims
- Adjust engine mounts if shaft misalignment originates forward
- Never force couplings together under misalignment
- Recheck after torquing bolts
Repeat alignment checks after running the engine for 10 minutes and again after first sea trial.
Real-World Failures Due to Neglected Rear Housing Maintenance
Case Study 1: Tugboat Output Seal Leak
- Symptoms: Oil dripping at stern shaft entry
- Diagnosis: Hardened rear shaft seal and worn groove
- Repair: Installed shaft sleeve and new Viton seal
- Result: No leaks after 1,000 hours of continuous duty
Case Study 2: Vibrating Crew Boat at Cruise Speed
- Symptoms: Unstable coupling, high vibration
- Root Cause: Bent output shaft from improper lifting during installation
- Fix: Shaft replacement and alignment procedure
- Result: Smooth performance after reassembly
Rear Housing Reassembly Tips
- Always use a new gasket or O-ring between housing sections
- Clean bolt threads and apply thread locker if specified
- Torque housing bolts in cross-pattern to avoid warping
- Fill with oil after reassembly and allow system to rest before startup
- Verify pressure and check for leaks during post-service testing
Final Inspection Checklist
✅ Shaft seal installed with correct orientation
✅ Shaft runout within OEM spec
✅ Rear bearing races smooth and free from wear
✅ All bolts torqued and logged
✅ Alignment shims labeled and documented
✅ Housing gasket replaced and sealed
✅ Flange torqued and marked
✅ Oil topped off and filter changed
Summary: Output Shaft and Rear Housing Maintenance for Twin Disc MG516 Marine Gear
Servicing the output shaft and rear housing of the MG516 is a critical part of long-term transmission reliability. These components transfer every ounce of power from the engine to the propeller, and they must be maintained to precise standards.
By performing routine inspections, addressing leaks early, and checking alignment and runout, you can prevent:
- Seal blowouts
- Shaft bearing failure
- Misalignment-related damage
- Costly at-sea repairs or recoveries
Marine mechanics, fleet managers, and independent operators alike should include output shaft service as part of any major transmission maintenance program.
Rebuilt Twin Disc MG516 Marine Transmissions
Plate Kit For Twin Disc MG516 Marine Transmission
Gasket Kits For Twin Disc MG516 Marine Transmission
Videos About Twin Disc Transmissions
6 Reasons Your Twin Disc Transmission Has Low Oil Pressure
7 Reasons Your Twin Disc Transmission Is Overheating
3 Reasons Your Clutch Plates in Your Twin Disc Transmission Are Making Excessive Noise
Bull Gear On A Twin Disc Transmission
Rebuilt Twin Disc Transmissions