

 Free US Calls: 1-888-433-4735
 International: 305-545-5588

Introduction: What to Know Before You Open the MG527
The Twin Disc MG527 Marine Gear is built to last—strong cast housings, heavy-duty clutches, precision gearing, and a hydraulic system engineered for performance. But when internal service is needed—whether due to high hours, abnormal noise, shifting issues, or a scheduled rebuild—the disassembly and reassembly of the MG527 must be done with precision and care.
Opening a marine transmission like the MG527 is not a casual task. It involves draining fluids, lifting heavy components, removing drive couplings, inspecting clutch packs, replacing seals, and reassembling with correct torque values and clearances. Doing it wrong can lead to leaks, misalignment, or catastrophic failure. Doing it right brings the gearbox back to like-new condition—ready for thousands more hours of dependable operation.
This guide provides a comprehensive overview of gearbox disassembly and reassembly procedures for the Twin Disc MG527. While we strongly encourage consulting the OEM service manual for precise tolerances, measurements, and part-specific data, this walkthrough equips you with the real-world steps, safety precautions, and best practices needed to approach the job with confidence.
Parts Catalog for Twin Disc MG527 Marine Transmissions
Plate Kit For Twin Disc MG527 Marine Transmissions
Rebuilt Gears for Twin Disc MG527 Marine Transmissions
Gasket Kits For Twin Disc MG527 Marine Transmissions
Section 1: Preparatory Steps Before Disassembly Of The Twin Disc MG527 Marine Gear
A successful gearbox service starts before the first bolt is removed. The time spent preparing your tools, documenting wiring, and staging your workspace will pay off in smoother disassembly and faster reassembly.
1. Assess the Service Environment
- Ensure the vessel is dry-docked or fully stabilized.
- Work in a clean, dry, well-ventilated space with adequate lighting.
- Have lifting equipment available: chain hoist, gantry crane, or engine lift capable of handling 200–400 lbs (90–180 kg).
2. Gather Tools and Supplies
Tools Required:
- Standard and metric socket/wrench sets
- Torque wrench (1/4″, 3/8″, 1/2″ drives)
- Hex key and Torx sets
- Pry bars, rubber mallet
- Seal puller
- Shop press (for bearings if needed)
- Hydraulic line caps and plugs
- Clean containers for oil and small parts
- Dial indicator for shaft endplay (if inspecting bearings)
- Alignment tools (for reinstallation)
Supplies:
- Marine-grade transmission oil (SAE 30/40)
- Gasket material or replacement kits
- Sealant (RTV, as required)
- Zip-lock bags for bolts and tags for wiring
- Parts trays
- Gloves, goggles, oil-absorbent mats
3. Drain the Gearbox Oil
Steps:
- Warm the transmission slightly to improve oil flow.
- Place a drain pan under the gearbox.
- Open the drain plug (or use vacuum extractor if drain access is limited).
- Let oil fully drain—at least 30 minutes.
- Remove and clean the oil filter or screen.
- Dispose of oil properly; take a sample for lab analysis if desired.
4. Tag and Disconnect All External Connections
Hydraulic Lines:
- Use plastic or metal tags to identify forward, reverse, and pressure return lines.
- Cap all open fittings to prevent contamination.
Control Linkages:
- Disconnect throttle and gear shift linkages at their respective pins or clevises.
- Label each control connection for reinstallation.
Electrical Wiring (if equipped):
- Disconnect solenoids, sensors, or shift position senders.
- Tag each connector with a unique label.
Cooling Lines:
- Disconnect transmission oil cooler lines.
- Blow them out with air if possible. Cap both sides.
Section 2: Accessing Internal Components Of The Twin Disc MG527 Marine Gear
Once the MG527 is drained, disconnected, and prepped, it’s time to begin disassembly. Work methodically—label parts, lay them out in sequence, and use torque logs for fasteners.
1. Remove Output Coupling
- Mark coupling position for reinstallation (alignment is critical).
- Use appropriate puller to detach coupling from shaft.
- Inspect coupling for keyway damage or spline wear.
- Place safely on a clean surface.
2. Remove Input Bell Housing (If Needed)
- Support housing with straps or hoist to prevent falling.
- Remove housing bolts in a cross-pattern.
- Tap gently with mallet to loosen.
- Place housing aside and inspect alignment dowels.
3. Remove Rear Cover or Inspection Ports
- Loosen all bolts evenly to prevent binding.
- Use plastic wedge or pry tool to break gasket seal.
- Inspect gasket for failure signs (coolant intrusion, oil stains).
- Cover exposed gearset with clean shop towels to prevent contamination.
4. Remove Clutch Pack Assembly
Note: The clutch pack may be secured by snap rings, pressure plates, or spring assemblies.
- Remove securing hardware methodically.
- Extract friction plates, steel plates, and backing plates in order.
- Lay out in the same sequence for inspection.
- Inspect for warping, glazing, or metal-on-metal scoring.
- Replace any worn components with new plates from a rebuild kit.
5. Remove Intermediate Gear Set (If Required)
- Depending on your repair depth, intermediate gears may need inspection.
- Support shafts before removal.
- Note gear tooth condition, oil residue, and keyway wear.
6. Remove Bearings and Seals
If you’re performing a full rebuild:
- Pull rear and front bearings with proper tools.
- Remove shaft seals with seal puller or press.
- Clean bore surfaces and shaft shoulders.
Section 3: Safety Tips for Handling Heavy Parts For The Twin Disc MG527 Marine Gear
The MG527 is not a lightweight component. Mishandling can result in injury or gear damage. Use the following safety practices:
1. Use Lifting Equipment
- Never try to manually lift the full gearbox—use a hoist rated above gearbox weight.
- Use lifting eyes or engine hooks if provided.
- Always have a second person when moving or rotating gear.
2. Protect Sealing Surfaces
- Place removed parts on padded surfaces.
- Avoid placing housings on concrete or steel tables without padding.
- Clean work surfaces before placing open gear assemblies.
3. Avoid Cross-Threading
- Always hand-start bolts when reassembling.
- Clean threads with a wire brush or tap set before reinstalling.
4. Wear PPE at All Times
- Gloves, safety glasses, and non-slip boots are essential.
- Use back braces when lifting.
- Use caution when working under the gear (never trust only a jack).
Section 4: Gearbox Reassembly Best Practices For The Twin Disc MG527 Marine Gear
Putting the MG527 back together is not just a reversal of disassembly—it’s a precise process that demands attention to cleanliness, alignment, torque, and lubrication.
1. Clean All Parts Thoroughly
- Use brake cleaner or solvent on all reused components.
- Wipe all mating surfaces until oil and old gasket are removed.
- Blow out oil passages and bolt holes with compressed air.
- Inspect all threads, keys, and splines.
2. Replace All Worn Components
Replace:
- All shaft seals
- All paper or composite gaskets
- Any warped or worn clutch discs
- Bearings with signs of pitting or looseness
- Damaged keyways, keys, and splines
- Any fasteners showing corrosion or thread damage
3. Use Proper Lubrication
- Pre-lubricate all bearings with gear oil.
- Lightly coat clutch discs with fresh oil before install.
- Apply anti-seize on threads where specified (not on torque-critical bolts).
4. Reassemble in Reverse Sequence
- Install intermediate gears and shims first (if removed).
- Replace clutch packs in correct order: friction > steel > friction > pressure plate.
- Use new snap rings or retaining clips.
5. Torque Every Bolt to Spec
- Use torque wrench on all fasteners:
- Rear cover bolts
- Housing bolts
- Shaft nuts
- Coupling bolts
- Torque in a crisscross or spiral pattern to prevent distortion.
- Log torque values in a notebook for quality assurance.
6. Reconnect Cooling and Hydraulic Lines
- Ensure lines are clean and flushed before reinstalling.
- Torque fittings gently—over-tightening can crack fittings.
- Replace any old O-rings or crush washers.
7. Refill Oil
- Use high-quality SAE 30 or 40 transmission oil (or synthetic equivalent).
- Fill to proper level—do not overfill.
- Bleed air from hydraulic system by shifting gear back and forth at idle (in water).
8. Final Checks Before Startup
| Item | Checklist |
| Coupling Alignment | Rechecked with straight edge or dial indicator |
| Oil Level | At correct line after bleeding |
| Shift Linkages | Adjusted and tested manually |
| Cooling Lines | Reconnected and leak-free |
| Electrical Sensors | Connected, zip-tied cleanly |
| Bolts | Torqued and marked with paint for reference |
First Startup After Reassembly
- Start engine at idle.
- Shift into forward and reverse several times.
- Watch for leaks at rear cover, cooling lines, and shaft seal.
- Monitor oil pressure and temperature.
- Test propulsion at dock under light load.
- Recheck all bolts and oil level after first sea trial.
Reassembly Do’s and Don’ts
Do:
- Use new gaskets, O-rings, and seals
- Document every torque spec
- Keep your workspace clean
- Take pictures during disassembly for reassembly reference
- Have a helper when moving heavy parts
Don’t:
- Reuse seals or warped clutch plates
- Use power tools to torque critical fasteners
- Skip oil priming
- Allow dust or water into open housings
- Guess torque values—get the specs
Conclusion: Bring Your MG527 Back to Life With Precision
Disassembling and reassembling the Twin Disc MG527 is a major service task—but one that can be done confidently with the right preparation, tools, and discipline.
By following this guide:
- You’ll avoid common errors that lead to leaks or misalignment
- You’ll restore shift performance and torque transfer
- You’ll extend the life of your transmission and protect your vessel’s driveline
Take your time, work clean, and always double-check your assembly steps. When done properly, a rebuilt MG527 is as good as new—and ready for thousands of additional hours on the water.
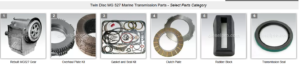
Plate Kit For Twin Disc MG527 Marine Transmissions
Rebuilt Gears for Twin Disc MG527 Marine Transmissions
Gasket Kits For Twin Disc MG527 Marine Transmissions
Videos About Twin Disc Transmissions
6 Reasons Your Twin Disc Transmission Has Low Oil Pressure
7 Reasons Your Twin Disc Transmission Is Overheating
3 Reasons Your Clutch Plates in Your Twin Disc Transmission Are Making Excessive Noise
Bull Gear On A Twin Disc Transmission
Rebuilt Twin Disc Transmissions